The Audio Tab
Now that we’ve tackled our video settings, it’s time to work on audio. Unless you’re doing a time-lapse capture, the Camtasia Recorder allows you to record audio narration (or audio from your system) during your video capture. Here on the Audio tab of our Tools Options dialog, we can influence several aspects of recording this audio, from choosing a codec to selecting a capture device. We’ll discuss all of these options in turn.
Selecting an Input: Audio Devices and Sources
In the last few chapters, we’ve discussed audio narration and sound effects, and how to implement them in your recordings. Here on the
Audio tab, we’ll be able to tweak the audio, both for input and output.
On the input side, you’ve got three basic qualities to adjust:
-
The capture device
-
The input source
-
The recording volume
Adjusting the audio capture device, source, or volume here changes these settings globally, not just in Camtasia Studio. By clicking the Device drop-down list, you can set which audio driver you wish to use when recording your sound. This driver is typically tied to a sound card or audio interface device. The options in this list will vary depending on the hardware and software on your system. Except in rare circumstances, you’re going to choose the driver that corresponds to your sound card or audio interface.
Of course, every device will offer one or more sources. If you’ve ever looked at the back of your computer and located your sound card, you know that you’ve probably got four or five jacks all lined up in a row. A few of these are for output, like your speakers, but at least a couple of them are likely to be input jacks, like a microphone, MIDI device, or Line In jack. Most sound cards also support the ability to record from the system itself; that is, record what you hear on your computer. To record a particular source, just select it from the Source drop-down list. Now, it’s very likely that you’ll be completely mystified as to the functions of some of the sources you’ll find. A full discussion of audio equipment and source selection can be found in Chapter 10, “Working with Other Media: Audio, PIP, and Title Clips.”
Next on the Audio tab, you’ll find a volume meter as well as a slider tool for adjusting the sensitivity of your recording. To test the volume, get some sound cranking through the selected device and source (i.e., speak into the mic, or play some sound on your computer if recording from the system). You can then get a sense of where to set the volume slider (try to keep the input in the orange part of the meter without going into the red).
Of course, if you’re not sure which device or source you need, help is just a click away. If you click the Audio Setup Wizard… button, you’ll find the same simple Audio Setup Wizard that we first saw in Chapter 5.
Selecting an Output: Audio Format
Let’s move on to our Audio Format settings. Microsoft designed AVI files to be ready for sound. The audio track contained in an AVI file is Microsoft Waveform Audio (WAV), which can either be part of an AVI or exist as a stand-alone file. In fact, you can use Camtasia Studio to actually split an AVI, saving the WAV data as a separate file. More on this in Chapter 9. For now, go ahead and click the Audio format… button. Now, just as there are video codecs for compressing video, the AVI file system also has a number of audio codecs for getting the size of the audio track down. Since uncompressed audio (called PCM, or pulse code modulation) can take upward of 172 KB per second for CD-quality audio, it is imperative to have good audio compression to keep those file sizes manageable. Virtually all audio codecs are lossy;to keep the audio lossless, you have to keep it uncompressed.
The default recording format for the Camtasia Recorder is the TechSmith LAME MPEG Layer-3 codec, a very high-quality MP3 encoder. This yields a highly compressed file with very little loss in quality. While seeming like an ideal solution, I tend to ignore the good but lossy default in this case, and I encourage you to do the same. Here’s why:
I am of the opinion that, as with video compression, you should refrain from doing any lossy compression here at the recording stage unless recording the AVI is your final step (no editing). If this is the case, please see the AVI section of Chapter 12, “The Production Process” for a breakdown of the more common audio codecs. Otherwise, you should be recording an uncompressed sound file using PCM, working with PCM all through the editing process, and then choosing a codec for compressing the final distributed product.
Now, when selecting a compression method, in fact even with uncompressed (PCM) audio, you’ll have a few choices to make in terms of the codec’s attributes. You have three basic attributes that need to be set: the sample rate of your recording, the bit depth, and whether you wish to record in mono or stereo. The sample rate is, simply put, the number of samples (digital snapshots of an audio waveform) per second. The higher the sample rate, the greater the number of sound frequencies that can be reproduced (and, of course, the larger the file). In order to accurately reproduce a particular frequency, the sample rate has to be set to double that frequency. This is called the Nyquist frequency, and is the reason why audio CDs use a sample rate of 44,100 Hz (44.1 kHz). Its corresponding Nyquist frequency is 22,050 Hz, just outside the range of human hearing (20,000 Hz). When you record your audio with the Camtasia Recorder, it’s always best to start with a high sample rate in order to achieve the highest quality possible, and then sample down if needed.
Next comes bit depth, also called bit resolution. Bit depth refers to the number of unique amplitude levels in your recording, and generally, you have two choices: 8 bit and 16 bit. Just as 8-bit color depth gives you a maximum of 256 colors to play with, 8-bit resolution provides you a maximum of 256 levels of amplitude. This produces a 48 dB dynamic range. A resolution of 16 bit gives you 65,536 amplitude levels, doubling the dynamic range to 96 dB. Some audio applications can now provide up to 32-bit resolution, though these are still the exception (Camtasia Studio does not), and many of today’s sound cards cannot yet support 32 bit. For recording your initial clips, I’d recom- mend setting the bit depth to 16-bit resolution.
And lastly, we have the choice between mono and stereo. This one is usually a no-brainer. Ninety-nine percent of the time, you’re going to choose mono. Why? Because you’re probably recording your own voice from a single microphone. One mic, one source. And when you only have one source for recording, it makes no sense to create a stereo WAV file from it, as the exact same thing would be playing from both speakers anyway. A monophonic signal will take up half the file space, and give you the same result. Of course, stereo signals do have their uses in screen recording, albeit rare. For those readers who have been spending their entire lives in a cave in Siberia and have never owned a hi-fi, a stereo signal is one with two channels, a left channel and a right channel. This allows for spatial positioning of sound content on a spectrum from left to right. There are only two reasons you would ever want to set the Recorder’s signal output to stereo:
-
You and a colleague are both narrating the video using separate microphones, and wish to separate the voices into distinctive channels. Even then, I’d probably record mono to save on file space, unless your voices are so similar that you fear your audience wouldn’t be able to tell you apart otherwise.
-
You are recording system sound from an application with stereo sound. Once again, practicality would probably win out over precision, and I would actually still select mono to cut the file size in half.
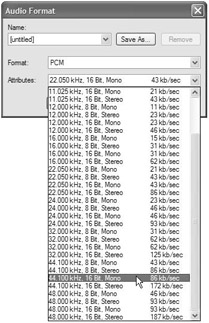
For those keeping score at home, my recommendation for recording audio is 44.1 kHz, 16-bit mono. Here in the Audio Format dialog, I can click the Attributes drop-down menu, and make my choice. Note that the data rate appears next to every possible attribute combination, a handy reference for finding an acceptable set of attributes. From this, I can see that my chosen attributes will give me a data rate of 86 KB/sec. So, if I have two minutes of video, the audio portion will take up about 5 MB. Large, but not unwieldy. Obviously, don’t forget to factor in the Video track when guesstimating the file size.

PCM uncompressed audio and its endless combinations of attributes.
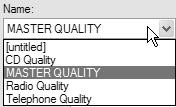
Also, notice here that we have a handy way of saving off presets of codecs and attributes we use a lot. We can call these up by utilizing the drop-down box labeled Name. As you can see, you have four presets already done for you. You can clear any or all of these if desired by selecting the preset you want to disappear and clicking Remove.To add a new preset, simply choose the desired codec and attributes, and then click Save As….
Especially if you’re working with a lot of different output formats, setting up your audio properties this way can be a real time-saver. Also, keep in mind that you have access to the same library of presets regardless of whether you’re in the Camtasia Recorder or the main Camtasia Studio application, which is rather practical.

A list of audio presets. As you can see, it’s easy to add presets as your needs grow more complex.
EAN: 2147483647
Pages: 146