Exporting Your Flash Menu
Now that you’ve visited both tabs in your Camtasia Theater application, you’ve probably noticed that the same two options appear at the bottom of both tabs, namely a check box called Launch Menu after export and, of course, the Export Flash Menu button.

You’ll see these options at the bottom of the Camtasia Theater window, regardless of which tab you’re currently viewing.
Clicking the former will actually launch the HTML page that contains your menu elements so that you can preview it directly after its production. It’s a good idea to keep this item checked. But it’s the Export Flash Menu button that gets the whole process rolling. Upon clicking, you’re presented with a dialog that prompts you for an output directory. Do keep in mind that the names of the output folder, the SWF video, and the HTML file that displays it are all taken from your menu name, and as such you are not given an option to name the files. Note that you can alter the name of the project folder and the HTML file without any glitches, so if you want accented characters in your menu name (refer to the discussion of this in the “General Properties” subsection in the “Menu Tab” section of this chapter), or if you prefer that the page be named index.html for easy referencing, feel free to change it. However, leave the file names of your SWF files alone unless you’re comfortable editing the accompanying XML document (and we’ll talk about how to do this in the next section). At any rate, find the directory into which you want your production folder to go, and click OK. If a folder with that name already exists in that directory, a warning dialog will appear, asking if you wish to overwrite the pre-existing folder. A click on Yes means that the old folder and its contents will be replaced, choosing No will give you the opportunity to choose a different directory for your new project folder, and Cancel escapes back to the main Camtasia Theater interface in case you need to rethink what your next move should be.
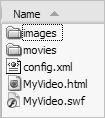
Once you start the production process, a status dialog will update you on Theater’s progress. With any luck, you will soon see a congratulatory message telling you that your project was successfully exported. Before moving on, let’s talk briefly about the different components of your production folder. Its contents probably look something like this:

Your HTML file (mymenuname.html) is the web page your users will access when they want to open your presentation. This is an automatically created file that already contains all appropriate references to your SWF and XML files needed to view the presentation. When a link is clicked on this page, the user will be presented with the navigation menu, control bar, and the first video of the series.
| Tip | So what if there are circumstances where you don’t necessarily want to start with the first video in your menu? For example, you may have a web page that discusses one particular feature of your software, but the video project you created that specifically addresses that feature is the fourth video in a series of 10. You can instruct the HTML file to load the exact video of your choosing with the movie query string parameter. Instead of pointing to www.mysite.com/myvideo/myvideo.html, you can do something like this: www.mysite.com/myvideo/myvideo.html?movie=4. This example would instruct the presentation to load per usual, only this time starting with the fourth video in the series. |
The folder’s SWF file (mymenuname.swf) contains the actual menu, video window, and control bar created by Camtasia Theater, but under- stand that these items are dynamically populated with settings and menu items by the accompanying XML file (config.xml). This is a special markup file that puts everything together, containing pretty much all the settings you specified in Camtasia Theater, including the menu tree structure as well as the format of both the controls and the menu. And while not terribly complex, there are two additional folders with project-specific content. The images folder contains all the images making up the neat “brushed metal” border effect that appears around your menu, control bar, and video content. The movies folder is comprised of your project’s SWF videos (including the preloader if applicable), all assembled in one place. These files are just copies of your original SWFs; the Camtasia Theater export process doesn’t alter them in any way.
Now that you know what all these files do, it’s time to upload them to your web server. There’s no real trick to it; just fire up your favorite FTP client and put the entire folder into a directory of your choosing. As I mentioned, feel free to change the name of the folder as well as rename your HTML file index.html. After all, a link called www.mysite.com/myvideos is significantly cleaner than www.mysite.com/myvideos/mylongandboringfilenamethatiseasilymistyped.html.
Also, do remember to upload everything, the entire contents of your production folder. In addition to not forgetting any files, keep in mind that all those files need to maintain the correct directory structure. For example, your videos must be in the movies folder, and if they’re not, you’ll end up with a beautiful menu that doesn’t play anything. And who wants that?
EAN: 2147483647
Pages: 146