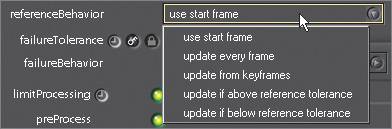
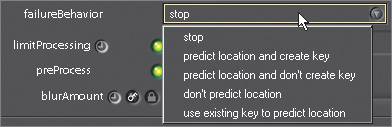
Making Tracker Adjustments


If the tracker misses, which it never does, you have a few options:

  • Stop the tracker, go to the bad frame, reposition the crosshairs, and click the tracking button again. You don't need to go back to your start frame. Frames that are outside the tolerance (see below) are marked in red on the Time Bar.

  • Activate the preProcess option in the tracker. This applies a small blur to the footage and reduces irregularities due to film grain.

  • Lower your referenceTolerance value, and track again from the beginning or from the frame before the bad frames. The lower the referenceTolerance is, the more forgiving the tracker will bebut it will also be less accurate. Access the referenceTolerance parameter by clicking the + next to the Tolerances parameter group in your tracking node.

  • Start over, and switch referenceBehavior, located in the tolerances parameter group, from "use start frame" to "update every frame." This means that instead of trying to compare the tracking region with the first "pure" frame, the tracking algorithm will try to match to the previous frame. If you retrack from the middle of a sequence, it will consider your new start frame as your reference frame with either setting.

  • At any time, you can turn on the AutoKey button in the Viewer and manually adjust a track point by simply grabbing it and putting it where you need it. You can use the + and keys by the Backspace key to zoom in and out to see the points more easily.

  • Change the matchSpace from luminance to hue or saturation, and then retrack. The matchSpace parameter determines which image value the tracking algorithm will be using. The matchSpace controls are in the Tolerances parameter group of your tracking node. Just click the + next to Tolerances to reveal the matchSpace parameters.

  • Change the subPixelResolution to get more precise tracks. The tracker will take longer, but it will be more accurate.

    Note

    When checking the accuracy of your tracks, it's best to turn off applyTransform to see whether the curves are matching up to the points.

  • Another technique you can use to assist with difficult shots is to insert tracking keyframes manually. For example, if you have 100 frames to track, you can put in a keyframe every 5 or 10 frames with the AutoKey feature. A helpful trick is to set an increment of 5 or 10 in the Time Bar and press the left arrow or right arrow to jump by the increment amount and set keyframes. Once your keyframes are entered, return to frame 1 and set the failureBehavior under the Tolerances submenu to "use existing key to predict location." The tracker searches along the preexisting motion path to find matching patterns.


Apple Pro Training Series. Shake 4. Professional Compositing and Visual Effects
ISBN: 321256093
EAN: N/A
Year: 2005
Pages: 156

flylib.com © 2008-2017.
If you may any questions please contact us: flylib@qtcs.net