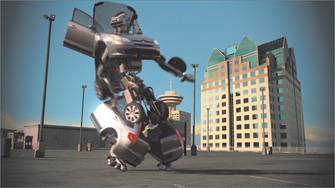
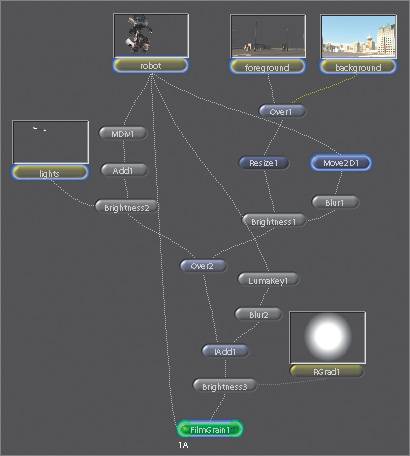
| The robot composite is almost finished, and it looks pretty good. It just needs a few finishing touches. It would look better if we added the following effects: brighter headlights, glowing highlights, a dark vignette, and film grain. Color-Correcting the Headlights The headlights of the car are a tad dim and definitely could be brightened up. 1. | FileIn the lights.1-60#.iff clip from the Lesson03 folder.
| 2. | Drag through the Time Bar to see the lights image.
This lights image will be used to isolate and color-correct only the headlights. 3D artists like to render separate elements in the form of mattes so that you, the 2D artist, have ultimate flexibility when putting all the pieces together.
| 3. | Highlight Add1 and insert a Brightness node from the Color tab.
| 4. | Connect the output of the lights node to the Mask input of Brightness2.
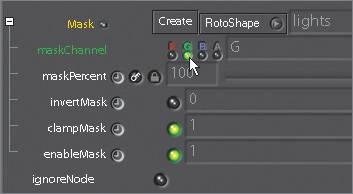
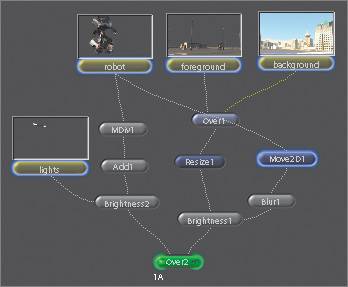 | 5. | Open the Mask Parameters and choose G for the maskChannel.
Because the alpha channel for the lights image has a different shape from that of the headlights, we can use the green channel instead.
 | 6. | Click the left side of the Over2 node so that you can see what you are doing.
| 7. | Set the Value parameter to 1.8.
Woof! Now, you say, why woof? Woof is a technical term used when a setting has hit its perfect mark. I used to work as cameraman back in the day, and in the course of making equipment adjustments, engineers barked out a "woof," indicating that it was time to stop. You should stop adjusting at 1.8 because it is a good setting, so as I said, woof!
|
Adding a Glow Adding a glow to the highlights is a great way to spice up the image and give it a more filmlike quality. Using a LumaKey, blurring the result, and adding it back to the original image can create a simple glow. 1. | Select the robot node and Shift-click LumaKey on the Key tab.
 Shift-clicking creates a new branch.
LumaKey creates a key in the alpha channel based on overall luminance. Values below loVal are set to black, and those above hiVal are set to white.
| 2. | Activate the matteMult parameter and set loVal to 0.35 and hiVal to 0.65.
The resulting image is a representation of the image's highlights.
| 3. | Click Blur from the Filter tab.
| 4. | Set the Pixels parameter to 140.
Blurring the LumaKey prior to adding it to the original image generates the glow effect.
| 5. | Add an IAdd function from the Layer tab after Over2, and connect Blur2 into the right input.
 IAdd is a function that adds one image to another.
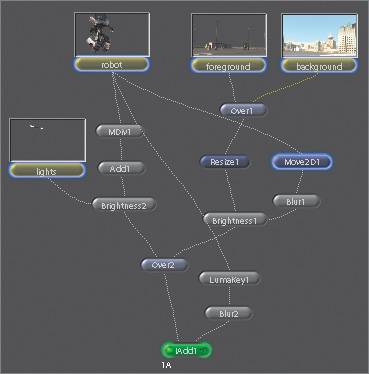 | 6. | Set the Percent parameter to 60.
Glow is natural, glow is good. Not everybody does it, but everybody should. Glow is natural, glow is fun. Glow is best when it's ... one on one. OK, OK, I'll stop.
 |
Creating a Vignette A vignette, or soft fade, is a popular photographic effect in which the photo gradually darkens around the edges, usually in an oval shape. Wouldn't you say that the robot is just begging for a vignette? Well, I would. 1. | Add a Brightness node from the Color tab after IAdd1.
| 2. | Set the Value to 0.3.
This darkens the entire image. What we really want is to darken only the edges of the screen. This can be accomplished by using an RGrad, which generates a radial gradation.
 RGrad is located on the Image tab, but within all nodes you can create an RGrad that will be connected to the Mask input automatically.
| 3. | Choose RGrad from the RotoShape pop-up menu next to the Mask Create setting.
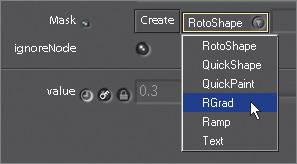 I know, I know. The image is getting dark in the center of the gradation, so it will need to be inverted.
| 4. | Click the right side of the Brightness3 node to edit its parameters.
| 5. | Open the Mask parameters and activate invertMask.
| 6. | Set the Res parameters for RGrad1 to 960 and 540 to match the resolution of the composite.
 | 7. | Set the aspectRatio, radius, falloffRadius, and falloff to create a darkened border around the edges of the screen.
Here are the values I used:
Parameter | Value |
|---|
aspectRatio | 1.3 | radius | 266 | falloffRadius | 419 | falloff | 0.8 |
 Don't freak out, you're almost done.
|
Simulating Film Grain To finish off the composite, the robot needs to have grain added so that it matches the grain of the background clip. The FilmGrain node is used to simulate film grain and is especially useful for adding grain to computer-generated elements. You may apply grain from a preset film stock, match grain to an existing plate, or set your own grain by adjusting sliders. In this exercise, you will match the grain of the background clip to the robot.  1. | Place a FilmGrain node from the Filter tab after Brightness3.
The grain is everywhere, but you want it to appear only on the robot. The FilmGrain's Mask input can take care of this.
| 2. | Connect an output of the robot node to the Mask input of the FilmGrain1 node.
 The grain becomes limited to the area within the robot mask. The next step is to place a sample box in an area of the background from which you want to sample the grain. The area should be very flat without detail, otherwise, the grain analysis may be inaccurate. Small elements will be perceived as grain detail, so the best area in the background clip would be the sky to the right of the robot.
| 3. | Click the sky to the right of the robot to add a sample box.
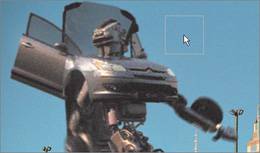 You can add as many sample boxes as you want, but for this exercise you are drawing only one.
Note If you want to remove the grain sample box, click the Undo Last Region icon (left). Click the Reset the Regions icon (right) to remove all boxes and start over.  | 4. | Now that you have the grain sample box in place, click the Analyze the Grain icon in the Viewer.
 This sets the parameters in the FilmGrain node to match the grain of the background clip, and it does a pretty good job.
But hold on a minute. The grain is too heavy in the shadow areas. To fix this, you can adjust the filmResponse parameters to a higher value, which will cause the grain to be more apparent in the brighter areas of the robot.
| 5. | Click the + next to filmResponse to expand its parameters.
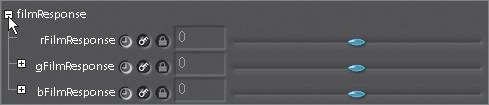 | 6. | Set rFilmResponse to 0.5 and the grain will be less apparent in the shadow areas.
For those of you interested in minutiae, the FilmGrain node has the following parameters:
Parameter | Function |
|---|
intensity | sets the intensity of the grain | grainSize | sets the size of the grain | aspectRatio | sets the aspect ratio of the grain to compensate for anamorphic or nonsquare pixel distortion | seed | sets the random seed for the grain | filmStock | allows the user to select from preset film stocks | r, g, b StdDev | this value is multiplied by the amount parameter; a higher value indicates more variation in the grain, making it more apparent | r, g, b Softness | controls the softness of the grain | r, g, b FilmResponse | determines the distribution of the grain relative to the luminance of the image; for grain to appear more in the white areas, push the value toward 1 | colorCorr | specifies the apparent color saturation of the grain |
The composite looks good, so it's time to make a flipbookbut not just any flipbook. Imagine being able to render a flipbook as a QuickTime movie, play it, and save it if you like it. Well, on Mac OS X, you can render to a temporary QuickTime file. This allows you to play extremely long clips. Once the flipbook is rendered, you can then save it using QuickTime's built-in features.
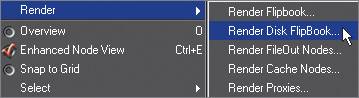
| 7. | Right-click the FilmGrain1 node and choose Render > Render Disk FlipBook.
 | 8. | In the Render Parameters window, click Render.
Shake pre-renders the QuickTime movie.
 Once pre-rendered, the QuickTime movie is ready to play.
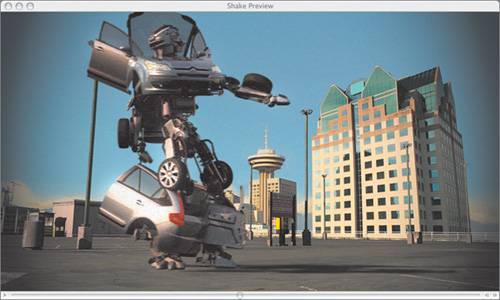 | 9. | Click the Play button at the bottom left of the Shake Preview window to watch the QuickTime movie.
If you'd like, you can save the QuickTime movie from the Shake QuickTime Viewer's File menu.
 | 10. | Quit the Shake QuickTime Viewer.
| 11. | To compare your render with the final comp, you can create a flipbook of the robot_final.1-60#.iff clip, located in the Lesson03 folder.
That's it. You can go home now.
| 12. | Quit Shake.
|
|