11.8. Slideshow Movies on the Web Chapter 9 offers complete details for posting individual photos on the Web. But with just a few adjustments in the instructions, you can just as easily post your slideshow movies on the Web, too, complete with music. 11.8.1. Preparing a Low-Bandwidth Movie for the Web (No Transitions) You could, of course, just make a slideshow movie as described on the previous pages, and then slap it up on the Web. Unfortunately, a movie like that would involve quite a wait for your Web visitors . They would click the movie's icon to view it ”and wait while the entire 3 MB movie downloads to their computer. Only then could they begin watching it. But if you have QuickTime Player Pro, you can create movies that start playing almost immediately when Web visitors click them. Here's how to preprocess your finished slideshow movie so that it will start faster online. Open your movie in QuickTime Player Pro, and then follow these steps: -
Choose File  Export. Export. The "Save exported file as" dialog box appears. Make sure that the Export pop-up menu says "Movie to QuickTime Movie," and the Use pop-up menu says Most Recent Settings. -
Click Options. The Movie Settings dialog box appears (Figure 11-11, top). Your job is to format the movie so that it will look good without taking a long time to download. -
Under Video, click Settings. In the Compression Settings dialog box (Figure 11-10, bottom), choose "Photo ”JPEG" from the first pop-up menu. This format is compact and high quality, making it a good choice for slideshows. -
In the " Frames per second" box, select "Best" from the pop-up menu. QuickTime will select the most economical frame rate possible. The resulting file will be small, but you'll lose the crossfades between slides, if you used them. -
Drag the Quality slider to Medium or High, and then click OK. You return to the Movie Settings dialog box. 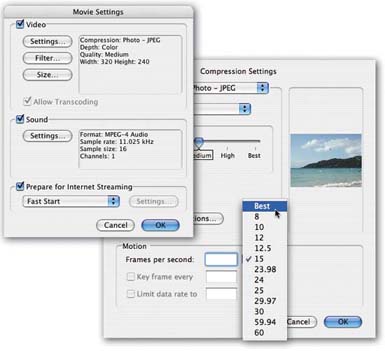 | Figure 11-10. Top left: These settings will help you prepare your movie for Web serving. After you've tried an export or two, you can play with the adjustments to customize your slideshow even further.
Bottom right: These are good video settings for an exported slideshow Web movie; it will consume only 1 megabyte for a 20-slide show at 320 x 240 pixels, with music. By choosing Best for your "frames per second," you're telling QuickTime to be very frugal with the data rate. Your pictures will still look great, but you'll lose those elegant dissolve transitions. The images will simply cut from one to the next . | | -
Click the Size button. Enter 320 in the Width field and 240 in the Height field; click OK. Use a larger size only if you're sure that your audience members all have highspeed Internet access. Note, though, that if you post your movie to a .Mac account, Apple's HomePage service will just squish it down to 320 x 240 anyway, possibly resulting in distortion. -
Under Sound, click Settings. In the Sound Settings dialog box, choose MPEG-4 from the Compressor pop-up menu, and then click OK. The MPEG-4 Music format produces high-quality music at very small file sizes, which is just what you'd hope for in Web- played movies. (If your movie has a spoken dialog track rather than music, use the Qualcomm PureVoice codec instead.) You return once again to the Movie Settings box. Here, confirm that the "Prepare for Internet Streaming" checkbox is turned on, and that Fast Start is selected in its pop-up menu. These settings are responsible for QuickTime's fast-playback feature, in which your viewers don't have to wait for the entire movie to download before playback starts. Instead, they'll only have to wait for a quarter or half of it, or whatever portion is necessary to play the entire movie uninterrupted while the latter part is still being downloaded. -
Click OK, then Save. Your slideshow takes a few minutes to export. But once the process is complete, you're ready to upload the file to your Web site.
Note: Once you've optimized and exported your slideshow in QuickTime Pro, don't use the File Save or File Save As command after making changes to the movie. If you do, youll automatically turn off the Fast Start option you built in when you exported the movie.It's OK to make further changes. But when you're finished, use the File Export command again, repeating the previous steps, to preserve the movies Web-optimized condition.
11.8.2. Preparing a High-Bandwidth Movie for the Web (With Transitions) If you expect that your audience will have high-speed Internet connections (or if they're on your same office network), you can retain the elegant between-slide transitions that you've worked so hard to perfect. In this scenario, file size isn't so important. 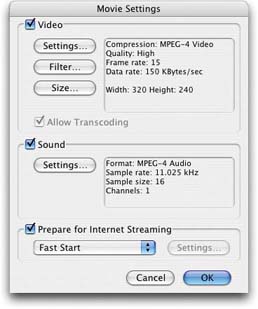 | Figure 11-11. You can preserve your cool-looking slide transitions by increasing the compressor, frame rate, and data rate for your exported movie.
These changes, of course, produce a bulkier file; for a 20-slide set, the slideshow movie file swells from 1 to 14 megabytes. Still, your audience won't mind; they have high-speed connections, and you've turned on the Fast Start option in the movie. | |
The steps are the same as those outlined in the previous section, but you use a few different settings in the Options dialog box (steps 2 “7). This box should look like Figure 11-11 before you click OK.
Tip: If your movie will be played back from a hard drive or CD (instead of over the Web or a network), you can be even more generous with the quality and file sizes. You can bump the frame rate (video smoothness) to 30 frames per second and the data rate to 200 or more.
11.8.3. Uploading to a .Mac account If you maintain your own Web site, upload the movie as you would any graphic. Create a link to it in the same way. Your movie will start to play in your visitors' Web browsers when they click that link. If you have a .Mac account, though, posting the movie online is even easier. When your movie file is ready, bring your iDisk onto the screen as described on page 228. Drag your movie file into the Movies folder, as shown in Figure 11-12. 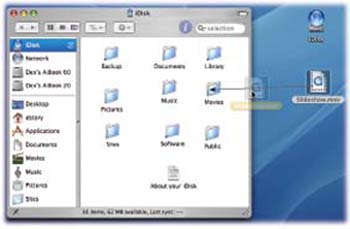 | Figure 11-12. Once you've brought your iDisk icon to the screen, drag your slideshow movie into its Movie folder. Be prepared to wait a long time for both steps; the iDisk is not what you'd call a speedy mechanism. | |
Now open your Web browser. Go to www.mac.com, sign in, and then click the HomePage tab. You're now looking at the Web page shown at top in Figure 11-13. -
Click the iMovie tab, and then click one of the movie templates. Now a "big-screen" version of that template thumbnail appears. -
At the top of the page, click the Edit icon. A "Choose a file" Web page appears (Figure 11-13, bottom), featuring a tiny list of movies you've dragged into your iDisk's Movies folder. Whichever one is first in the list begins to play immediately, just to remind you of what it is. -
Click the name of the movie you want, and then click Choose. You return to the Edit page. Ignore the fact that your actual movie doesn't yet appear in the placeholder frame.  | Figure 11-13. Top: You can choose from a number of canned backdrops for the movie window that will display your slideshow.
Bottom: If you click Choose, you open the screen shown in the inset. Every movie you've ever dragged to your Movies folder (Figure 11-12) appears here, ready for selection.
Then create a movie-playing page like this: | | -
In the text boxes at the bottom of the dialog box, type a title and caption for your movie, if you like. If you'd like a self-updating counter that shows how many people have viewed your movie, turn on the Show checkbox at the very bottom of the window. -
Name the movie page by typing a title into the text box just above the movie, and then click Publish. Finally, a Congratulations page appears, letting you know the Web address of the finished movie page. Note the little button that offers to email this address to your friends , family, and agent, too ”a handy feature, considering that this case-sensitive address is none too easy to remember (http://homepage.mac.com/yourname/ iMovieTheater1.html). You can also click the blue lettering of the address to view the movie yourself, right then and there ”an almost irresistible offer. |