12.2. Adding Actions You can think of PowerPoint actions as super-customized links. The difference is that when you create an action, PowerPoint doesn't make any assumptions the way it does when you create, say, a link to a Web page. Instead, when you create an action, you get to customize everything about it, from the action you want PowerPoint to take (for example, linking to a Web page, running a program, running a macro, or running an object action) to whether you want something to happen when a presenter clicks the action, mouses over the action, or both. You can even tell PowerPoint to play an accompanying sound orif you're applying an action to an imageto highlight the image when clicked. You can add an action to text or any other kind of object (such as a shape or drawing), or to one of PowerPoint's built-in action buttons . 12.2.1. Adding Actions to Text or Images You can add an action to text or an image. The following steps show you how. -
Select the text or image to which you want to add an action. Go to Insert  Links Action. Links Action. An Action Settings dialog box similar to Figure 12-7 appears.  | Figure 12-7. PowerPoint automatically selects the Mouse Click tab, which means that clicking the action button triggers the actions you choose. Selecting the Mouse Over tab lets you set up actions that occur when the presenter mouses over the action button, as described on page 383. PowerPoint designates an action based on the action button you chose, but you can change it. | | -
In the Mouse Click tab, choose how you want your text or image to respond when a presenter clicks it. Your options include: -
None. Tells PowerPoint not to do anything when the object (text or image) is clicked. Normally, you won't choose this option unless you're testing a complicated slide and want to turn off a button for simplicity's sake; when you want the presenter to trigger an action not by clicking, but by mousing over the button (page 383); or when you want PowerPoint to play a sound file (but do nothing else) when the object is clicked. -
Hyperlink to. Tells PowerPoint to link to another slide or to another type of document (such as a Web page). Clicking the drop-down menu lets you choose from Next Slide, Previous Slide, First Slide, Last Slide, Last Slide Viewed , End Show, Custom Show, Slide, URL, Other PowerPoint Presentation, and Other File. -
Run program. Turning on the radio button next to this option lets you browse your computer for another program (such as Microsoft Word or Adobe Flash) or file (such as .docx or .pdf) you want PowerPoint to launch when the link is clicked. -
Run macro. Tells PowerPoint to run a macro (a VBA program you can attach to a presentation file, as described in Chapter 14) when the object is clicked. This option appears grayed out until you've attached a macro to your presentation file. -
Object action. PowerPoint doesn't activate this option unless the object to which you're applying an action is an object (like a PDF document) that you've inserted into your slide using Insert Text Object, and that happens to contain named, runnable actions. -
Play sound. Turning on this checkbox lets you choose one of several built-in sounds (like the sound of applause or a bomb going off), or any other .wav sound file stored on your computer, to play when the link is clicked. It also lets you turn off any other sounds that happen to be playing when the presenter clicks the link. -
Highlight click. Available only if you're applying an action to an image or shape (as opposed to text), this option tells PowerPoint to shrink the image slightly as it's clicked. Choosing this option gives the presenter a visual verification that she's clicking the objectespecially useful in situations where you've added multiple actions to a single slide. -
Click the Mouse Over tab. Options identical to those in the Mouse Click tab appear. -
In the Mouse Over tab, choose how you want your text or image to respond when a presenter mouses over it.
Note: Whether you choose to add an action to the Mouse Click tab, the Mouse Over tab, both, or neither depends on how you want your object to respond to a click (and to a mouseover). If you're having trouble deciding whether or not to go with a mouseover, check out the box on page 384.
-
When you finish, click OK and test your action by pressing Shift+F5 (to run the slideshow beginning with the current slide) and then mousing over and clicking your action. DESIGN TIME
The Trouble with Mouseovers | | Generally speaking, in most cases you want to steer clear of triggering an action when someone mouses over your action, for the simple reason that most folks don't expect anything to happen until they click something (and so may be flustered when something appears to happen onscreen for no apparent reason). Still, there are good reasons for triggering a link on mouseover. For example, say you're a programmer who's using PowerPoint to mock up the program you're working on to so you can present it to management. If your program's user interface contains links that respond to mouseovers, you'll need to mirror that behavior in PowerPoint. |
12.2.2. Adding Action Buttons Customizing one of PowerPoint's twelve predesigned action buttons may be easier than creating your own graphic link by hand. Not only have the button graphics already been created and (in some cases) the actions already set up, but adding an action button to your slide automatically pops up the Action Settings dialog boxsaving you a tidy handful of keystrokes. Using an action button instead of applying an action to your own homegrown image can be easier on your audience, too, especially when you deliver your presentation over the Web, because PowerPoint's action buttons reflect standard international symbols such as a left arrow (for the Back/Previous action button) and a lower-case letter i (for the Information action button). For example, adding the Home action button shown in Figure 12-8 gives your presenter an instant, one-click way to display the first slide in your slideshow. Table 12-1 gives you the lowdown on all the action buttons PowerPoint offers.  | Figure 12-8. Why use action buttons over the standard navigation controls? If you're running your slideshow in kiosk mode, you don't see the navigational controlsso it's action buttons or nothing. | |
DESIGN TIME
Creating Hotspots and Clickable Images | | Turning an image into a clickable link, as described on page 382, is pretty easy: All you do is select the image and then tell PowerPoint which file you want to open when you (or whoever's running your slideshow) click the image. But what if you want to make only a portion of an image clickable? In other words, what if you want to create a hotspot? You can do it easily with an action button. Here's how: -
Add an action button to your slide (page 384). -
Drag an image on top of the action button, so that the image completely covers the action button. -
Right-click the image and then select Send to Back Send to Back from the shortcut menu. (Your action button is now on top of the image.) -
In the Format Shape dialog box that appears, choose Fill No Fill; then choose Line Color No Line. When you finish, click Close to dismiss the Format Shape dialog box. Mission accomplished: your action button is now invisible, but it still responds to mouse clicks. |
Table 12-1. PowerPoint Gives You a Variety of Action Buttons You Can Add to Your Slides | Button | Action (What the Button Links to Automatically) | Notes | | Back/Previous | The previous slide in slide order (not necessarily the last slide viewed) | PowerPoint's onscreen controls also offer a back/previous button (page 411). | | Forward/Next | The next slide in slide order | PowerPoint's onscreen controls also offer a forward/next button. | | Beginning | The first slide in your slideshow | Same as the Home action button, but with a different graphic. | | End | The last slide in your slideshow | Useful for giving the presenter a quick way to cut to the main point/ wrap-up . | | Home | The first slide in your slideshow | Same as the Beginning action button, but with a different graphic. | | Information | Nothing; you need to customize the link | Use this button to link to a text file, slide, or Web page that explains slide content in detail. | | Return | The last slide displayed | Not necessarily the previous slide. | | Movie | Nothing; you need to customize the link | Use this button to link to a video or animation clip, such as an MP3 or Flash file. | | Document | Nothing; you need to customize the link | PowerPoint sets this button up to launch a program; you get to tell it which program. | | Sound | Plays applause sound | PowerPoint sets this button up to play the applause sound, but you can substitute any other .wav sound you want to play. | | Help | Nothing; you need to customize the link | Use this button to link to a text file or Web page that explains the slide contents in detail. | | Custom | Nothing; you need to customize the link | You should modify this plain square graphic to reflect the custom link you specify. For example, say you're creating an online quiz in PowerPoint. You can place the text True on one custom action button and False on another, then link each button to a slide displaying a congratulatory or try-again message, respectively. |
To add an action button to a slide: -
Go to the Insert Illustrations Shapes and click the down arrow (see Figure 12-9). The Shapes gallery appears. Scroll down the shapes panel to the Action Buttons section. 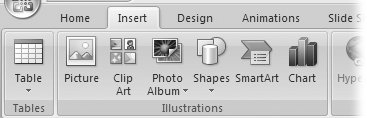 | Figure 12-9. PowerPoint comes with so many different predesigned shapes that they won't all fit on the Insert ribbon, so you need to click the down arrow shown here to see them allincluding the special, linked shapes PowerPoint calls action buttons. | | -
Click the action button you want to add to your slide, and then click your slide and drag. (In Figure 12-9, the action button selected is Home.) As soon as you let go the mouse, an Action Settings dialog box similar to the one in Figure 12-10 appears. 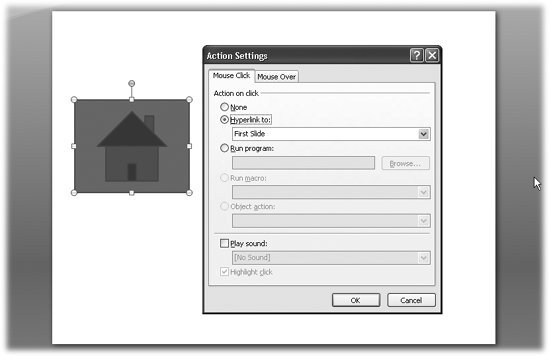 | Figure 12-10. PowerPoint automatically selects the Mouse Click tab shown here, which means that clicking the action button will trigger the actions you choose. (Selecting the Mouse Over tab lets you set up actions that occur when the presenter mouses over the action button, instead.) PowerPoint predesignates an action based on the action button you chose (here, Home), but you can change it. | | -
If you wish, change the action PowerPoint automatically adds to some action buttons (Table 12-1). You can change the way the action button responds to a mouse click and to a mouseover (page 382, Figure 12-7). -
When you finish customizing your action button, click OK. The action button appears on your slide, ready to test.
Note: You can drag your newly created action button to reposition it just the way you can reposition any other image on your slide.
|