3.2. Manually Formatting Text Appearance While PowerPoint's automatic formatting options (page 77) help with the grunt work of formatting the text on your slides, you should do some of the formatting yourself. After all, the program has no way of knowing which words or phrases you want to emphasizewhich, when you get right down to it, is what formatting is all about. PowerPoint conveniently displays all of its text formatting options on the Home tab (Figure 3-7). A handful of the most commonly used formats also appear when you right-click text or when you select it, as shown in Figure 3-8.
Note: If you're the kind of person who simply can't stand pop-ups, you can turn off the Mini Toolbar. To do so, select Office button  PowerPoint Options and then, in the PowerPoint Options window that appears, select Popular and turn off the "Show Mini Toolbar on selection checkbox. PowerPoint Options and then, in the PowerPoint Options window that appears, select Popular and turn off the "Show Mini Toolbar on selection checkbox.
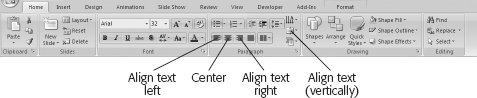 | Figure 3-7. Most of PowerPoint's text formatting options appear on the Home tab. | |
 | Figure 3-8. As soon as you right-click or select text, PowerPoint pops up the semi-transparent , or ghosted , Mini Toolbar shown here. Mouse over the Mini Toolbar and it becomes active, giving you a quick way to apply the most common formatting options (bold, italics, and so on). | |
Using the options you find on the Home tab, you can format individual characters and words by changing their color , font size , font, underlining, shadowing, and so on. You can format paragraphs by indenting them, turning them into bulleted or numbered lists, and by applying effects to them, such as rotating them or turning them into diagrams. The following sections show you how. FREQUENTLY ASKED QUESTION
Finding, Installing, and Troubleshooting Fonts | | I use PowerPoint at work, and my kids use PowerPoint on our home computer to create school reports . We've got the same version of PowerPoint installed on both computers, but my work version lists fonts that my home version doesn't. What gives? PowerPoint can display only the fonts that are installed on your computer. So when you want to use a font that isn't listed in PowerPoint's font list (Figure 3-9), you have to do two things: Copy the font file to your computer, and then install the font. (Most fonts these days are TrueType fonts, so called because the font's appearance stays "true" at any font size, onscreen or in print. TrueType font files carry the .ttf file extension.) Where can I find fonts to install? Free (and for-a-fee) fonts abound on the Web. You can either search for fonts in your favorite search engine, or begin with Microsoft's official font site: http://www.microsoft.com/typography/links/default.aspx. Once you've found a font you like and copied it to your computer, here's how to install it in Windows XP: -
-
Install New Font. -
3.2.1. Changing the Font PowerPoint's fonts (what printers used to call typefaces ) determine how text looks: spidery, staid, clunky , old-fashioned, funky, and so on. Arial, Helvetica, and Times Roman are three common fonts, although PowerPoint offers a lot more than that. (The actual number of fonts you can apply to your text in PowerPoint depends on how many fonts you have installed on your computer. For more information, see the box on page 85.) To change the font: -
Click in a text box. The Drawing Tools Format contextual tab appears, and PowerPoint activates the formatting options on the Home tab. -
Select the characters you want to format. The characters appear highlighted, and you see a ghosted Mini Toolbar. -
Choose Font, either in the Home Font group or from the Mini Toolbar. A list of fonts similar to the one you see in Figure 3-9 appears. -
Select a font. PowerPoint automatically reformats the selected text. 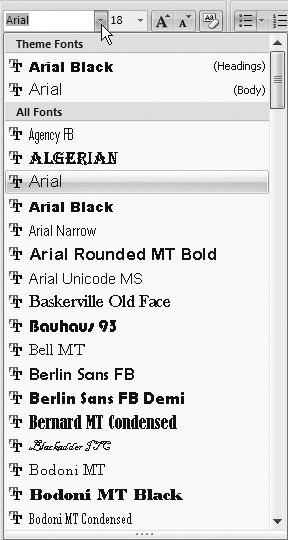 | Figure 3-9. PowerPoint doesn't raise a fuss if you choose a different font for every single character on your slide, but you should stick with one or two fonts per presentation (unless you like the ransom note look). Out of the box, the program assumes you want to use the Calibri font. | |
Note: Although they're common in the print world, serif fonts (fonts with fancy little feet on the letters ) tend to be harder to read on computer screens than sans-serif (literally, "without serif") fonts. Sans-serif fontslike Calibrilook clearer onscreen.
3.2.2. Changing Font Size PowerPoint gives you two different ways to change the size of your font: You can increase or decrease your font by choosing from a list, or you can type a specific font size (such as 38). If you're like most folks, you'll want to increase or decrease your font size, eyeball the result, and repeat until you achieve the look you want. But when you need to match the font size on one slide to the size on another, the quickest approach is to specify the number directly using the drop-down menu shown in Figure 3-10. 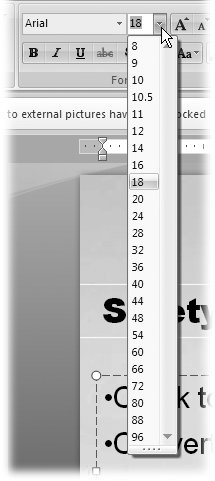 | Figure 3-10. If you don't see the particular font size you're looking for, no problem. Instead of clicking the arrow next to the Font box, click the displayed font (here, 18), type your own font size, and press Return. PowerPoint obediently applies any size you specify, from ridiculously small (1) to ridiculously large (999). | |
Tip: Have pity on the folks in the back row (or, if you'll be delivering your slideshow over the Web, the folks with small monitors ) and keep your font size as large as possible. A quick way to tell if your font's big enough is to print out a slide and drop it face-up on the floor. If you're standing over it and can't read it easily, your font is too small.
To change font size: -
Click in a text box. The Drawing Tools Format context tab pops up, and PowerPoint activates the formatting options on the Home tab. -
Select the characters you want to format. The characters appear highlighted, and the Mini Toolbar appears. -
In either the Home Font group or on the Mini Toolbar, choose a font size option. You have three choices: -
Increase font size. Clicking this option (the one with the "A" followed by the up-arrow) bumps up the font size to the next-highest size on the list. -
Decrease font size. Clicking this option (the "A" followed by the down-arrow) shrinks font size to the next- lowest size on the list. -
Font size menu. Clicking this option (a drop-down box displaying a number) shows the list you see in Figure 3-10, from which you can choose the precise font size you want. Rolling your mouse over the list shows you immediately, right on the slide, what your text looks like in each font. When you find the size you want, click it to apply the previewed changes to your slide. NOSTALGIA CORNER
The New Font Dialog Box | | In older versions of PowerPoint, the Font dialog box offered a one-stop shop for all things font- related : font and size, bolding and underlining, coloring and shadowing, superscripting and subscripting , and more. In PowerPoint 2007, the font dialog box still exists, although it looks a bit different than it used to. Think of the font dialog box as a leftover feature that consolidates all of the font-related settings described in this chapter into a single spot. Using the Font dialog box saves you time if you're used to using it in older versions of PowerPoint, or if you want to make a bunch of font changes all at once. To display the Font dialog box, either click the Font dialog launcher (the little down-arrow in the bottom right corner of the Home tab's Font section, as shown in Figure 3-7) or right-click in a text box and then, from the context menu that appears, choose Font. To use the Font dialog box to change an underline from a solid to a dashed one, click the Font tab, and then choose the dashed style you want from the "Underline style" drop-down box. To change the color of an underline, from the Font tab, head to the "Underline color" drop-down box and choose a color. | 3.2.3. Bolding, Italicizing, and Underlining Text Three of the easiest and most common ways to draw attention to text are to bold, italicize, or underline the text (Figure 3-11). These effects look and behave pretty much the same in PowerPoint as they do in most word-processing programs, including Microsoft Word. 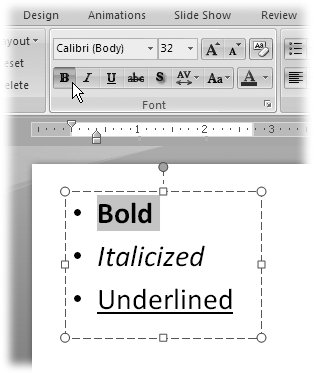 | Figure 3-11. Whether you choose them from the Home tab or the Mini Toolbar, Bold and Italicize are toggle options. Click once to apply them, and click the same option again to remove them. Although these basic formatting effects are among the oldest known to humankind, they're also the most effectiveas long as you use them sparingly. | | To bold, italicize, or underline text: -
Click in a text box. The Drawing Tools Format contextual tab pops up, and PowerPoint activates the formatting options on the Home tab. -
Select the characters you want to format. The characters appear highlighted, and the Mini Toolbar appears. -
Choose one or more of the formatting options in the Home Font group or from the Mini Toolbar: Bold, Italicize, or Underline. (The Underline option isnt available on the Mini Toolbar.)
Tip: If you prefer keyboard shortcuts, after you've selected the text you want to format, you can press Ctrl+B (to make it bold), Ctrl+I (to italicize it), or Ctrl+U (to underline it). Pressing the same two keys again removes the effect.
Tip: You can change the style of underline from normal to dashed or dotted , and you can change the color of the underline. Check out the box on page 88 to see how to customize an underline.
3.2.4. Changing Text Color and Background Color PowerPoint lets you change the color of your text (and its background) from basic black to puce, chartreuse, chocolate mousse, or any other hue you come up with. You can color all of it, just a word or two for emphasis, or change the background color of the text box. You can also apply a gradient effect that makes your text look as though a light's shining on it (the following section shows you how).
Note: Color's a moot point if you intend to fax or print your presentation on a black-and-white printer. In that case, you want to make sure your slides look good in grayscale , which you do by choosing View Color/Grayscale Grayscale. Because grayscale adds shades of gray to plain black-and-white, its the best way to print a non-colored version of a color presentation. For more details, see the box on page 271. When you're satisfied with the way your slideshow looks in grayscale, tweak your printing settings to tell PowerPoint to print in grayscale. Page 268 walks you through the process of printing a presentation in grayscale.
To change text and text background color: -
Click in a text box. The Drawing Tools Format context tab pops up, and PowerPoint activates the formatting options on the Home tab. -
Select the characters you want to format. The characters appear highlighted, and the Mini Toolbar appears. -
Click the drop-down arrow next to the Font Color icon that appears in the Mini Toolbar or in the Home Font group. The color picker you see in Figure 3-12 appears. 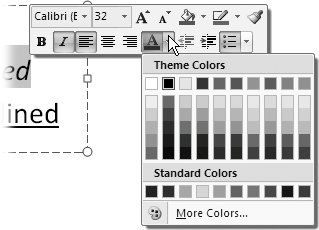 | Figure 3-12. Here, you see the basic color picker that appears when you choose Font Color from the Mini Toolbar, or when you select Font from the Font section of the Home tab. Most of the time, these basic options are all you need. But if you like, you can apply fancy color effects such as textures, gradients, and transparency to your text. Page 91 shows you how. | | -
Choose a color from either the Theme or Standard sections of the color picker. Choosing a color from the Theme section makes sure the color of your text coordinates attractively with the other colors in your theme, like the background color of your slide. If you choose a color from the Standard section, there's no guarantee it will look good with the other elements on your slide. 3.2.5. Adding Special Color Effects When it comes to coloring your text, you're not limited to the handful of color swatches PowerPoint's color picker provides. You can also: -
Make your text more or less transparent, so that the background of your slides shows through your text. -
Apply a custom color you create yourself. -
"Paint" your text either with a picture, or with a texture (a tiny picture repeated so many times it forms a pattern). -
Add a gradient effect. As you see in the following sections, you apply these effects by using the Format Text Effects dialog box. 3.2.5.1. Adjusting transparency You can tell PowerPoint to make the fill portion of a chunk of text transparent, so that if you apply background color to the text box (page 90) or the slide itself (page 90), then the color shines through. To do so: -
Select the text you want to make transparent. Right-click the selection and then choose Format Text Effects from the shortcut menu. The Format Text Effects dialog box appears (Figure 3-13).
Note: If you right-click a selection and don't see the Format Text Effects option, chances are you selected a misspelled word. In that case, you need to fix the misspelling or right-click the selection and choose Ignore All. Then, when you right-click the corrected selection, the Format Text Effects option appears.
-
On the left side of the Format Text Effects dialog box, choose Text Fill. Text-fill-related options appear on the right side of the Format Text Effects dialog box (Figure 3-13). 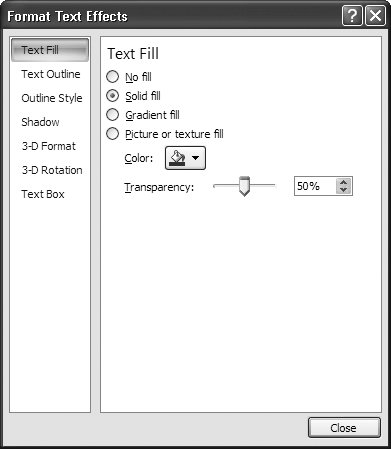 | Figure 3-13. Here, you see a 50% transparency applied to the selected text. An easy way to make text completely invisible is to turn on the radio box next to "No fill." (You may want to hide the text if you just want to print the graphics on your slides, for example.) | | -
Make sure the radio button next to "Solid fill" is turned on. If it isn't, turn it on. -
Drag the Transparency slider anywhere from 0% (completely opaque ) to 100% (completely see-through). 3.2.5.2. Mixing custom colors If you don't like any of the colors you see in the color picker that PowerPoint offers (page 90), you can always create your own custom colors. For example, if somebody in your Marketing Communications department gives you RGB (red-green-blue) or HSL (hue-saturation-lightness) values because they want all corporate presentations to match, then you can use the Custom tab of the Colors dialog box to choose a custom color based on those values. Here's how to create a custom color: -
Click in a text box. The Drawing Tools Format context tab pops up, and PowerPoint activates the formatting options on the Home tab. -
Select the characters you want to color. The characters appear highlighted, and the Mini Toolbar appears. -
Go to Home Font and click the drop-down arrow next to the Font Color icon. Or use the Font Color icon on the Mini Toolbar. A color picker appears. -
In the color picker, choose More Colors to open the Colors dialog box. Select the Standard tab to choose a preblended color (Figure 3-14), or select the Custom tab to blend your own custom color (Figure 3-15). 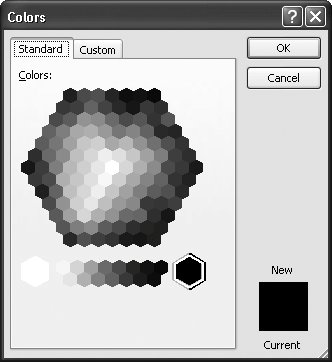 | Figure 3-14. The Standard tab offers many more color options than the color picker. Simply click any of the hexagonal color swatches you see here, and then click OK to apply that color swatch to your text. | | 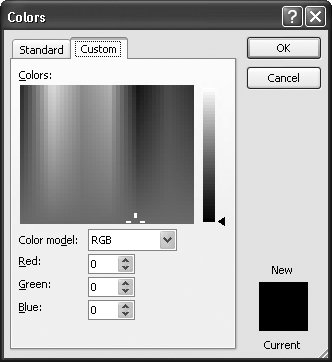 | Figure 3-15. The Custom tab of the Colors dialog box lets you specify a custom color visually or mathematically. Visually: Click anywhere on the color box, or drag the slider. Mathematically: Use the drop-down boxes to select a color model (your choices are RGB and HSL), and then use the color-model-specific drop-down boxes to choose values for red, green, and blue; or hue, saturation, and lightness. | | 3.2.5.3. Picture Rather than tinting your text red, green, or blue, you can "paint" your text using a picture instead of a color. Figure 3-16 shows you an example.  | Figure 3-16. You can add colors and textures to your text using an image, like the sunset image shown here. | | To apply a picture to your text: -
Select the text you want to format. Right-click the selection, and then choose Format Text Effects from the shortcut menu. The Format Text Effects dialog box appears. -
On the left side of the Format Text Effects dialog box, choose Text Fill. Text-fill-related options appear on the right side of the Format Text Effects dialog box. -
Select "Picture or texture fill." Picture-related options appear (Figure 3-17). -
Choose a picture to apply . Your options include: -
File. Lets you browse your computer for the picture file you want. -
Clipboard. Automatically applies the last image you added to your clipboard. -
ClipArt. Lets you select an image from Microsoft's Organizer, which includes Microsoft-supplied ClipArt images as well as any images you've imported to the Organizer (page 307). 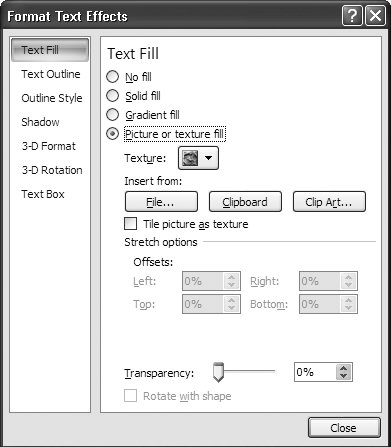 | Figure 3-17. You can apply a picture as a picture or as a texture. When you apply a picture as a picture, PowerPoint slaps the text over the picture much as you slap a cookie cutter over a hunk of rolled-out dough. When you apply a picture as a texture, PowerPoint tiles the picture to form a repeating pattern. | |
Tip: If you like, you can tell PowerPoint to repeat a small image to cover the entire text selection by turning on the checkbox next to "Tile picture as texture."
3.2.5.4. Texture PowerPoint comes with a dozen or so repeatable patterns called textures . You can apply any picture you like as a texture, as described in the previous section, but PowerPoint's texture images are specifically designed to look good when they're repeatedraindrops, marble, wood grain, and granite. To apply a built-in texture to your text: -
Select the text you want to format. Right-click the selection and then choose Format Text Effects from the shortcut menu. The Format Text Effects dialog box appears. -
On the left side of the Format Text Effects dialog box, choose Text Fill. Text-fill-related options appear on the right side of the Format Text Effects dialog box. -
Select "Picture or texture fill." Picture-related options appear. -
Click the Texture drop-down box. A gallery of textures appears (Figure 3-18). 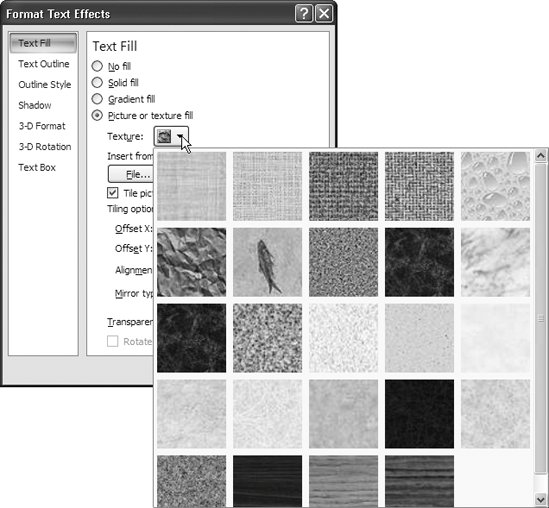 | Figure 3-18. You can think of the textures that PowerPoint provides as wallpaper for your text: cool in the right hands, but a little goes a long way. | | -
Click the texture you want to apply to your text. The gallery disappears, and PowerPoint applies the texture to your selection. Figure 3-19 shows you an example. 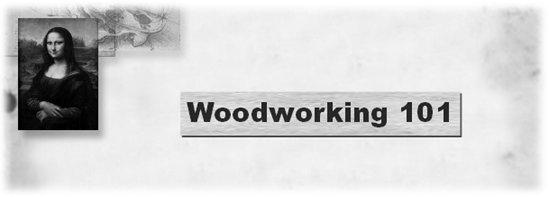 | Figure 3-19. In the example you see here, the texture coordinates nicely with the presentation's theme in terms of color choice and overall vibe. It also does a good job of emphasizing the title text. | | -
Click Close to dismiss the Format Text Effects dialog box. 3.2.5.5. Gradient Applying a gradient effect makes your text appear as though it's made of metal and a light's shining on it from one of several angles. Check out Figure 3-20 for an example. 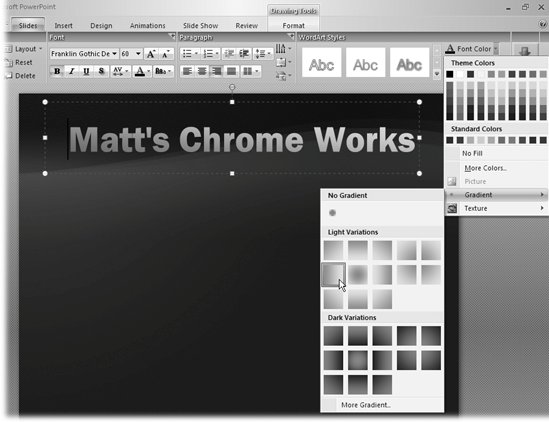 | Figure 3-20. The gradient effect looks a lot more impressive onscreen than it does in a black-and-white screenshot, but it's still not for everyoneor for every presentation. In order for the effect to show up properly, you'll need a fairly good- sized font, as shown here (bolding helps). | | To apply a gradient to your text: -
Select the text you want to format. Right-click the selection, and then choose Format Text Effects from the shortcut menu. The Format Text Effects dialog box appears. -
On the left side of the Format Text Effects dialog box, choose Text Fill. Text-fill-related options appear on the right side of the Format Text Effects dialog box. -
Turn on the radio box next to "Gradient fill." The gradient-related options shown in Figure 3-21 appear. -
Click Close. PowerPoint applies a standard gradient. For details on customizing the gradient, check out Figure 3-21 and page 98. 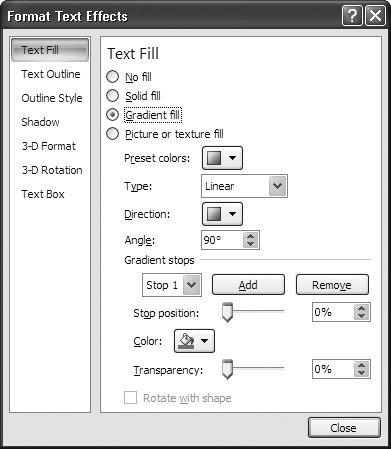 | Figure 3-21. PowerPoint lets you fine-tune the presets it offers to create custom looks. Here, you can choose from cool, tie-dyed preset colors, as well as set stops (the sizes of the bands that make up your gradient) and transparency (how see-through you want each band to appear). The options that PowerPoint activates depend on the type of gradient you choose (Radial, Linear, Rectangular, or Path). | |
Note: For a quick way to change the color of your text box using PowerPoint's Shape Fill option, see page 290. If you're interested in changing the color or texture of your slide background, head to page 129.
3.2.6. Tweaking the Text Outline Because PowerPoint treats each character of text as a combination of fill and outline, you can pick one color for, say, the letter A, and a different color for the outline of the A. This technique works best when you're working with a large font and you plump up the outline a bit, as shown in Figure 3-22.
Tip: Tweaking font outlines isn't just for standard text: it can also yield attractive results on Webdings characters too, as shown in Figure 3-22.
 | Figure 3-22. Choosing a contrasting color for your text's outline can help emphasize a headline, as shown here. But it can also add a quick dash of color to a Webding like the bed shown here. In addition to changing the color of an outline, you can also tell PowerPoint to draw it thicker, thinner, or dashed, as described on page 99. | | To change the outline color of your text: -
Select the text you want to format. The characters appear highlighted, and the Mini Toolbar pops up. -
Right-click your selection and then choose Format Text Effects from the shortcut menu. The Format Text Effects dialog box appears. -
On the left side of the Format Text Effects dialog box, choose Text Outline. Outline-related options appear (see Figure 3-23). 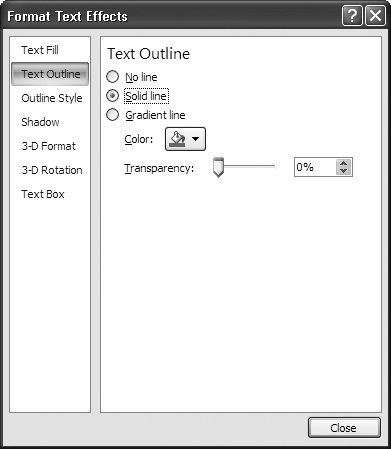 | Figure 3-23. The options PowerPoint displays in the Format Text Effects dialog box change based on whether you choose a Solid line (shown here) or a Gradient line. But no matter which option you choose, you get to specify the color you want your text outline to have. For the complete skinny on gradients, check out page 96. | | -
Turn on the checkbox next to Solid (for a solid text outline), or Gradient (for a graduated light-to-dark outline). PowerPoint shows you some options for modifying your outline. You can specify the color of your outline text, exactly like choosing text colors, as described on page 90. If you choose a gradient, you can fine-tune it as described in Figure 3-21. The categories on the left side of the Format Text Effects box let you change your text outline from solid to dashed or dotted, specify the outline's width, and otherwise customize your text outline. To do so: -
On the left side of the Format Text Effects dialog box, choose Outline Style. The style-related options you see in Figure 3-24 appear. 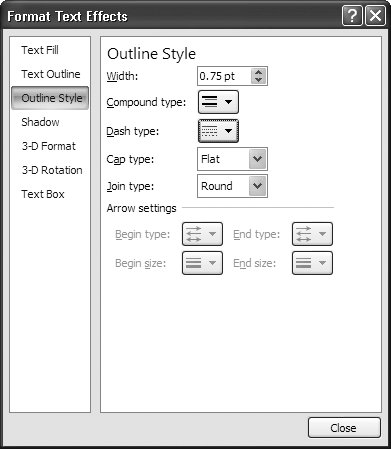 | Figure 3-24. Unless the text on your slide is very large, most of the nitty-gritty customization options you see in this dialog box are overkill. Still, it's nice to know they're there. | | -
Modify your outline's appearance. You options include: -
Width. Lets you choose the thickness of your outline. Unless your font size is spectacularly huge, though, you want to stick with a skinny outline. (Very large outline weights overwhelmand can even obscurethe font itself.) -
Compound type. Lets you choose from single, double, and triple outlines. -
Dash type. Lets you choose from solid, dashed, and dotted outlines. -
Cap type. Lets you customize the appearance of capital letters. Your choices include flat, square, and round. -
Join type. Lets you customize the appearance of outline joins. Your choices include round, bevel, and miter. -
Arrow settings. Lets you choose whether you want an arrowhead at the beginning or the end of the line. WORD TO THE WISE
Real-Life Color Advice | | Whether you're using PowerPoint to create a sales presentation, an academic lecture, a book report for third-grade science class, or something else entirely, you need to be aware of color and how it supports (or detracts from) the message you're trying to get across. Keep the following time- tested rules in mind as you add color to your PowerPoint slides: -
Feel free to skip 90 percent of PowerPoint's color options. There are exceptions, of course, but in the majority of cases, using bold or italics highlights your important points more effectively than throwing in a hot pink font surrounded by a dashed blue outline. -
Color can't save a bad presentation. There isn't a color, background, or texture in existence that can compensate for a lack of well-organized content. Instead of overusing color (which is distracting), spend that time creating an interesting and organized presentation. -
Contrast is at least as important as color. Contrast which is how two colors look next to each otheraffects readability big-time. (That's why black text on a white background is ubiquitous: It works.) Putting two similar colors togetherlike a blue circle on a green flagis seriously hard on the eyes. It can also cause problems when you go to print or fax your presentation, because on black-and-white printers, the non-contrasting colors may appear indistinguishable from each other. -
Color conveys its own emotional message. Blue, the color of the sky and the ocean, connotes unlimited potential. In American culture, it also connotes solidity and respectability (think Big Blue and blue chip stocks). Some audiences may think pink means femininity; purple, royalty; red, danger; and so on. Color isn't an exact science, and its effects vary depending on your audience's culture and preferences, but it always makes a statement. Ideally, you want that statement to reinforce the one you're making with your content. -
Professionally designed color schemes abound. Use them. With the time you save on color-tweaking, you can do a few more dry runs of your presentation. (For more on color schemes, check out page 28.) | 3.2.7. Adding Special Text Effects In addition to basic bolding, italicizing, and underlining, you can add all kinds of special effects to your text, as you can see in Figure 3-25. You find the special effects options on the Font and WordArt Styles sections of the Home tab. 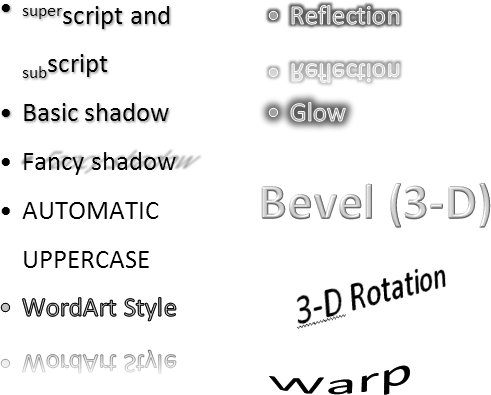 | Figure 3-25. Special text effects like these can add zing to your presentationas long as you use them sparingly and remember not to sacrifice readability for coolness. | | To add a special effect to your text, simply select the text, and then click the effect on the ribbon. -
Add a superscript or subscript. If your presentation covers chemistry or some other scientific field, you'll need to subscript and superscript characters (think H 2 O). On the Home tab, click the Font dialog launcher and then, in the Font dialog box that appears, make sure the Font tab is selected and then turn on the checkbox next to Superscript or Subscript. -
Add a shadow. Select Home Font Text Shadow. When you do, PowerPoint automatically adds a shadow to your text. For a more sophisticated shadow effect, right-click your selection, choose Format Text Effects, and then, in the Format Text Effects dialog box that appears, click Shadow (see Figure 3-26). Click Presets to choose from a handful of standard shadows; then, if you want, you can use the other options (Figure 3-26) to tweak the standard shadow. 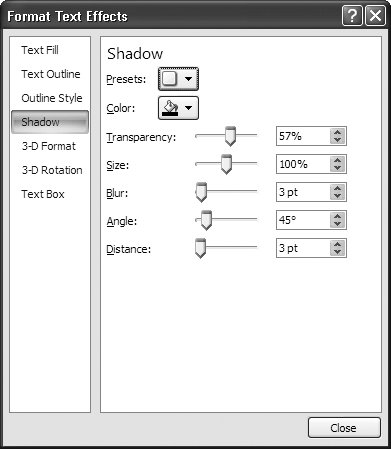 | Figure 3-26. Shadows tend to make skinny fonts unreadable, but they can effectively draw attention to short headings displayed in plump, bold fonts. Click Presets to choose from a gallery of attractive, predesigned shadow options; then click Size, Angle, Distance, or any of the other options shown here to customize the predesigned look. | |
-
Change text case . You can tell PowerPoint to format the case of your text automatically, which is useful for fixing capitalization goofs. Click Home Font Change Case (the "AAa button). From the menu that appears, choose one of the following: "Sentence case" (uppercases the first word of each line and adds a period after last word); "lowercase" (changes all characters to lowercase), UPPERCASE (changes all characters to uppercase); Capitalize Each Word (uppercases first letter of each word); or "tOGGLE cASE" (reverses the existing capitalization). This last option is rarely useful unless you just typed in a bunch of text with the caps lock key on by mistake). -
Apply a pre-crafted effect (Quick Style). The Quick Styles section of the Home tab offers a gallery of text effects including outlined fonts, glows , and reflections. To see them all, click the down arrow next to the Quick Styles option. The result is the full gallery of effects shown in Figure 3-27. Clicking an effect applies it directly to your text. 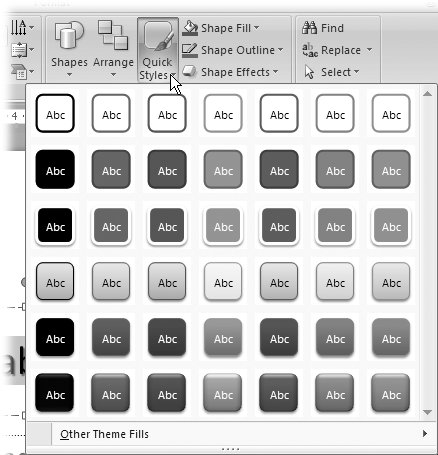 | Figure 3-27. PowerPoint offers a quick-pick gallery of the most popular text effects, including outlines, colored fills, and 3-D beveling. | |
-
Add a reflection. Reflections can make your slide look overcrowded, so don't use this effect unless your slide is relatively text-free (and you're sure it adds to your message). To add a reflection, select Home Drawing Shape Effects Reflection and then, from the effects gallery that appears, click to select a reflection option.
-
Add a glow or softened edges. If you plan to create interactive presentations for delivery on CD/DVD or over the Web, you'll like the glow effect: It's a time-honored look for clickable buttons called rollovers . To add a glow, go to Home Drawing Shape Effects Glow and then, from the gallery that appears, click to choose a glow option. To soften the edges of your text (kind of a backwards glow effect), go to Home Drawing Shape Effects Soften Edges. -
Add a beveled (3-D) effect. To get the most out of applying a 3-D effect, make sure your text is large and blocky. 3-D doesn't do much for skinny, light-colored characters. Then go to Home Drawing Quick Styles Text Effects Bevel and, from the gallery that appears, click to choose a bevel option. -
Add a 3-D rotation effect. Another effect that looks better applied to shapes than to text, the 3-D rotation effect reformats your text in 3-D form and then slants it based on the perspective you choose. On the Drawing section of the Home tab, select Shape Effects 3-D Rotation and then, from the gallery that appears, click to choose the option you want. -
Convert your text to a diagram. Previous versions of PowerPoint let you create a diagram; PowerPoint 2007 takes an existing list and turns it into an editable diagram for you. To convert a list into a diagram, click anywhere on the list; then head to the Paragraph section of the Home tab and click "Convert to SmartArt Graphic" (Figure 3-28). (Or, alternatively, you can right-click your list and choose "Convert to SmartArt" from the context menu that appears.) From the gallery that PowerPoint displays, click a diagram type, and bamPowerPoint converts your text. Figure 3-29 shows you the result. 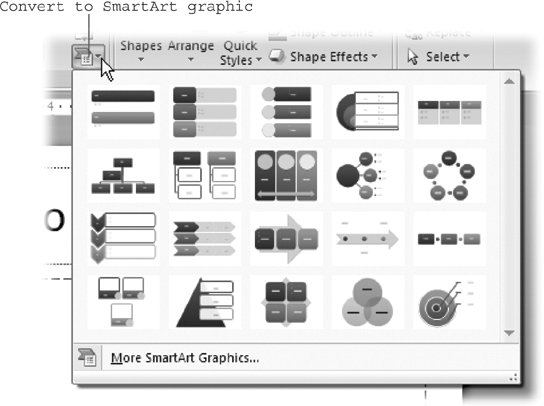 | Figure 3-28. You find the "Convert to SmartArt Graphic" option on the Home tab. If none of these popular diagram types suits your taste, click More SmartArt Graphics to see a giant gallery packed with dozens more. When you find a diagram type you like, click to select it. | |
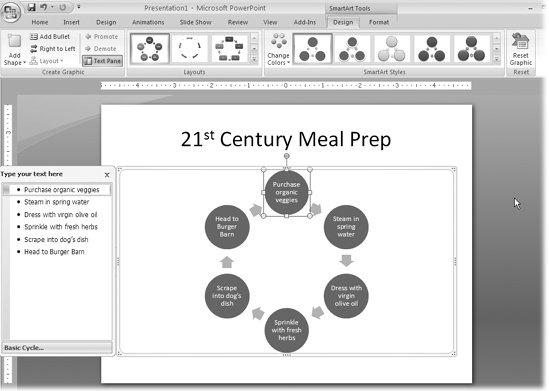 | Figure 3-29. Here's the result of applying a diagram to your text. The best part: drag one of the circles, and PowerPoint automatically adjusts the arrows so the diagram always makes sense. The SmartArt Tools (Design and Format) contextual tabs pop up automatically, so that the tab now shows options related to diagrams. Also, PowerPoint automatically displays a box that makes it easy for you to edit your diagrammed list and get more information about the diagram type you chose. | |
Note: For tips on editing diagrams, check out Chapter 6.
 |
|