11.1. Preparing and Testing MapServer
| < Day Day Up > |
| A few things need to be set up before using MapServer. There are some differences between operating systems such as the name of your MapServer executable, where files are stored, etc. 11.1.1. MapServer for Windows (MS4W)Chapter 4 described how to access and install the MS4W package. You might want to look at the MS4W portion of that chapter and review how to start the web server. A custom application will be built later in this chapter, but first you need to understand how MapServer works in the MS4W environment. MS4W comes with a version of the Apache HTTP web server. The MapServer program is stored in Apache's cgi-bin folder, the main location for many web programs. If you were compiling your own mapserv.exe file, you install it by copying it into the cgi-bin folder. By default, this folder is located in the \ms4w\Apache\cgi-bin folder on the drive MS4W is installed on (e.g., C: orD:). There may be several versions of MapServer located there. For example, mapserv_36.exe is MapServer Version 3.6 (very out of date) and mapserv_44.exe is the most recent Version 4.4. Usually the more recent version will just be called mapserv.exe. 11.1.2. MapServer on Linux with ApachePreparing MapServer on Linux is also described in Chapter 4. Installing the MapServer CGI program is similar to how you do so for MS4W. The mapserv executable is simply copied (or linked) to Apache's cgi-bin folder. For example, on SuSE Linux, the web server's cgi-bin folder is located at /srv/www/cgi-bin. The mapserv application must be copied into this folder so it is accessible to the web server. These instructions also apply to non-MS4W installations of Apache on other platforms. 11.1.3. Configuring ApacheConfiguring Apache to use MapServer doesn't have to be complicated. If you put the mapserv/mapserv.exe program into the web server's default cgi-bin location, there may not be much more to do to get the program running. The next section gives a couple of example tests to see if it is running properly. There are other settings you will need in order to access maps produced by MapServer. When MapServer runs, it needs a temporary area to create the images for maps, legends, scale bars, etc. This temporary folder must also be accessible to the web so that users can view the images created by MapServer. 11.1.3.1 Windows temporary image folder locationMS4W comes with a temporary folder already set up. This folder is c:\ms4w\tmp\ms_tmp. The Apache configuration file at c:\ms4w\Apache\conf\httpd.conf sets this folder up with an alias called /ms_tmp. This means that when a web application requests a file in /ms_tmp, Apache looks for the file in c:\ms4w\tmp\ms_tmp. For example, if MapServer created a map image at c:\ms4w\tmp\ms_tmp\mymap.png, the web application would request to see the image by using a URL like http://localhost/ms_tmp/mymap.png. The key thing to remember is that MS4W creates all the temporary map image files in this folder. 11.1.3.2 Linux temporary image folder locationIf you are using a fresh install of Apache, you need to set up your temporary location and alias in the configuration files manually. There are several ways to configure settings. One method that uses Apache 2 on SuSE Linux is discussed here. You can set up your MapServer temporary folder anywhere on your filesystem. To keep it simple, you can put it directly under the htdocs root folder. This means that you don't need to create an alias for Apache because the folder is a child of the web server's root folder. For example, the root web folder may be set in the /etc/apache2/httpd.conf file and specified as DocumentRoot /srv/www/htdocs. You can create your temporary image folder in /srv/www/htdocs/ms_tmp so that MapServer will be able to find it when it is set to look in http://localhost/ms_tmp. As a quick test, if your earlier image mymap.png is placed in /srv/www/htdocs/ms_tmp, you should be able to see it at http://localhost/ms_tmp/mymap.png. Permissions for the ms_tmp folder must be set properly for MapServer to be able to save the map images. The trick is to have the web server user and group assigned as owner of the folder. You can then run the command: > chown wwwrun.www /srv/www/htdocs/ms_tmp This should make it accessible to the web server and, in turn, to MapServer. This process will vary on other platforms, depending on how your web server is being used, but the concepts are the same. The distinction between the filesystem path to the ms_tmp folder (it doesn't have to be called ms_tmp by the way; call it whatever you like) and the online URL is very important to understand when setting up your MapServer applications. MapServer needs to know where on the filesystem it can write the map image files to. It will also need to know what URL to send back to the web browser for loading the map images into the web page.
11.1.4. Testing and TroubleshootingYou can run a few tests to check that the MapServer program is properly set up. The set up of MS4W and Linux running Apache is very similar, but there are some differences worth mentioning. 11.1.4.1 Testing mapserv.exe on WindowsThe first step for testing MS4W assumes that the web server is running as described in Chapter 4. To test that the MapServer executable (mapserv.exe) is available, you make a direct request to it without any parameters. For example, point your web browser to http://localhost/cgi-bin/mapserv.exe. You should get a message like this: No query information to decode. QUERY_STRING is set, but empty. This is a good thing. It is a message coming directly from MapServer. You didn't pass any of the required details to MapServer for processing, but the message confirms that you were able to make a request. It is also a reminder that you won't be running MapServer this way. If you get any other errors, there is either a permissions problem and Apache can't access the requested file, or the web server isn't up and running properly. 11.1.4.2 Testing mapserv with Apache on LinuxThe MapServer program on Linux can be tested the same way you do MS4W. The only difference is that the name of the program is slightly different. With Linux, there are no standard filename suffixes such as .exe to tell you which files are executable and which aren't. Instead, there are file permissions. On Linux the main MapServer program is simply called mapserv. This is the same file that was discussed earlier in this chapter and copied into the cgi-bin folder of the web server. Test the mapserv executable on a Linux and Apache system by going to the URL http://localhost/cgi-bin/mapserv. Notice there is no .exe suffix. You should get the same notice from MapServer as with the MS4W examples earlier: No query information to decode. QUERY_STRING is set, but empty. 11.1.5. Testing the MapServer Setup Using a Demo ApplicationTo test that MapServer can actually create maps, you will build on the demonstration map files used with the command-line tools in Chapter 10. The countries_simpl shapefile dataset can be downloaded as a compressed archive file from http://ftp.intevation.de/freegis/worlddata/freegis_worlddata-0.1_simpl.tar.gz. The map file example from Chapter 10 will be customized further and made into a web-based application. To do so, there are three files involved:
Figure 11-1 illustrates how the basic application begins, with a start page sending settings to the CGI to produce a map. Figure 11-1. The start page initializes MapServer by passing it a map file and an HTML template document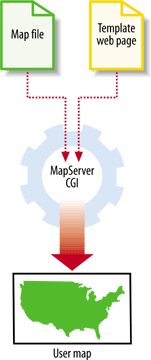 Example 11-1 takes the demonstration map file global.map, used in the previous chapter, and adds the settings required to make it a web map. The additional settings are highlighted. Example 11-1. Sample of global map application's map file MAP SIZE 600 300 EXTENT -180 -90 180 90 IMAGECOLOR 180 180 250 UNITS DD SCALEBAR STATUS EMBED UNITS KILOMETERS INTERVALS 3 TRANSPARENT TRUE OUTLINECOLOR 0 0 0 END LEGEND STATUS EMBED POSITION LR TRANSPARENT TRUE END WEB TEMPLATE global.html IMAGEPATH "/srv/www/htdocs/tmp/" IMAGEURL "/tmp/" END LAYER NAME countries TYPE POLYGON STATUS DEFAULT DATA countries_simpl LABELITEM 'NAME' LABELMAXSCALE 50000000 CLASSITEM 'NAME' CLASS NAME 'Bulgaria' EXPRESSION 'Bulgaria' OUTLINECOLOR 100 100 100 COLOR 255 255 150 LABEL SIZE LARGE OUTLINECOLOR 255 255 255 MINFEATURESIZE 40 END END CLASS NAME 'All Countries' EXPRESSION ('[NAME]' ne 'Bulgaria') OUTLINECOLOR 100 100 100 COLOR 200 200 200 END END ENDOnly a few lines were added to make the map file work with the web server instead of command-line tools.
A whole new object called WEB was added. There are three parts to the web object:
LABELMAXSCALE 50000000 was also added to the countries layer. This sets the map to show labels only when zoomed in to a certain map scale. The scale of the initial map is so small that Bulgaria is barely visible. Having a label on top of the country makes it harder to see; instead, as you zoom in to a more readable scale, the labels will appear. With these map file settings in place, you can set up an initialization page. This page will be called index.html and its contents are listed in Example 11-2. The page can be called whatever you want.
Example 11-2. Listing of the index.html MapServer initialization page<HTML> <HEAD><TITLE>MapServer Test</TITLE></HEAD> <CENTER><H2>MapServer Test</H2> <FORM method=GET action="/cgi-bin/mapserv"> <INPUT type="hidden" name="map" value="/srv/www/htdocs/global.map"> <INPUT type="hidden" name="layer" value="countries"> <INPUT type="hidden" name="zoomdir" value=1> <INPUT type="hidden" name="zoomsize" value=2> <INPUT type="hidden" name="program" value="/cgi-bin/mapserv"> <INPUT type="submit" value="Start MapServer"> </FORM></CENTER></BODY></HTML> This example is almost as stripped down as it can be. There is a title and heading on the page. Other than that, the rest of the HTML code is for starting MapServer. This page can be completely customized as long as the form and its variables are maintained. All this page shows is a single button: Start MapServer. Behind the page are a bunch of hidden settings that are passed to MapServer when the form is submitted. This starts the first map. After the application is started, the index.html page isn't used.
The MapServer CGI application sends the viewer a new web page. The URL to that web page contains several variables (like the ones defined in index.html). When a user requests a change to the map, it then sends those variables back to the CGI for reprocessing. The purpose of the index.html page is to get the whole process started without forcing you to have a complex-looking initial URL. As you saw in Example 11-1, a template file called global.html is specified in the map file. This template file is also a web page written in HTML. MapServer takes this page and populates portions of it before sending it back to the user's web browser. Example 11-3 shows my global.html code. Example 11-3. Listing of the global.html MapServer template file<HTML> <HEAD><TITLE>MapServer Test</TITLE></HEAD> <CENTER><H2>MapServer Test</H2> <HR> <FORM method=GET action="/cgi-bin/mapserv"> <INPUT NAME="img" TYPE="image" src="/books/4/2/1/html/2/[img]" width=600 height=300 border=0 ALT="Map Image"> <INPUT type=hidden name=zoomdir value=1 [zoomdir_1_check] > <INPUT type=hidden name=zoomsize size=4 value=[zoomsize]> <INPUT type="hidden" name="imgxy" value="[center_x] [center_y]"> <INPUT type="hidden" name="imgext" value="[mapext]"> <INPUT type="hidden" name="map" value="[map]"> <INPUT type="hidden" name="savequery" value="true"> <INPUT type="hidden" name="mapext" value="shapes"> </FORM></CENTER></BODY></HTML> If you are familiar with HTML forms and tags, you may notice that the only objects visible on this page are the heading and title and an image. The image source (SRC) is filled in by MapServer in real time when the page is generated. When MapServer populates global.html, it checks for any MapServer-specific variables, such as [img]. MapServer replaces this text with the URL to the map image on the web site. This is the temporary map image that MapServer created.
Figure 11-2 shows the output web page created by the global.html. The map will look exactly like some of the map output from the command-line tools in Chapter 10. The only difference is that this map is being created by MapServer when requested, and automatically embedded into a web page. The basic global.html template has virtually no controls, or at least none that are apparent. Controls refers to the buttons and check boxes you see on many web maps. These were deliberately left out so that this example would be simple to implement, and the HTML code wouldn't be more confusing than necessary. To interact with this map, just click on the map, and it will zoom in towards that location. Click once on the map, and then wait for the map to update. Once the image is updated, click again. Notice that if you zoom in toward Bulgaria, the label starts to appear. The results of clicking twice on the map are shown in Figure 11-3. Because the number of controls has been kept to a minimum, there are no zoom-out buttons. In a web-mapping application this simple, the only way to zoom out is for Figure 11-2. The basic global web map example Figure 11-3. Zooming in to Bulgaria by clicking two times on the map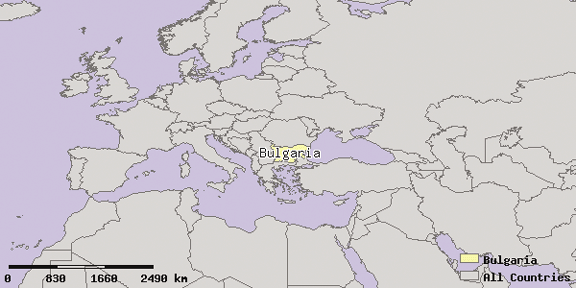 the user to go back in the web browser. This actually works reasonably intuitively because web page users are used to going back to previous pages. If you've made it this far with your application, MapServer is set up and running well. Of course there are many other options and settings you can use. Some of these are covered in the next section when you start to make further customizations to the global map example. |

| < Day Day Up > |
EAN: 2147483647
Pages: 138
- Challenging the Unpredictable: Changeable Order Management Systems
- ERP System Acquisition: A Process Model and Results From an Austrian Survey
- The Effects of an Enterprise Resource Planning System (ERP) Implementation on Job Characteristics – A Study using the Hackman and Oldham Job Characteristics Model
- Relevance and Micro-Relevance for the Professional as Determinants of IT-Diffusion and IT-Use in Healthcare
- Development of Interactive Web Sites to Enhance Police/Community Relations