| As you learned in Lesson 3, the Site Map displays a visual representation of a selected portion of your site. As you view pages in the site map and move the pointer over the pages, you'll see information about each page in the status area (the bottom bar) of the Files panel. 1. | In the local Files panel, use the Show menu to switch back to the Yoga Sangha site. Select the index.html file that is located inside the Lesson_14_Sites folder. Click the Options menu on the Files panel (Macintosh only). Choose Site > Set As Home Page.
Because many of the Lesson folders contain a copy of the entire site for the purposes of working through the lessons in this book, you'll need to reset the home page to the index.html file that is within this lesson's folder to see the site map.
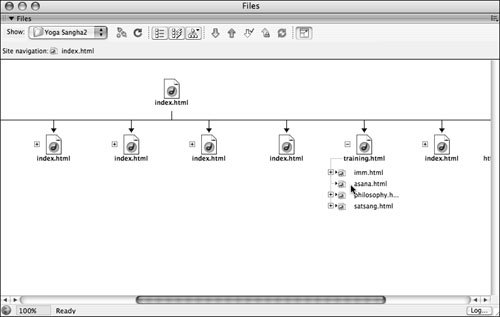
| | | 2. | Switch to the Map Only view. Click the plus (+) symbol next to the file training.html. Place the pointer over the filename asana.html in the list below the training.html file.
As you learned in Lesson 3, the Site Map view uses a visual method to show you the files that the home page connects to through links. The training.html file is located in the training folder; the subsequent files listed beneath this training.html file show all the files that the training.html file links to.
The status bar at the bottom of the Files panel shows the title and size of the document as well as the date it was created. Make sure that you roll over the filename, not the file icon. The information doesn't appear in the status bar unless the pointer hovers over the name of the file. You can see by the information that appears on the status bar that the asana.html document is untitled.
 If you forgot to title a page or want to change a title, you can do so in the Files panel. If you forgot to title a page or want to change a title, you can do so in the Files panel.
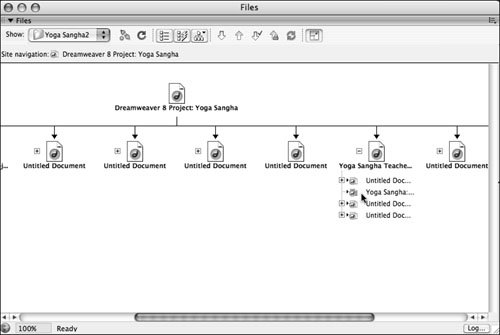
| 3. | On the Macintosh click the Options menu; or in Windows use the menu in the Files window. Choose View > Site Map Options > Show Page Titles to see page titles instead of filenames in the site map.
The site map is regenerated to display the files by title.
| 4. | Locate the second page titled Untitled Document in the expanded list, which is the asana.html file that you looked at in Step 2. Click the title once to select it. Pause and then click the title again.
A rectangle is placed around the title to indicate that it can be edited. Don't double-click; you don't want to open the file. You just need to select the title so you can edit it.
| 5. | Type Yoga Sangha: In-Depth Asana Training & Practice as the new title and press Return (Macintosh) or Enter (Windows).
The site map shows the new title.
 Tip You can open a page for editing from the Files panel by double-clicking the file in either the Site Map pane or the Local Folder pane. | 6. | Click the Options menu (Macintosh only); or use the menu in the File window (Windows). Choose View > Site Map Options > Show Page Titles to switch the view from titles back to filenames.
The checkmark next to the Show Page Titles option in the View > Site Map Options menu will be removed and the files switch back to displaying their filenames.
| | | 7. | Click the Site Files button on the Files panel toolbar to switch to the list of files. Open the Training folder and select the imm.html file.
Note You might want to shrink the left pane (the remote view area) by dragging the bar between the two panes to the left. This procedure will give you more room to work with in the Local Files pane, making it easier to see the files. When you need to change the name of one of your files, you should change the name in the Dreamweaver Files panel to preserve the link information maintained by Dreamweaver. If you change the filename outside Dreamweaverfor an HTML file, a graphics file, or any other fileDreamweaver has no way to track your changes. By making the change within the Files panel, you give Dreamweaver the opportunity to update all pages that link to the file or contain the graphic.
| 8. | With imm.html selected, click the filename to make it editable. Change the filename to immersion.html and press Return (Macintosh) or Enter (Windows).
The imm.html filename becomes highlighted at the first click, and a rectangle appears around the filename, indicating that it can be edited at the second click.
The Update Files dialog box opens, listing all the files affected by this name change.
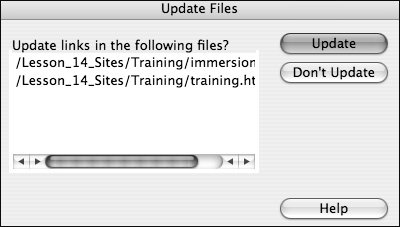 | 9. | Click Update to update the files with the new filename.
The files list now shows the new filename.
Note Dreamweaver makes the filename change within each file in the list that references the changed file. If a file in the list is open, Dreamweaver makes the change, but does not save or close the file. You must manually save the changes to any open files that have been changed by choosing File > Save. | | | 10. | In Files panel, open the ysImages folder in Lesson_14_Sites.
Note Only one image, darcy.jpg, is in the folder. If a file or folder is not in its proper place, you can move the file or folder to its correct location. Making this change in the Files panel ensures that all the link information remains correct and intact. | 11. | Drag the darcy.jpg image's icon to the Images folder in Lesson_14_Sites further up in the list, near the explorations folder.
Any files that use this image will be affected by the move; you need to fix the path to the image. The Update Files dialog box opens, asking whether affected files should be updated.
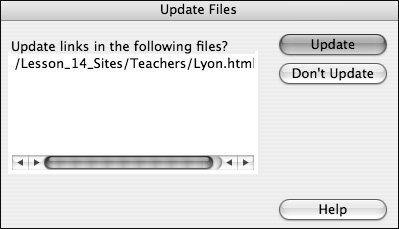 | 12. | Click Update to keep the link to this graphic correct.
|
The graphic moves to the Images folder. Any references to it in the HTML files are still working. If you were to move the file while working outside of Dreamweaver, the paths would not update, and this image would appear to be broken. This means that when displayed in the Document window or browser, a generic image icon would appear in its place, indicating that the file could not be found at the location specified in the HTML. Note Dreamweaver allows you to customize the Files panel by reordering, showing, hiding, or adding columns. To make changes to the columns in the Files panel, choose Site > Manage Sites to open the Site Definition dialog box and then select the File View Columns list. You can use the up or down arrow buttons to change the order of the columns. The Options Show checkbox controls which columns are displayed in the Files panel. You can also add or delete columns, and associate them with Design Notes. You will learn more about Design Notes later in this lesson. The rest of the book assumes that you are using the default arrangement of columns in the Files panel and have made no changes. You can use the scroll bar at the bottom of the Local Files pane to see all the columns.
|