| After you have created the content document pages, you need to link the navigation elements to those pages that should display in the content area of your Web page. To get the content to appear in its proper location, you need to target the link to the desired frame. | | 1. | Place the insertion point in the text link Introduction in the moreContent frame (the right frame). In the Property inspector, replace the null link (#) by clicking the Browse for File icon next to the Link text box. Select the community_intro.html page in the same directory. Press Return (Macintosh) or Enter (Windows) to apply the link. Select content from the Target menu while the link is still selected.
By default, links are targeted to the frame or window in which they are located; however, these links should open their corresponding documents in the content frame, not the moreContent frame.
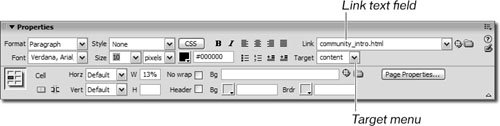 Each time you create a new frame, the name of that frame is automatically added to the Target menu. Clear, concise, and descriptive names serve you best. Although Dreamweaver's default frame names give you an idea of the frame location, those generic names can still be difficult and confusing to sort out when you try to make a document open in a certain frame. Each time you create a new frame, the name of that frame is automatically added to the Target menu. Clear, concise, and descriptive names serve you best. Although Dreamweaver's default frame names give you an idea of the frame location, those generic names can still be difficult and confusing to sort out when you try to make a document open in a certain frame.
Note If you are working on a document that will be loaded in a frame and you are not working on it inside the frameset, as you are in this lesson, you don't have the option in the Target menu to select the names of any frames. Dreamweaver displays only the names of frames that are available in the current document in the target menu. In these cases, you need to type the exact name of the frame in which you want the page to open into the target text field. | 2. | Repeat step 1 to link the text About to AboutGreen.html and the text Begin to BeginningGreen.html. Each of these links should be targeted to the content frame.
There are other options available in the Target menu:
_blank loads the linked document in a new, unnamed browser window. _parent loads the linked document in the parent frameset of the frame that contains the link. If the frame containing the link is not nested, the linked document loads into the full browser window. _self loads the linked document in the same frame or window as the link. This target is implied, so you usually don't have to specify it. _top loads the linked document in the full browser window, thereby removing all frames.
| | | 3. | Save the file and preview it in the browser.
|
When previewing your frames pages in the browser, you might get a dialog box informing you that all the frames need to be saved. Click OK to save all frames and the frameset. When you click the About link, the AboutGreen.html document displays in the content frame. Tip If your pages don't appear in the frames you expect them to, check to see that you have selected the correct frame from the Target drop-down menu in the Property inspector for each link. The links should open all the pages in the content frameif not, you need to correct the target using the Target menu for any links that do not open in that frame.
|