| You can use the Property inspector to specify the size of your frames or you can simply drag the borders in the Document window to perform the same task. In addition to specifying a size in the Property inspector, you can also determine how browsers allocate space to frames when there is not enough room to display all frames at full size. | | 1. | In the Document window, verify that the nested frameset is selected by positioning the pointer over the horizontal border between the top and bottom frames. When the pointer changes to a double arrow, click the border once to select the frameset.
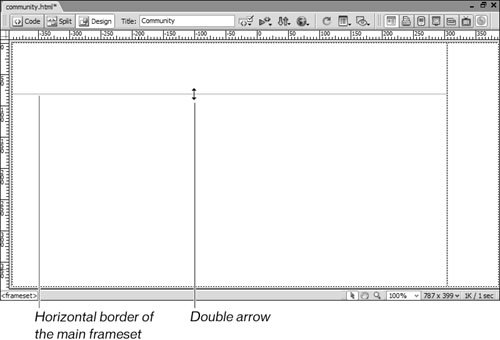 The nested frameset is selected, and the Property inspector shows the frameset properties. The Property inspector changes depending on whether you selected a frameset or a frame. To change the size of the frames, you need to make sure that you selected the frameset. The nested frameset is selected, and the Property inspector shows the frameset properties. The Property inspector changes depending on whether you selected a frameset or a frame. To change the size of the frames, you need to make sure that you selected the frameset.
 Tip Click the expander arrow in the Property inspector to view all Frameset properties if they are not already visible. | | | 2. | Drag the border between the top and bottom frames until the top frame is 112 pixels high.
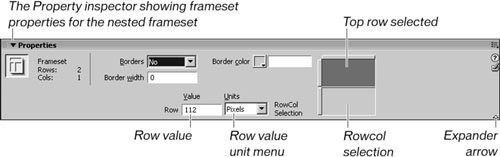
Use the Row Value in the Property inspector to check the height or type 112 in the Row Value text field when the top row is selected in the RowCol Selection area to get the exact height. Make sure that Pixels is selected from the Units menu. The top row in the RowCol Selection should be dark to indicate that it is active.
 | 3. | With the frameset still selected, click the bottom row in the RowCol Selection area in the Property inspector to select the bottom row within the nested frameset. Next to the Row Value text field, verify that Relative is selected from the Units menu.
When you use the RowCol Selection in the Property inspector to select a row or column, you are selecting that row or column within the frameset, which enables you to modify the properties of the frameset as they apply to that specific row or column. You are not selecting an individual frame.
Setting the value unit of the bottom row to Relative allows the bottom row to expand or contract depending on how large the user's browser is and how much space is left after the top row is allocated the 112 pixels that you assigned to it. By default, Dreamweaver automatically places a 1 in the Row Value text field of rows that are defined as Relative.
Note If you view the HTML code for the frameset size, you see frameset rows="112,*". The 1 in the Row Value text field, in conjunction with the Relative unit chosen from the menu, is the same as the asterisk (*) in the code; it represents a size that is relative or proportional to the other rows in the frameset. | | | 4. | In the Frames panel, click the entire frameset to select it. In the visual representation of the frame in the Property inspector, click the left column in the RowCol Selection area to select the left nested frames column.
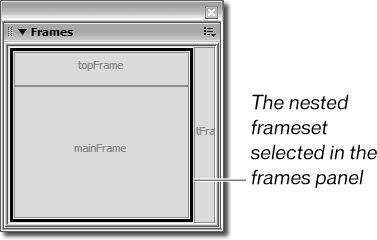
In your document, the outer frameset is made up of columns, whereas the nested frameset is composed of rows.
The left column in the Property inspector darkens to indicate it has been selected.
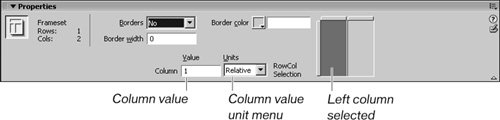 | 5. | In the Column Value text field of the Property inspector, type 484 and press Return (Macintosh) or Enter (Windows). Verify that Pixels is selected from the Units menu.
The left column's width is adjusted to 484 pixels.
When you are deciding how to resize the column, keep these units of measurement in mind:
- Pixels: This option sets the absolute size of the selected column or row to the number of pixels that you enter. It is the best option for any frame that needs to have a set size. If other columns or rows are defined by a different unit, those other columns or rows are allocated space only after rows or columns specified in pixels are their full size.
- Percent: This option specifies a percentage that the current column or row should take up in its frameset. Columns or rows specified with units set to Percent are allocated space after columns or rows with units set to Pixels and before columns or rows with units set to Relative.
- Relative: This option specifies that the current column or row is allocated space using the current proportions relative to the other columns and rows. Columns or rows with units set to Relative are allocated space after columns or rows with units set to Pixels and Percent, but they take up all remaining space. If you set the bottom or the right frame to Relative, the frame size changes to fill the remaining width or height of the browser window.
| 6. | In the Property inspector, click the right column in the RowCol Selection area to select the right column of the frameset. Next to the Column Value text field, verify that Relative is selected from the Units menu.
This procedure enables the right column to expand or contract, depending on how large the user's browser is and how much space remains after the left column is allocated the 484 pixels assigned to it.
| | | 7. | Save the frameset by choosing File > Save Frameset.
|
If this command is not available, first select the outer frameset by clicking the border between the top and bottom frames. Tip If you have the frameset selected, Cmd+S (Macintosh) or Ctrl+S (Windows) saves the frameset only.
Leave the community.html file open to use in the next exercise. |