| The first step of creating a Websitebefore you begin to create any individual pagesis to designate or create the folder on your computer that will contain everything within your site. This process is called defining a local site. The designated folder, known as the local root folder, sets the boundaries of the local site that resides on your hard disk and mirrors the remote site, which is the actual site on the Web server that your visitors will access. Defining a local site enables you to maintain the same folder hierarchy between the local and remote versions, which is crucial to creating and maintaining a functional site. The creation of a local site, composed of the local root folder within which you set up the structure of the site's files and folders, prevents your site from storing any site files outside of the local root folder. The files on your hard disk that are outside of the local root folder cannot be transferred to the remote server. This restriction ensures that as you develop your site, you won't access files that aren't available when the site is made available online. Many Dreamweaver features, such as the potential to update all references to a file that may have been moved to a different location in the site, require the definition of a local site to fully function. You should make a practice of always creating and working within local sites. If you don't, you might have problems with links, paths, and file management (Dreamweaver's tools for these features are covered in later lessons of this book). The development of your site occurs in the local site on your hard disk, in which you build and initially test your pages. Note Setting up a site is not required, although it is recommended. Dreamweaver will allow you to quickly edit, connect, and transfer files without setting up a site. You'll learn more about managing your site in Lesson 14.
| | 1. | Copy the DW8_YogaSangha folder from the CD-ROM to your hard disk.
The DW8_YogaSangha folder will become the local root folder of your site. This folder contains all the files and folders for the Yoga Sangha project site that you will re-create portions of as you work through the lessons in this book. When you begin work on your own sites, you will need to create an individual local root folder for each site.
The name of a local root folder can be the name of the respective site or any name you choose. If you develop multiple sites, it is helpful to use names that are descriptive and can be distinguished easily from one another. The name of the local root folder is simply for file management purposes and is not visible to the visitors of the site.
Save your local root folder in a location on your hard disk that is outside the Dreamweaver 8 application folder. If you ever need to reinstall Dreamweaver, your work will be lost if it is located inside the Dreamweaver 8 application folder.
Tip Suggestions for common locations to store local root folders: Macintosh: Macintosh HD/User Name/Sites/local root folder Windows: MyDocuments\local root folder | 2. | On the Dreamweaver Start page, select Dreamweaver Site from the Create New section.
Tip You can also create a new site by choosing Site > New Site or Site > Manage Sites, clicking the New button, and selecting Site from the pop-up menu. The Site Definition dialog box appears. The Site Definition dialog box opens with two tabs: Basic and Advanced. These tabs allow you to choose how you will go through the process of defining a site. The Basic version, which is shown by default when you open the dialog box, walks you step-by-step through the process. The Advanced version gives you a number of additional options and settings to configure, and it does not include the explanatory text descriptions available in Basic view.
For this exercise, click the Basic tab if it is not already selected.
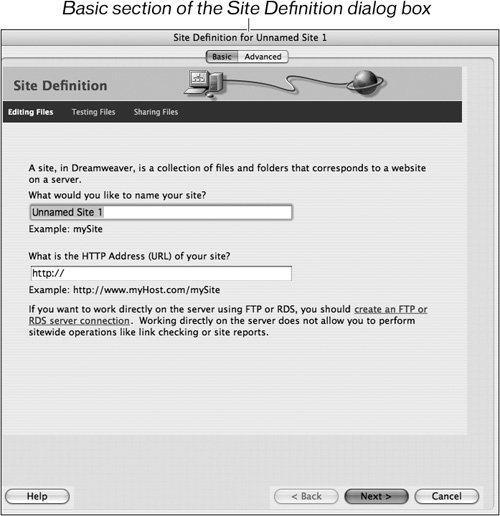 | | | 3. | In the Basic tab of the Site Definition dialog box, Dreamweaver poses the question, "What would you like to name your site?" Type Yoga Sangha in the Site name text field and then click Next.
Yoga Sangha is the name of the project site you are creating. When you create your own sites, the names that you assign should let you easily identify them. Clear and specific site names allow you to immediately distinguish sites by name, making it easier to manage multiple sites. Like the local root folder, the site name is for your reference only in Dreamweaver's list of defined sites and is not visible to users of your site.
You should leave the HTTP Address text field on this screen blank. The HTTP Addressthe URL of the online siteis used to define site-root relative links, which are covered in Lesson 3. This item is optional and not necessary for the exercises in this book.
Note This section of the Basic site setup corresponds to the Site name text field of the Local Info category in the Advanced view. Throughout the course of defining your site, you can switch back and forth between the Basic and Advanced views if you want to see how the Advanced view appears. You'll work with the Advanced view in Lesson 14. | | | 4. | Dreamweaver asks, "Do you want to work with a server technology such as ColdFusion, ASP.NET, ASP, JSP, or PHP?" Click the radio button for the option "No, I do not want to use a server technology." Click Next to advance to the next section.
At this time you are not creating pages that will incorporate databases or other server technologies, so you should select the No option. You can always add this functionality at a later pointany time you need to make changes to your site setup, you can choose Site > Manage Sites, select your site in the list, and click the Edit button.
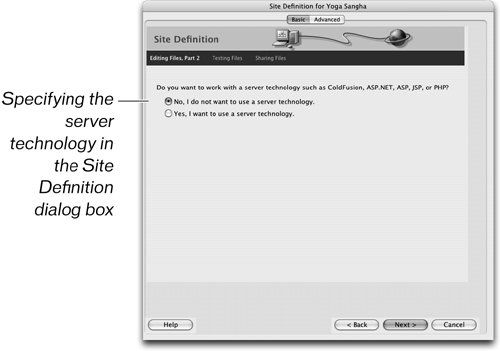 Note This section of the Basic setup corresponds to the Testing Server category in the Advanced View, which gives you additional options that are involved with creating dynamic sites, such as choosing the server model that is used on your remote server. | 5. | At the top of this section, Dreamweaver asks, "How do you want to work with your files during development?" Click the option "Edit local copies on my machine, then upload to server when ready (recommended)."
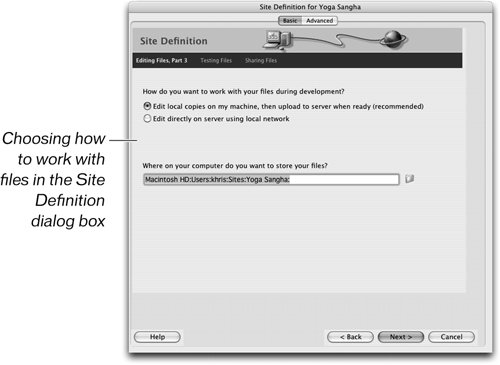 At this time, you will be working with files that are located on your machineyou don't need to have access to a remote server. Editing files that exist on your computer is the most common selection. If you have a remote server, this option means that there are two copies of the filesone copy on your local hard drive and a second copy on your server. This gives you the option to retrieve the original files from the server if necessaryprovided that you haven't replaced them by uploading files that were changed locally. Doing production and testing work on your local hard drive prevents unfinished pages from being publicly displayed. At this time, you will be working with files that are located on your machineyou don't need to have access to a remote server. Editing files that exist on your computer is the most common selection. If you have a remote server, this option means that there are two copies of the filesone copy on your local hard drive and a second copy on your server. This gives you the option to retrieve the original files from the server if necessaryprovided that you haven't replaced them by uploading files that were changed locally. Doing production and testing work on your local hard drive prevents unfinished pages from being publicly displayed.
If you were working directly on a server, any changes you might make would be immediately applied to the original files.
| | | 6. | Also in this section, Dreamweaver asks, "Where on your computer do you want to store your files?" Click the folder icon to the right of the text field and browse to find the DW8_YogaSangha folder.
This text field allows you to select the folder on your hard disk within which all the files for the site are stored. This folder is the equivalent of the root folder on the remote site. Dreamweaver needs to define this local root folder to determine the paths for documents, images, and links in your site. You will learn about paths and links in Lesson 3.
The DW8_YogaSangha folder is the folder that you copied from the CD-ROM to your hard disk in Step 1 of this exercise. By default, the text field initially contained the path to a folder called Yoga Sangha. Using that default would create a new folder on your hard disk called Yoga Sangha, which would become your local root folder. Because you need to use the DW8_YogaSangha folder that contains the files, you must locate that folder.
Macintosh Users: Find the DW8_YogaSangha folder on your hard disk, select it, and click Choose.
Windows Users: Find the DW8_YogaSangha folder on your hard disk, select it, and click Open; then click Select to choose the DW8_YogaSangha folder as your local root folder. The text "Select:DW8_YogaSangha" appears in the lower-left corner of the Choose Local Root Folder For Site Yoga Sangha dialog box to indicate that the DW8_YogaSangha folder will be selected.
Tip Be sure to select the DW8_YogaSangha folder that you copied to your hard disknot the one residing on the CD-ROM. In some versions of Windows, files copied from a CD are marked read-only; to fix this, select all of the files (Ctrl-A), after copying them, go to Properties (Alt-Enter or right-click on the selected files and click Properties), and uncheck the Read-Only checkbox. Then click Apply, or OK. 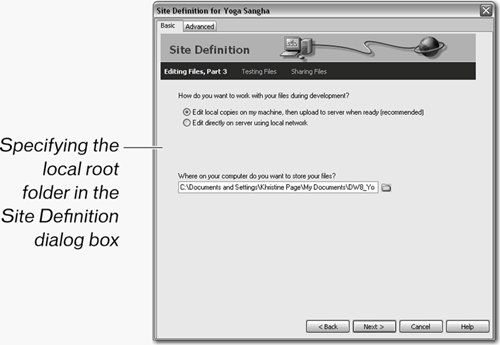 The path to the local root folder, DW8_YogaSangha, is now displayed in the text field and its location is shown in relation to your hard disk. The path to the local root folder, DW8_YogaSangha, is now displayed in the text field and its location is shown in relation to your hard disk.
In this case, however, you need to choose the DW8_YogaSangha folder that already exists (and contains the many files that you need to work with in this book's lessons) as your local root folder.
When you create your own sites, if you do not already have a folder, you might find it useful to allow Dreamweaver to automatically create one for you based on the name you chose for your site.
Understanding the Advanced Site Definition Options This section of the Basic site setupin which you are specifying the local root foldercorresponds to the Local root folder text field of the Local Info category in the Advanced view. The Advanced site definition options also allow you to select Refresh Local File List automatically, Enable Cache, specify a Default Images folder, and define the HTTP Address for the site. The Refresh Local File List option is checked by default, causing Dreamweaver to update the site list whenever you add a new file to the site folder. If you uncheck this option, you need to refresh the local files manually whenever you make changes such as adding or deleting files. The Enable Cache option is checked by default. Enabling the cache allocates memory to store frequently used site data, improving the speed of linking and site-management tasks. The site cache stores information in your computer's RAM memory making access to features that use the cache quicker. When this option is active, Dreamweaver will continuously update the information stored in the cache as you work. Although it is usually best to leave the cache option on, keep in mind that re-creating the cache can slow operations on extremely large sites. The Default Images folder allows you to specify the location of images in your site and can reduce the amount of time that it takes to browse for images when inserting them. The use of images is covered in Lesson 5. The HTTP address, another optional feature, is used to define the URL of your Website. This address is used to verify absolute links. More information on links is covered in Lesson 3. |
| | | 7. | Click Next to advance to the next section. Below the question "How do you connect to your remote server?" choose None from the menu.
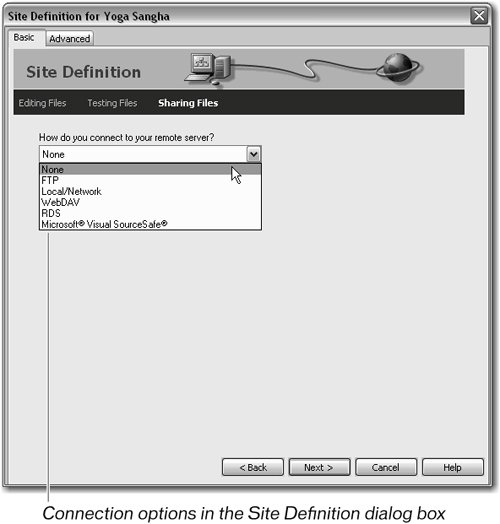 At this time, you are working on a local site; you do not need access to a remote server. More information about connecting to a remote server can be found in Lesson 14. At this time, you are working on a local site; you do not need access to a remote server. More information about connecting to a remote server can be found in Lesson 14.
Note This section of the Basic setup corresponds to the Remote Info category in the Advanced view, which gives you additional options that are involved in transferring files to a remote server, such as specifying the folder to store files in on the server. | | | 8. | Click Next to advance to the next section. Review the information about the site you just defined and then click the Done button at the bottom of the dialog box.
|
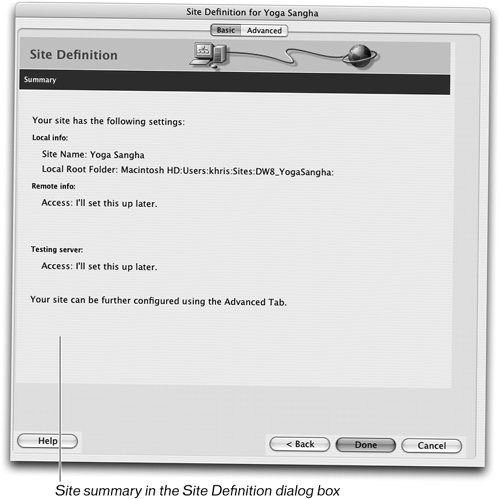 Because you chose the No options for the Remote Info and Testing Server sections, Dreamweaver displays "Access: I'll set this up later." for both. When you click Done, Dreamweaver scans the files in the DW8_YogaSangha folder to create the site cache. You may see a dialog box appear briefly as Dreamweaver completes the process of creating the cache for the first time. Creating the cache will take longer on very large sites. The Files panel now displays the DW8_YogaSangha folder. By default, the Files panel is displayed at the bottom of the panel groups that you'll explore later in this lesson. You'll also learn more about the Files panel in Lesson 14.  Note If you have never defined a site in Dreamweaver, the Files panel displays a hierarchy of folders on your computer and a link to open the Manage Sites dialog box. For Macintosh users, the default selection in the Site panel pop-up menu is Computer, which initially contains Macintosh HD, Network, FTP & RDS Servers, and Desktop folder. For Windows users, the default selection is Desktop, which initially contains My Computer, My Network Places, FTP & RDS Servers, and Desktop items. After you create a site, that site becomes the default selection. If you have more than one site, Dreamweaver displays the most recently used site in the Files panel. The Files panel is located in the Files panel group.
|