| At times, you may want to extract an image from a PDF file and use the image in another authoring program, edit the image for brightness and color balance, print images apart from the document layout, or perform a host of other tasks. As with text extractions, you start by selecting images, then you copy them and ultimately paste the images into authoring programs. Adobe Reader offers several options for copying image data, changing the resolution of copied images, and pasting image data into other applications. Selecting Images You select images with the same tool you use to select text. You can select an image in its entirety or just a particular section using the Select tool. Once an image is selected, you can copy it to the clipboard much like text is copied to the clipboard. To select images in Adobe Reader: 1. | Press Ctrl/Command+K to open the Preferences dialog. Remove the checkmark for Enable text selection for the Hand tool (Figure 8.19). Disabling the Hand tool for text selections makes it easier to scroll the document window with the Hand tool without inadvertently selecting text.
Figure 8.19. Uncheck the box for Enable text selection for the Hand tool and select Images before text in the Select Tool Options pull-down menu. 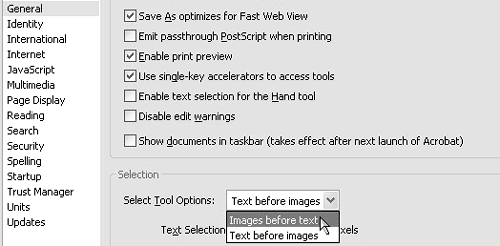
| 2. | Click the Select Tool Options pull-down menu and select Images before text.
| 3. | Click the Select tool.
| 4. | Click an image. When you click the Select tool anywhere on an image, you select the entire image.
| 5. | Move the cursor into the selected image. When the cursor moves into the image, a Select Image icon appears within the selection (Figure 8.20).
Figure 8.20. Click on an image and the entire image is selected. 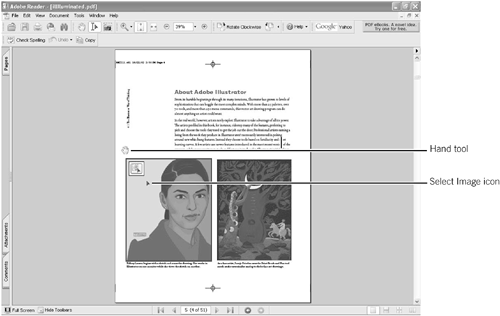
| 6. | To deselect a selected image, click the Hand tool. With the Hand tool selected, click outside the image selection. The image is deselected.
| 7. | To select a portion of an image, click and drag the Select tool in the area you want to copy as shown in Figure 8.21. Release the mouse button and the area is selected.
Figure 8.21. Click and drag the Select tool to select a portion of an image. 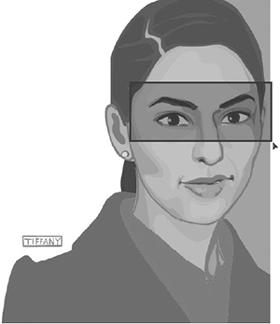
|
Why does the Select tool cursor change to a Hand icon when I try to select an image? If a PDF document contains button fields or links, the link or button action overrides the image selection. As you move the cursor over a button or link, the cursor changes shape, indicating that the link or button action will be invoked when you click the mouse button. In Figure 8.22, the cursor is positioned over a link to a URL. Figure 8.22. If you move the Select tool over a button or link, you can't select the image. 
|
Copying and Pasting Image Data You can copy any selected image or portion of an image to the clipboard. Once copied to the clipboard, you can paste the data into programs that accept the pasting of image data. If you want to edit an image after pasting it, you need to use an image editor. The two most common image editors are Adobe Photoshop CS and Adobe Photoshop Elements. To paste image data into Photoshop Elements: 1. | Select the image you want to copy. As you move the cursor to the Select Image icon, a Copy Image to Clipboard button appears (Figure 8.23). Click the button to copy the image to the clipboard. Alternatively, you can select Edit > Copy.
Figure 8.23. Click the Copy Image to Clipboard button or select Edit > Copy to copy the image data to the clipboard. 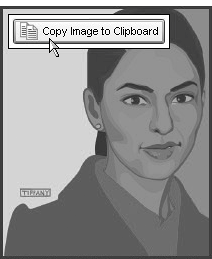
| 2. | Launch your image editor.
| 3. | Select File > New from Clipboard. Adobe Photoshop Elements creates a new file from clipboard data. In addition, if you select File > New, both Adobe Photoshop CS and Adobe Photoshop Elements open a new document that's the same size as the clipboard contents. Select Edit > Paste to paste the clipboard contents into the new document window (Figure 8.24).
Figure 8.24. Select File > Paste to paste clipboard data into a new Photoshop Elements file. 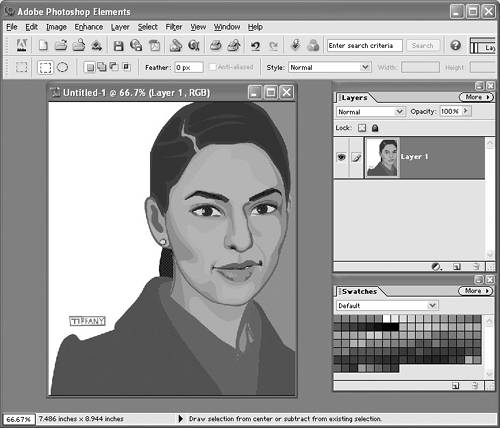
|
From Photoshop Elements you can adjust the image for color correction, edit the image using Photoshop Elements tools, and save the image in a format compatible with an authoring program you use to combine text and images. Using the Snapshot Tool The Snapshot tool enables you to marquee an area on a PDF page and copy the data within the marquee to the clipboard. If you want to copy and paste both text and images together, you can use the Snapshot tool. In addition, any image that appears beneath a link or button field can be copied to the clipboard using the Snapshot tool. To copy data to the clipboard with the Snapshot tool: 1. | Open a file in Adobe Reader.
| 2. | Click the Snapshot tool in the Adobe Reader Toolbar Well.
| 3. | Drag a marquee around the area you want to copy like the example in Figure 8.25.
Figure 8.25. Drag a marquee around the page data you want to copy to the clipboard. 
| 4. | Release the mouse button. A dialog appears and informs you that the selected area has been copied to the clipboard. Click OK.
| 5. | Paste the data into an authoring program. You can use Adobe Photoshop Elements or Adobe Photoshop CS if you want to edit the image data using the same methods described in the previous section "Copying and Pasting Image Data".
|
Why does my pasted data appear rotated? When you copy image data with the Select tool and paste the data, some image data may appear rotated. This anomaly is due to the way a PDF was originally created. Although the pages in Reader appear in the proper rotated view, the pages may have been transversed during PDF creation. In Figure 8.26 a PowerPoint file converted to PDF is pasted into a new document window in Adobe Photoshop Elements in a rotated view. Figure 8.26. Some pages may be rotated when pasted after copying with the Select tool. 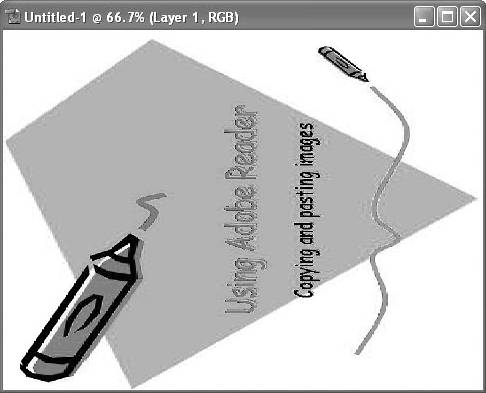
Use the Snapshot tool to overcome this problem. When you use the Snapshot tool to paste the data, the orientation and rotation appearing on a document page is exactly the same orientation and rotation you copy to the clipboard (Figure 8.27). Figure 8.27. To resolve problems with rotated images, copy the image with the Snapshot tool. 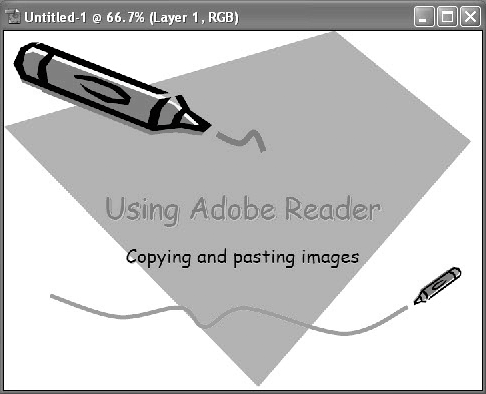
If you want to maintain the original image resolution, use the Copy File to Clipboard command. If you copy data that appears rotated when pasted into an image editor, use either the Rotate Clockwise or the Rotate Counterclockwise tool to first rotate the page, then use Edit > Copy File to Clipboard. |
Adjusting Resolution for Copied Images Image resolution is always an important consideration when copying and pasting data and when viewing images on screen or on printed pages. Screen resolutions are optimal at 72 pixels per inch (ppi) at 100% size. If you zoom in to a 72-ppi image, you quickly see image degradation. If you want to print documents containing images, 72 ppi is insufficient for almost every printer. You need higher resolutions in order to print images that look satisfactory. You may want to copy images or page data in Adobe Reader at higher resolutions than the standard monitor view of 72 ppi. Adobe Reader has a special setting that lets you capture data at different resolutions. To capture data at a user-definable resolution: 1. | Open the Preferences dialog by pressing Ctrl/Command+K.
| 2. | Select General in the left pane. In the Selection pane, check the Use fixed resolution for snapshots box (Figure 8.28).
Figure 8.28. Check the box for Use fixed resolution for snapshots. 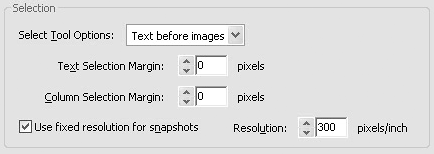
| 3. | Change the number in the Resolution box. Type a numberlike 300that might be used for printing images at better quality.
NOTE Adobe Reader cannot improve resolution from the original image resolution used when the PDF was created. Following these steps presumes the original resolution of the image data you copied was 300 ppi or more. If the original image resolution was 72 ppi, changing the fixed resolution from snapshots to a higher resolution won't improve the image quality. | 4. | Select the Snapshot tool and drag a rectangle around the area you want to copy to the clipboard.
| 5. | Open an image editor like Adobe Photoshop Elements and select File > New from Clipboard.
| 6. | The clipboard contents appear in a new document window (Figure 8.29).
Figure 8.29. Create a new document and paste the clipboard contents created from the snapshot into a new document window. 
| 7. | Return to Adobe Reader and set the image resolution to 72 ppi as described in steps 2 and 3.
| 8. | Create a new snapshot and paste the data into an image editor as described in steps 4 and 5. Zoom in on the image to roughly the same view as the first image created from the clipboard and compare the results with the snapshot taken at 300 ppi. In Figure 8.30 the data were copied at 72 ppi and pasted into a new Adobe Photoshop Elements document.
Figure 8.30. Compare the 72-ppi snapshot with the 300-ppi snapshot. 
|
Notice that the image quality appears much better in the higher-resolution snapshot image when you zoom in on the image. Why don't I just resize my image in an image editor? You can use image editors to change image resolution. Performing this task is known as resampling images. When you resample an image by adding more resolution, programs like Photoshop Elements and Photoshop CS quickly show image degradation in the resultant image. In Figure 8.31 the snapshot taken at 72 ppi was resampled at 300 ppi. The results show no improvement in image quality over the original 72 ppi image. Figure 8.31. Resampling an image in an image editor provides no improvement in image quality. 
For the best results when copying image data from Adobe Reader, set the image resolution in the General preferences for the desired quality and use the Snapshot tool to capture the image. Be aware that you take snapshots at higher resolutions only when the images were originally created with resolutions higher than 72 ppi. |
|