| At a high level, Studio's workflow for panning and zooming within an image has two simple steps. First you pick a starting position for the pan and zoom effect, then you choose the end position. When rendering the effect, Studio builds a movie from the starting point of the image to the ending point. This start-to-finish approach works well with some pictures, but sometimes you'll want to make more complicated passes through an image. For example, in the image shown in Figure 5.29, shot outside of historic Dollywood, I want to move to three different locations within the image, from daughter to mother to daughter. Figure 5.29. Now let's pan and zoom around this image; daughter to mother to daughter. 
To facilitate this, Pinnacle added a button called Match Previous Clip to Studio to simplify multi-point panning within an image. This section demonstrates both single-point and multiple-point pan and zoom effects. To insert a pan and zoom effect 1. | Start with the Movie window in Timeline view and the Album window open to the Still Images tab.
| 2. | Drag the image into the Timeline.
| 3. | Double-click the image.
Studio opens the Clip Properties tool (Figure 5.29).
| 4. | Click the Animate from Start to End checkbox.
The Set Start button is automatically selected.
| 5. | Do one or both of the following to set the start position:
- Use the Zoom slider to zoom into or away from the image.
- Click and drag the image to the desired position (Figure 5.30).
Figure 5.30. The zoom slider sets magnification levels, and you grab the image in the window to move it to the desired position. 
| 6. | Click the Set End checkbox (Figure 5.31).
Figure 5.31. Select the Set end radio button, then use the pan and zoom controls to move to the end position. 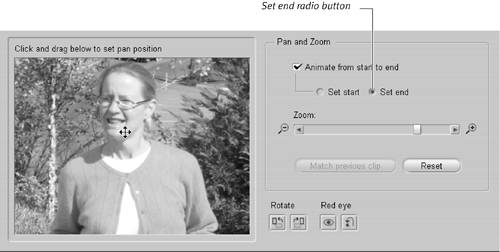
Studio resets the image to its original position.
| 7. | Do one or both of the following to set the end position:
- Use the Zoom slider to zoom into or away from the image.
- Click and drag the image to the desired position.
|
 Tip Tip
At this point, if you exit the Clip Properties window by clicking X in the upper-right corner or closing the Video Toolbox, the pan and zoom effect is set. But I've only zoomed into two of the three faces in the picture. To zoom seamlessly into a third image, see below.
To insert multi-point pan and zoom effects 1. | After inserting the first point of the multi-point pan and zoom effect, click the Open/Close Video Toolbox icon (Figure 5.4) to close the Video Toolbox.
Studio returns to the Album window open to the Still Images tab.
| 2. | Drag the same image to the Timeline (Figure 5.32).
Figure 5.32. To get to the second daughter, you have to drag the same video to the Timeline. 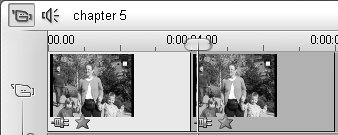
| 3. | Double-click the image.
Studio opens the Clip Properties tool (Figure 5.33).
Figure 5.33. Click the Match Previous Clip button and Studio aligns the starting point of the second clip to the ending point of the first clip. 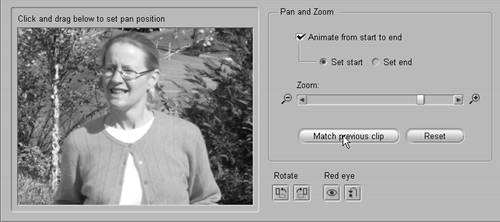
| 4. | Click the Animate from Start to End checkbox.
The Set Start button is automatically selected.
| 5. | Click the Match Previous Clip button.
Studio matches the Set Start pan and zoom location to the end point of the previous image.
| 6. | Click the Set End checkbox.
| 7. | Do one or both of the following to set the end position:
- Use the Zoom slider to zoom into or away from the image.
- Click and drag the image to the desired position (Figure 5.34).
Figure 5.34. Then pan and zoom over to the second daughter. 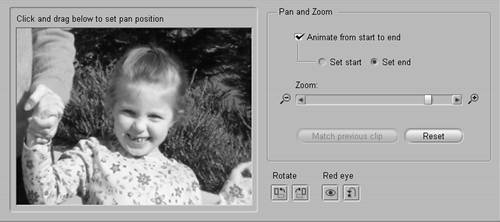
|
Tip
|