| Changing the playback speed of your clips is useful in a variety of circumstances, whether it's to showcase a child's look of delight or slow your golf swing to better reveal its flaws. It's also great for a fun, Chaplin-esque sped-up effect, which I use quite often in my home videos. If you're an experienced Studio user, you'll like how Pinnacle upgraded this feature for Studio 10. First, there are more options for achieving the optimal appearance of the adjusted video, discussed in the sidebar "Speed with style." Second, you can now make your video play in reverse. Finally, Studio no longer mutes the audio with all speed adjustments; it slows or speeds the audio with the video. If you like how it sounds, keep it; otherwise you can mute or delete the audio manually (see Chapter 11, "Working with Audio," for details). About Noise Reduction Filters Noise reduction filters work by attempting to distinguish between real motion that occurs from frame to frame, like a hand waving or lips speaking, and noise, which is random graininess and other artifacts (video defects) caused by a number of factors, including shooting under poor lighting conditions or using poor equipment. The slider bar shown in Figure 9.36 sets the threshold between noise and real motion. The farther you move the slider to the right (higher value) the more motion Studio assumes is noise. This increases the filtering, enhancing noise removal, but also potentially producing artifacts caused by the elimination of real motion. Move the slider to the left (lower value), and Studio uses a lower threshold, assumes that more motion is real motion, and removes less noise, reducing the cleansing effect. Noise reduction can work wonders when you're working with very poor quality video (see the sidebar "Video Rescue 101"), but it must be used judiciously because higher thresholds can and do produce artifacts. This means that you should render in the background to get the best possible preview before selecting your final settings. |
To change playback speed 1. | Place the target clip on the Timeline and select the clip.
| 2. | At the upper left of the Movie window, click the Open/Close Video Toolbox icon (Figure 9.3).
| 3. | On the left side of the Video toolbox, click the Add an Effect to a Video Clip icon (Figure 9.4).
| 4. | Select the Studio Plus RTFX category (Figure 9.40).
Figure 9.40. Using the Speed controls to slow down my chip shot so that I can visualize my errors. 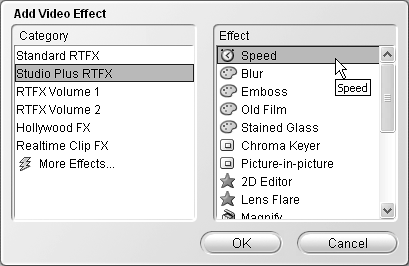
| 5. | Select the Speed effect.
| 6. | Click OK.
Studio opens the Speed settings window (Figure 9.41).
Figure 9.41. The Speed settings window. 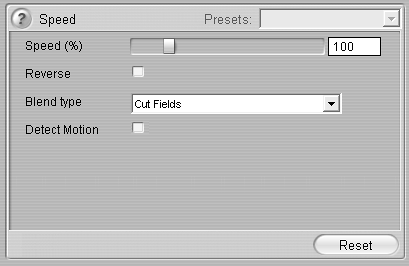
| 7. | To adjust video speed, drag the Speed (%) slider to the desired speed.
Dragging the speed to the left (below 100%), slows the video and increases its length on the timeline.
Dragging the video to the right (above 100%) speeds the video and decreases its length on the timeline.
| 8. | If desired, click the Reverse checkbox to make your video play in reverse.
| 9. | Choose the desired blend type (Figure 9.42). See the sidebar "Speed With Style" for details.
Figure 9.42. Here are your interpolation options when you slow video down. 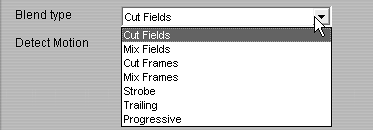
| 10. | When slowing down the video, click Detect Motion.
This will force Studio to create "tweener" frames to smooth the appearance of the video. This option has no effect when increasing video playback speed, so there is no harm in leaving it checked at all times.
| 11. | When you're finished, do one of the following:
- Click the X in the upper-right corner to close the Special Effects window.
- Click the Add New Effect button to select and configure another special effect.
|
Speed with Style Studio now offers multiple blending options to produce the highest-quality image, primarily when slowing video playback down. That's because when you slow video down, Studio has to "make up" frames to create the motion. For example, when slowing speed down to 25%, Studio has to create three new frames between each original frame. Studio makes multiple interpolative techniques available to ensure the highest-quality result. Here are the definitions from the Pinnacle Edition help files (the Studio help files weren't quite finished when I wrote this book): Mix Fields (for video): Motion is played back more smoothly but is not as sharply focused. In most cases, this is the best choice. Cut Fields (for video): Provides a sharper focus but motion can be slightly jerky. Mix Frames (for film): Provides smooth motion but is less focused. Cut Frames (film): Provides sharp focus but motion is often jerky. Strobe Effect: The Strobe effect is best used for motifs with a great deal of motion. Strobe plays a configurable number of identical frames in succession before repeating the same number of the next frame (omitting those in between). For example: Instead of the standard frame sequence 1-2-3-4-5-6-7 etc., 2-frame-Strobe plays back the sequence: 1-1-3-3-5-5-7-7 etc. Trailing: The Trailing effect makes movements and changes of motif visible by means of "trails" in the frame. Progressive: The Progressive option serves to convert interlaced material to noninterlaced material.
The net/net from the help file is that if you're working on video as opposed to film (and I assume that you are), try Mix Fields first, then Cut Fields. Mix and Cut Frames are effects primarily designed for use with film, so stay away from these. Moving down the list, Strobe Effect and Trailing are both "artistic" effects you should use when trying to achieve a certain look. The interlaced to noninterlaced conversion produced by the Progressive option is beyond the scope of this book. My experience aligns with the direction of the help files. I find that Mix Fields produces the smoothest result, so I always try that first, and then look for two types of artifacts. The first is shown in Figure 9.43, where you can see multiple faint shafts of my 60-degree wedge. This isn't the staggering speed of my swing (hey, it's only a wedge); rather, the artifacts are produced by the interpolative technique used to create the frames, and typically appear when the moving figures have sharp detail like a golf club. The other video detritus sometimes produced by Mix Fields is a shimmering artifact that typically occurs in a highly detailed background like the brick wall over my right shoulder. Figure 9.43. Note the multiple shafts of my wedge shown in this slo-mo video produced with the Mix Fields selection. 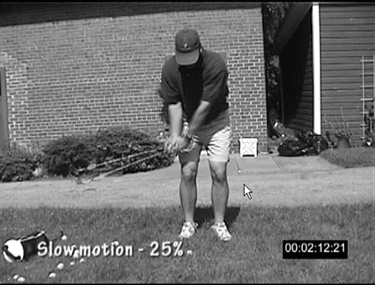
If I see either artifact, I'll use Cut Fields, which as you can see in Figure 9.44, shows only one shaft. However, this alternative produces a slightly choppier look, so I always try Mix Fields first. Figure 9.44. Much better only one shaft (still shanked the shot, though). 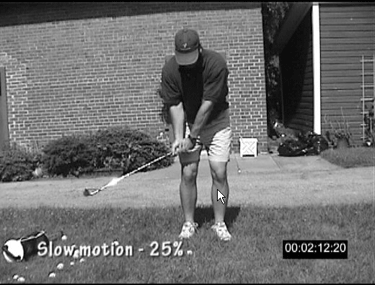
|
|