Flylib.com

Books Software


create a custom title


create a custom title

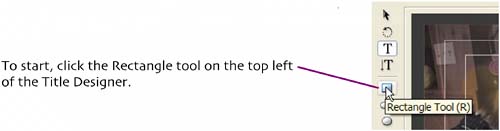
I like Premiere Elements opening title template, but prefer a different look for the titles I'll use between scenes. If you want to create your own titles too, follow along.

The initial steps are the same; move the Current Time Indicator to the target position on the timeline, then open the Title Designer. Let's take it from there.

When creating overlay titles, I usually create a translucent background box behind the text so that it's easy to read over the background video.

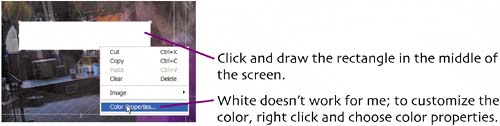
Lots of options here, but let's keep it simple. Dark gray backgrounds make text easy to read, irrespective of the video behind it.
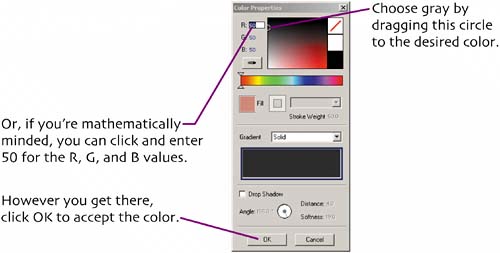

set opacity

Now make the background translucent with the opacity control.


choose a text style

Now choose a style and insert the title text. Note that I chose the same style used in the opening title template so my titles look consistent.


create closing credits

Closing credits add a nice professional touch to your movie. You know the drill by this point, move the Current Time Indicator to the desired title position, open the Title Designer, then click Title > Templates.

Here's the template I want use. You choose yours.

Click OK after making your selection.

Click OK to return to the Title Designer and then save the title as usual.


insert titles

Premiere Elements stores all saved titles in the Media window.

Then drag it to the target position.

Drag overlay titles, like this opening title, to the track above the background video or still image. Usually, this is Video 2.


common title tasks

Inserted titles have the same duration as still imageshere five seconds.

I usually insert a dissolve transition before and after all titles.

To insert a dissolve, open the effects window.

Drag it down to the edge of the title.

Repeat as necessary.

To preview your titles, see the instructions at Render Your Transitions , on page 52.


extra bits

choose a text style p. 85

  • Text styles included in title templates are also in the style library. If you use a template for some titles, and build others from scratch, you can use the same font style and maintian consistency by choosing it from the style library.


create closing credits p. 86

  • You can set the speed of the closing credits and other scrolling titles by adjusting title duration on the timeline. Making the title shorter will speed the credits up; making it longer will slow them down.


Chapter 7. using audio

Adding background music that your audience enjoys is the easiest way to help them enjoy watching your movies; worst case, if they don't like what they're seeing, their toes will be tapping.

Premiere Elements makes it easy to add background music to your projects. Then, you can either mute the audio captured with the camcorder so that your viewers can hear only the music, or mix the two tracks so the audience can hear both. In my project I'll do both.

This 11-minute project has five background music tracks (including the one inserted beneath the slide show). That's about right in my book (and this is my book).


add background music

Let's start by inserting some background music into the project. Find some music appropriate for your project and import it into the Media window as described in Chapter 2.

Release your mouse button.


trim audio clips

You trim audio clips like any other content: you simply grab an edge and drag it to the desired length.

Release the mouse at the desired location.

Premiere Elements automatically " snaps " the audio track back so that there's no gap left from the trim. If you ever get an undesired gap on the audio track, click the gap, right click and choose Ripple Delete, and Premiere Elements will delete the gap.