Inserting Video into PowerPoint:Mac
| < Day Day Up > |
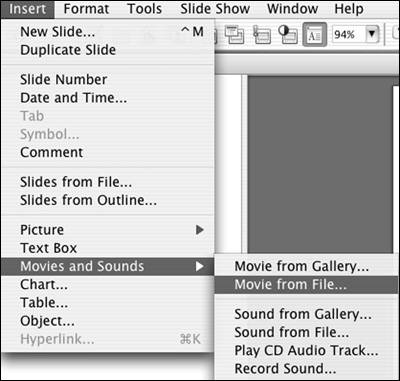
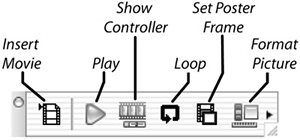
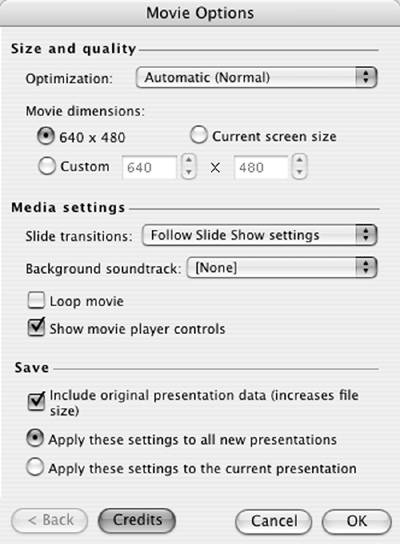
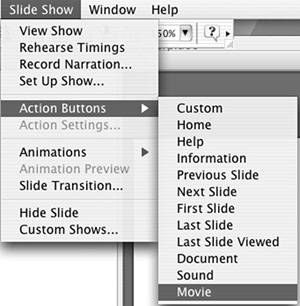
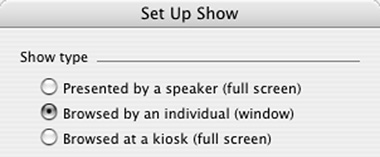
| You have two options when inserting video files into PowerPoint:Mac one easy, one hard. The easy way is to use the Insert Movies and Sounds command, which allows you to bring in QuickTime, MPEG, and AVI files, but not Windows Media Video files. The hard way is to insert a hyperlink to a Windows Media video or RealVideo file, which only works if you have RealPlayer and/or Windows Media Player for OSX installed. It's hard because unless you configure PowerPoint to run the presentation in a window, as detailed below, PowerPoint will exit the slideshow when you click the hyperlink and run either player. Interestingly, MPEG-2 is the only video format that you can play from within a window in PowerPoint for Windows, PowerPoint:Mac, and Keynote, making it the lingua franca for cross-platform presentations. Fortunately, MPEG-2 holds up quite well at higher data rates (like 4Mbps), so as long as you have the disk space on all computers, your video quality should not be affected. If you're producing videos for Macintosh use only, I recommend you encode them to QuickTime, using the Sorenson Video 3 codec. Encode at 640x480 resolution and at about 70 to 80KB/sec, which translates to around 5.6 to 6.4Mbps. Insert Movies and SoundsStart by clicking Insert > Movies and Sounds from PowerPoint:Mac's main menu (Figure 9.13). Using the Insert Movie dialog, select the target file. Figure 9.13. Inserting a movie into PowerPoint:Mac. PowerPoint will give you the option to play the video once you enter the slide (Figure 9.14); otherwise you'll have to click the video window to play it. Choose the desired option and PowerPoint inserts the video file at near full screen. Size and position the video window as you would any graph (or text object for that matter) into PowerPoint. Figure 9.14. Choose the desired option in this dialog. Now it's time to start configuring the video file. Click View > Toolbars > Movie to open the Movie Toolbar shown in Figure 9.15. Figure 9.15. PowerPoint:Mac's Movie Toolbar. You can use the Insert Movie command as the starting point to insert your next video file. Click Play to start the video playing in design mode, and Show Controller to display the player controls and slider bar located on the bottom of the video and shown in Figure 9.16. You can set a poster frame the frame that appears in the movie window before the video starts playing by dragging the controller to the target frame and clicking Set Poster Frame. These controls don't appear when you play the slideshow in PowerPoint; they're just to help you work with the file when creating the slideshow. Figure 9.16. Use the controller to select a poster frame. Clicking Loop will play the video file within the slide until you click the video window to stop playback, a nice option for kiosks and other unattended presentations. Click Format Picture to expose PowerPoint's regular formatting controls for resizing, positioning, and otherwise changing the appearance of the video frame. In the PowerPoint Preferences window, General Tab, there's a Movie Options button, which when clicked, will reveal the screen shown in Figure 9.17. Figure 9.17. PowerPoint:Mac's Movie Options. Despite making sure that the Show movie player controls checkbox was enabled, PowerPoint:Mac did not insert player controls in any of the inserted movies, whether QuickTime or MPEG-2. Instead, when playing the videos in Slide Show mode, we clicked the movie frame to start playback, and clicked it again to stop playback. Bear in mind that although it looks like the Save controls on the bottom of the screen (include original presentation data) would store the video file in the PowerPoint presentation file, it didn't in our tests. There's always a chance that our results are specific to our computer, so if you want to show the player controls with your inserted movies or store the video file with the PowerPoint presentation, give these controls a try. Insert HyperlinkPowerPoint:Mac lets you create a hyperlink from any text or image object in a slide to any external file. When you click the link in Slide Show mode, PowerPoint will run the program necessary to play the file, such as Media Player or Real Player, and load the file into the program. From there, you play the file as normal. As we've discussed already, if you run an external program while playing a PowerPoint presentation in normal Slide Show mode, PowerPoint closes the presentation. To keep the presentation open, you must switch the PowerPoint display from full screen to window mode, which changes the controls used to move through the slide show. Start by clicking Slide Show > Action Buttons > Movie (Figure 9.18). PowerPoint will convert the cursor to a plus sign you drag to create the movie icon shown on the left in Figure 9.19, and will open the Action Settings screen also shown in the figure. Figure 9.18. Inserting a Movie Action Button. Figure 9.19. Choosing the file that will play when a viewer clicks the button.In the Action Settings dialog, Click Hyperlink to: then go to the drop-down list box and choose Other File. PowerPoint opens the standard Choose a File dialog that you can use to choose the target video file. Then click OK to close the Action Settings dialog, and the hyperlink is set. Now you have to tell PowerPoint to play the presentation in a window to avoid shutting down the presentation when you play your video file. Click Slide Show > Set Up Show to open the dialog shown in Figure 9.20. Figure 9.20. Playing the presentation in a window. Click the Browsed by an individual (window) checkbox and then OK to close the dialog. Note that when you're playing a presentation in this window mode, clicking on a slide does not advance to the next slide. Instead, you have to use your right arrow key to move forwards, and the left arrow key to move backwards. When you select Slide Show mode, and click the movie button, PowerPoint:Mac attempts to run the program required to play the selected file. Before doing so, however, it will open the warning shown in Figure 9.21. Though the PowerPoint:Mac help file tells you that you can disable this message by disabling macro virus protection in the General Preferences dialog (click PowerPoint > Preferences, then the General tab), this didn't work in our tests (PowerPoint:Mac Service Release 1). Click OK, however, and the program should run with the file loaded (Figure 9.22). From there, you can use the normal controls to play the video file. |


| < Day Day Up > |
EAN: 2147483647
Pages: 110