How Do I Build My Menus?
| < Day Day Up > |
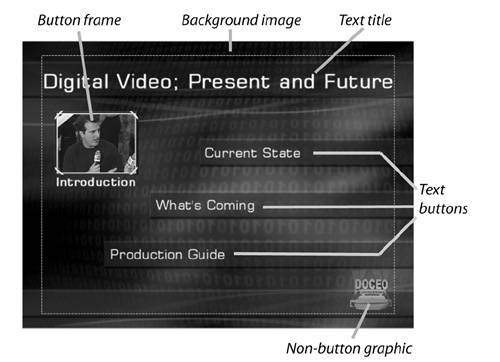
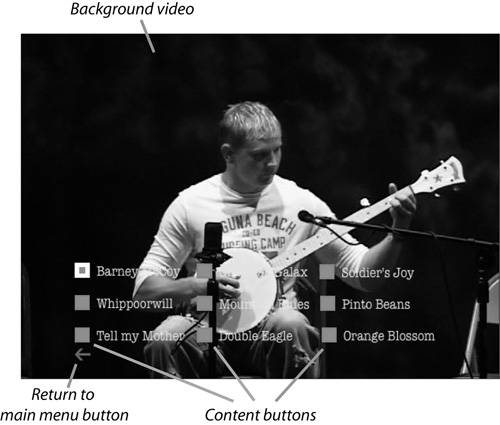
| Menus provide three basic functions. First, they provide an aesthetic introduction to the content on the disc, which is why we attempt to make our menus as attractive as possible. Second, they provide a link to the content, as in, "click this button and watch the video." Finally, menus control how the viewer navigates through the content, typically via menu-to-menu links. In terms of aesthetics, all authoring programs include menu design capabilities, but they vary dramatically in terms of the features and design flexibility. All authoring programs provide various ways to link content to menu buttons it's more of a mechanical function so there's little tangible difference between the programs. Where there is significant difference is between consumer and professional authoring programs and the amount of navigational freedom each provides. If you want to create an intuitive and efficient path to your content, you're probably going to have to go for a prosumer authoring tool, which will put you above the $100 price range. What are the Basic Design Components of a Menu?All menus share a core set of common characteristics. Let's explore these in Figures 8.1 and 8.2. Figure 8.1. A simple DVD menu. Figure 8.2. A menu with a motion video background. Figure 8.1 is a simple DVD menu with a bitmapped image as the background. Most authoring programs supply images such as the one shown to serve as a background, or you can create and insert your own. Alternatively, you can use a solid-color background or a video background such as that shown in Figure 8.2. All other menu components fall neatly into two categories: buttons, which are linked components that display content or jump to another menu when clicked; and everything else. As you can see in Figure 8.1, text can be a button linking to other menus (text buttons) or simply a title that doesn't link to anything. Graphics can also be linked to content, (see the button frame on the upper left, which plays a video file when clicked), or serve as garnish, (see the logo in the bottom right corner). All authoring programs supply text-creation and editing tools to create text titles and labels. Most also include simple drawing tools to create background boxes or circles as well as libraries of clip art you can use as buttons or additional garnish. Most authoring programs also allow you to customize the appearance of buttons in each of their three states: Normal, Selected, and Activated. For example, in Figure 8.2, the button and text "The Wreck" is in selected state, while all other buttons are in normal state. As the viewer clicks through the buttons using the arrow keys on the DVD remote control, each button in turn will show its selected state. When clicked, the button will display the activated state, and then play the song. Usually, you can tell you're in an activated state by color, but some programs also allow you to change graphics, underline the text, place a box around the button or similar effects. Figure 8.2 also contains a menu button that takes the viewer back to the main menu (shown on the lower left). Figure 8.2 also shows a menu with a video background this option is available on almost all authoring programs. Operationally, the video plays behind the menu buttons from the time the menu loads until the viewer clicks on a button. Another interesting common feature is the ability to insert an audio file, which plays until the viewer clicks on a button; you can also animate button frames, (like that shown in Figure 8.1) so that animation video audio starts playing within the frame when the menu appears. The key point to remember about these audio and visual baubles is that they cost you both disc space and rendering time. That is, if you add a two-minute video background to your menu, that's two additional minutes of video the authoring program must encode and store on disc, extending your production time and leaving less disc space for other content. How Do Navigational Options Vary By Program?Navigation refers to how the viewer moves through the content on a DVD, and your ability to customize navigational structure varies greatly by program. The most flexible products usually those costing $300 and more (with some exceptions) allow you complete navigational flexibility, to guide your viewers as you see fit. An example of this is shown in Figure 8.3. Figure 8.3. A custom-designed, branched menu structure.Let me set the project up for you. The videos were a composite of two interviews performed by Ken Santucci at a recent National Association of Broadcasters convention. The conversation began with the current state of the digital video market, then moved on to what new technologies were coming, and finished with some production tips. When creating the DVD, my goal was to allow the viewer to move through the project as efficiently as possible. So I created separate menus covering each general topic we discussed, with specific button frames to launch more discrete topics. As you can see in Figure 8.3, this is called a branched menu structure because it resembles the branches of a tree. Navigation though the title is logical and intuitive, and the viewer is never more than two clicks away from the desired content. The only negative here is that, as designer, I am in charge of creating all menu-to-menu and button-to-content links. This means more time developing and more risk of production errors. For example, when designing menus and titles from scratch, it's easy to forget to create a home button to link the viewer back to the main menu, or to forget to create the link between button and menu. In contrast, with template-based, sequential menu designs the only option with most consumer authoring programs the program creates all menu-to-menu and button-to-content links automatically. All you do is choose a template and identify the desired video and chapter points, and the program does the rest. The result is shown in Figure 8.4. Figure 8.4. Template-based, sequential menus.The little white icons on the bottom right of all the menus in Figure 8.4 are links to the menu immediately before and after the current menu, as well as a home button to get you back to where you started. The authoring program created all these links automatically, as it did links to all separate videos in the project. This reduces your authoring time significantly, and helps prevent design errors. The obvious downside is the end-user experience. All menus and videos are presented in sequential order; it's logical enough, but lacks the organization that guides the viewer through the disc, as well as the customization that might make a particular menu structure a better fit for a specific project. It's not the additional one or two clicks it takes the viewer to get to the desired content; it's the blind paging, which leaves viewers with no clue what's on the final menu page until they arrive. As you would expect, most consumer DVD authoring products in the sub-$100 price range are limited to template-based, sequential projects, which are clearly inferior to branched designs for professional use. How Do I Allow the User to Jump to a Random Point in the Video File (What Are Chapter Points)?Good question, and the current project is a perfect example. We filmed the interview live in two sessions and performed no editing, leaving two large video files to input into the DVD authoring program. Obviously, you can link to the start of any video (or slideshow for that matter), but how do you create links to sections within the video file? Figure 8.5 provides the answer. Figure 8.5. The chapter markers shown at the top provide specific points in the video to link to buttons on the menu.Virtually all DVD authoring programs let you create what are called "chapter points" in your videos, usually by moving to the desired frame and selecting "insert chapter point" or a similarly named function from the right-click menu. Once it's created, you can link a chapter point to any menu button just as you would with the start of the video. Chapter points are very effective when converting long video files to DVD in fact, virtually all Hollywood movies converted to DVD use chapter points to link movie sections to menu buttons. In addition to being simple and fast to create, chapter points within a movie don't interrupt the flow of playback from one chapter point to another. In the video shown in Figure 8.5, for example, if the viewer started watching at the first chapter point, the movie would flow through each subsequent chapter point without interruption until that video finished playing or the viewer interrupted by clicking the DVD remote. In contrast, if you produced each section as a separate video file, and then attempted to play sequentially from file to file, the player would pause for a second or two between each separate video file, showing a black screen in the interim. Not quite the track-switch thunk of an 8-track tape (boy, am I dating myself), but definitely something to avoid whenever possible. For this reason, whenever producing a video you expect viewers to watch from start to finish, outputting one long video file from your editor and adding chapter points to create discrete entry points is usually the preferred method. In fact, when working with long, sequential videos, the only reason to output separate files from your editor is if you need separate files to produce a playlist. What's a Playlist?I thought this question was coming. Let me explain in the context of a recent project, where I shot, edited, and produced a DVD of a concert hosted by a local music association. The concert was about 60 minutes in length, consisting of 11 songs, each about three minutes long, with the rest of the time taken up by the performers chatting and telling stories. Just to add a little context, performers were two of the surviving members of the Stoneman family, who'd played at the White House, hosted their own network television show in the '50s and '60s, and recorded at the historic 1928 Bristol sessions, which arguably launched commercial country music. They were country music before country music was cool, and for many in the audience, it was the stories more than the music itself that made the concert. So I wasn't about to cut the talk from the DVD. But I did want to offer DVD viewers the ability to see just the music portion click one button and see all 11 songs in a row, minus the stories. The answer? Playlists. Briefly, playlists (called "stories" in some programs), let you link together noncontiguous chunks of DVD content and combine them into a sequential presentation. Without playlists, I'd have had to create and render a separate video file containing just the songs in my video editor and add that video to the DVD, piling on another 30 minutes of video to an already crowded DVD. In contrast, playlists work with content already inserted into the project, and thus add minimal extra content to the disc. However, playlists work differently in different programs. Some authoring programs start playing at a chapter point in the video and automatically stop playing at the next chapter point. As shown in Figure 8.6, to prepare the converted video for the playlist, I created a chapter point at the start of every song, and then added a chapter point at the end of each song, basically when the applause died down. For example, "Barney McCoy" is the start of a song, "Barney end" is the end of the song. Figure 8.6. Creating end chapter points to create a playlist.Basically, to create the playlist, I created a list of the chapter points (called story markers in the authoring program I used, as shown in Figure 8.7) that marked the beginning of each song. During playback, this list instructs the DVD player to start the song, exit at the next chapter point, then re-enter at the next designated chapter point, the start of the next song. Figure 8.7. The playlist is a simple list of starting points. When watching the playlist from DVD, the viewer experiences about a one-second delay between songs, but that's expected, because the viewer knows the video is jumping from song to song. However, since I used chapter points to create the links for the playlist, viewers watching the concert from start to finish would experience smooth, uninterrupted playback. It may sound minor, but the key feature offered by this program was the ability for a playlist to exit at a chapter point. Not all programs can do this. If this is the case for you; and you create a playlist that includes a chapter point within a video file, the video will play from the chapter point until the end of the video file. Clearly, this wouldn't work if the concert video was one long file accessed via chapter points. Applying this to my project, I would have to split the concert into 22 separate files one containing a song, the next containing the post-song discussion, then another song, more discussion, and so on. Then I would link the songs together into a playlist that simply pointed to each song in sequential order. During playback, the viewer would experience short breaks between the songs, just as with the other technique, which would be fine. However, because I had to break the concert into separate video files, viewers choosing to watch the entire concert sequentially would experience a short break during each transition between songs. At the end of the applause to "Barney McCoy," for example, there would be a short pause until the performers started chatting, then a short break before the next song started. This would not sit well with the viewer, because the breaks come between linear segments of the concert, and are clearly artificial. Going forward, I'm sure most programs will boost their playlist functions with the ability to exit at a chapter point. If your program doesn't support this feature, you'll have to balance the value of the playlist against the value of uninterrupted playback of the sequential video. If you don't expect many viewers to watch the video, from start to finish, breaking your video into the pieces necessary to support a playlist won't be an issue. But if you're expecting sequential viewing, you'll have a much tougher decision. |

| < Day Day Up > |
EAN: 2147483647
Pages: 110