Producing Streaming Files
| < Day Day Up > |
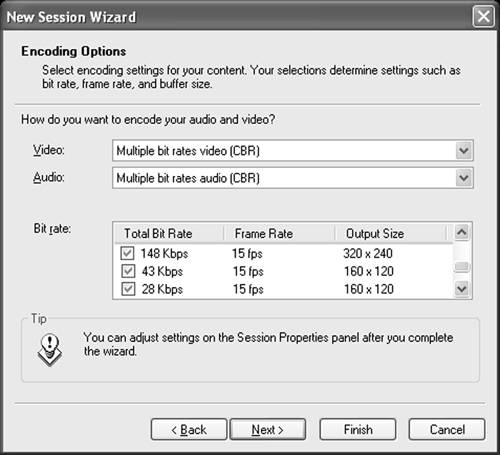
| Streaming files are generally produced for displaying over the Internet or on intranets. The three most dominant streaming technologies are Apple's QuickTime, Microsoft's Windows Media, and Real Networks' Real. If you're working in an organization, chances are your IT experts or video department have set standards regarding which technology to use and which encoding parameters to apply. So, before encoding, determine if there is a standard and, if so, follow it. Unlike QuickTime, Windows Media and Real enable the creation of a single file with multiple bitrates. This allows one file to serve viewers connecting at multiple connection speeds. For example, the file about to be produced in Figure 7.8 would contain a 148Kbps stream for viewers who connect via broadband, a 43Kbps stream the (solitary!) viewers connecting via 56Kbps modems, and a 28Kbps stream for viewers connecting at 28.8Kbps (heaven help him). This is convenient for webmasters, as it allows them to post one file instead of three. However, for this book, I'll assume most readers are interested in producing single-bitrate files, and I'll focus most of my attention there. Figure 7.8. Microsoft's Windows Media Encoder encoding a video clip at multiple bitrates in a single file. Whatever streaming technology you select, there are some general resolution and frame-rate guidelines you should follow, which I present in Table 7.1. (These are suggested values, not absolute requirements.) If your encoding tool provides templates that are similar but not identical, your results should still be acceptable.
Also, understand that not all encoding tools provide access to all these parameters. Even when they do, file output doesn't always match the input parameters, particularly the compressed frame rate. Specifically, if you encode a high-motion file at 56Kbps or lower, most streaming codecs will reduce the frame rate dramatically to preserve individual frame quality; it's not unusual to see video compressed at very low data rates displaying only a frame or two per second. In general, when it comes to encoding at lower bitrates, my take is that the codec developers know best. When presets are available I use them, and if the frame rate drops below the rate I've input, so be it. In some instances there may be workarounds to force a specific frame rate, but generally you're better off just going with the presets. With these basics covered, let's start encoding files in the specific formats. Apple QuickTimeIn terms of codec selection, Apple's QuickTime is going through a changing of the guard. Historically, the most popular QuickTime video codec has been Sorenson Video 3, which is still the dominant format used by movie studios for producing trailers (Figure 7.9). Figure 7.9. Sorenson Video 3 and QDesign Music 2 are Hollywood's choice for QuickTime encoding. However, despite Sorenson Video's popularity in these circles, Apple has recently cast its lot with MPEG-4, a standard that has yet to deliver video quality near Sorenson Video 3, or RealVideo or Windows Media Video for that matter. As a result, if you're producing video in iMovie, you can't easily produce Sorenson Video 3 files, and you have to work pretty hard to produce Sorenson Video 3 output in Final Cut Pro or Compressor, Final Cut Pro's batch encoding tool. Your choices are to use QuickTime Player, a general-purpose tool that may be confusing to beginners, or a third-party encoding tool such as Sorenson Squeeze. Let's work through the encoding screens in QuickTime Player. To encode a file, load the video file into QuickTime Player and choose File > Export from the main menu. Then click Options to open the Movie Settings screen shown on the left in Figure 7.10. Click Size to adjust the resolution of the output file, and Sound Settings to adjust audio parameters (see Figure 7.6). Figure 7.10. Encoding screens from the QuickTime Player.The bottom parameter in the Movie Settings screen is the checkbox for preparing the file for Internet streaming. Use Fast Start when creating a file that will be delivered without a QuickTime streaming server, which will allow the viewer to start watching the file before it's completely downloaded. In contrast, when producing a file for streaming from a QuickTime Streaming Server, use Hinted Streaming so the server can most effectively stream the file. With these decisions made, let's choose and configure our video codec. Click the Settings button on the top left of the Movie Settings window to open the Compression Settings screen, shown on the right. Most parameters should be familiar, save for the Quality slider. Briefly, most quality sliders either do nothing, since quality is controlled via the data rate setting, or try to improve quality by using more complex encoding algorithms that take longer to encode. Typically, documentation is sparse and you can't tell whether the quality slider actually improves quality or not, so my practice is always to set quality to the maximum setting. I've set keyframes at one every ten seconds, and am limiting the data rate to 25KBps, which translates to 200KBps. QuickTime Player is one of the few encoding tools that uses kilobytes per second rather than kilobits, so remember to adjust your encoding parameters accordingly. Click OK twice to close the two windows, then type the name of the encoded file, and hit Save to complete the process. Windows MediaMicrosoft's Windows Media technology provides very high-performance audio and video codecs, and as you'd expect, it's easily integrated with Microsoft applications such as PowerPoint and FrontPage. For this reason, Windows Media is generally my "go to" codec option for everything from streaming to high-bitrate files for desktop playback. Note, however, that Windows Media doesn't play on many UNIX operating systems, so if your target viewers include Linux desktop users, use RealVideo or MPEG-1 or 2. Microsoft has done a nice job of making Windows Media technology accessible to both consumers and technology professionals. Most consumer tools provide data rate-driven templates such as those shown in Figure 7.11. After choosing a template, always check to make sure that the resolution is 4:3, since some templates output at 720x480 rather than 640x480, and some at 176x144 rather than 176x132. Usually, you'll see some type of information screen that provides these options, such as the Settings box shown on the bottom left of Figure 7.11.
Figure 7.11. Encoding to Windows Media format in Movie Maker 2. Note the option to produce a DV-AVI file.Movie Maker 2 has no custom encoding parameters, so if you can't find a template you like, you're out of luck. As you can see from Figure 7.12, higher-end programs such as Sorenson Squeeze provide an extensive range of Windows Media format encoding options, which includes all three types of VBR encoding we discussed earlier. Here, you're free to customize encoding parameters to your liking, following the guidelines set in Table 7.1. Figure 7.12. Encoding to Windows Media format using Sorenson Squeeze.You can download Microsoft's Windows Media Encoder, for free at: www.microsoft.com/windows/windowsmedia/download/default.asp. As you would expect, the tool provides complete access to all Windows Media encoding parameters, but it's definitely targeted towards experts and may confuse novices. If you can't access the necessary encoding parameters in your consumer video editor, I recommend that you step up to either a prosumer editor or a third-party encoder such as Sorenson Squeeze. RealReal Networks' Real technology offers arguably the best video quality at modem streaming rates, and comparable quality to Windows Media at all higher rates. This makes it very popular among large corporations and networks such as CNN and CBS. However, Real files don't integrate with PowerPoint or FrontPage (both Microsoft products) as well as Windows Media video files, so I tend to use it less for day-to-day, knock-around use. Producing Real files is relatively straightforward, with a few twists we haven't seen before. First, when encoding within RealProducer, the company's own encoding tool (which I recommend), all rendering is template-based. Templates are called "audiences," and for each audience you can configure not only the audio/video data rate, but also alternate audio codecs and data rates to use when the audio is primarily voice or music. This is shown in Figure 7.13. Figure 7.13. Encoding using Real Producer.After you select an audience, you choose either Voice or Music mode, and RealProducer applies the selected codec and bitrate. You can also see in the figure that Real offers VBR encoding with the ability to set a maximum bitrate, which Real implements in two passes. Though not shown, RealProducer also offers a Video mode option that lets you choose between a high frame rate, with each individual frame possibly degraded (Smoothest Motion option), or a low frame rate with crisp images (Sharpest Image option). You can even produce a slideshow that will display one or two very crisp frames per second. |
 56Kbps
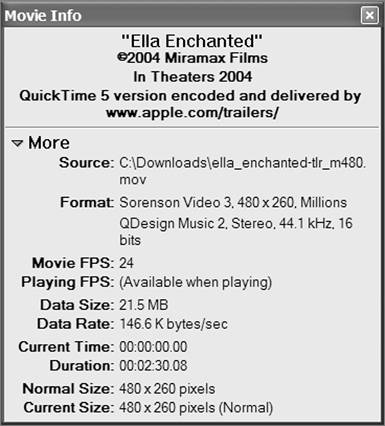
| < Day Day Up > |
EAN: 2147483647
Pages: 110