4. Add Cutaways, Noddies, and Establishing Shots
| < Day Day Up > |
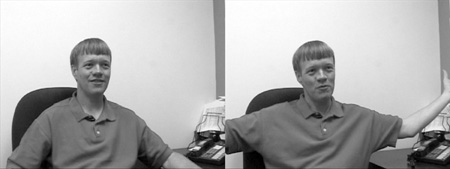
| Once you'v assembled all the clips that contribute audio to the project on the timeline, it's time to start adding other shots. Before we get to this, let's look at some of the goals to consider while editing. Avoid Jump CutsTake another look at Figure 5.2. Remember that I've trimmed all the clips of the doctor to remove unwanted frames from the beginning and end, so the clips don't flow smoothly from one to the other. For this reason, when the video moves from one clip to another, it's likely the image will jump from the frame shown on the left in Figure 5.4 to the frame shown on the right. Figure 5.4. A "jump cut" showing the last frame of the fifth video and the first frame of the sixth. This is called a "jump cut," because the video looks like it's jumping around. One moment viewers are watching the doctor with his hands on the chair, and the next moment they're seeing his arms waving in the air. Jump cuts are very disconcerting to the viewer because they make no visual sense. And, they create a problem any time you edit video of a relatively static scene and subject shot with a fixed camera. Fortunately, jump cuts are easy to avoid, if you take the time to shoot cutaways or noddies. This is illustrated in Figure 5.5. Figure 5.5. Use noddies or cutaways to hide jump cuts.The screenshot in Figure 5.5 shows an editor that offers multiple video tracks, which makes the concept of avoiding jump cuts easier to visualize. Basically, you have three choices:
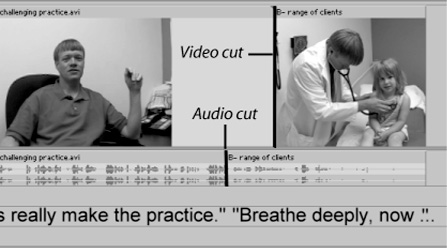
Inserting cutaways or noddies using editors with multiple video tracks is simple. You drag the video to the target location; sever the link between the audio and the video in the inserted clip (usually a right-click command that "unlinks" the audio and video) and then delete the audio. Or, you can simply mute the audio if that is easier. With most multitrack editors, after deleting the audio, you can click and drag the newly inserted cutaway down to the main video track to free the space and avoid inadvertently shifting the cutaway clip during subsequent edits. This is shown in Figure 5.6, where the cutaway and noddie are now part of the main track. Figure 5.6. Drag the inserted clips down into the main track to free the space.If you're working with an editor that doesn't have multiple video tracks, inserting cutaways is a bit more complicated, though most editors are up to the task. Technically, the procedure is called "insert editing," so check the program's help files or manual for that term and instructions on how to perform this edit in your tool of choice. What if you don't have noddies or cutaways to hide the jump cut? This happens frequently when you're editing group discussions or executive brief-ings and you're trying to consolidate the footage. Typically, I'll insert a short transition, such as a dissolve, between the two clips to let the viewer know that there was a change in time, which is the basic purpose of a transition. Briefly, transitions are effects that smooth the flow from clip to clip and can range from simple dissolves, where the first clip smoothly blends into the second, to more visual effects such as the '60s-era flower-power effects used in the Austin Powers movies. Most of the time, I'm pretty conservative with transitions and almost exclusively, stick with dissolves especially for business videos. Unfortunately, in jump-cut scenarios, where there's minimal change between the first and second scene, a dissolve can be practically invisible, as are most static two-dimensional effects such as wipes. In these instances, I'll either use a push transition (this pushes the first scene off the screen and pulls the second on screen), or an unobtrusive three-dimensional transition such as the cube spin shown in Figure 5.7. Figure 5.7. If you don't have cutaways, use a transition that makes it evident that a change in time is occurring, such as this cube spin (don't worry, the effect is more evident when you watch the video).Producing Split EditsA split edit is any edit where the video and audio move from one scene to the next at different times. If you watch television interviews, you'll notice that the sound and video seldom cut to the next scene simultaneously, as this is less interesting to the viewer. For example, if Larry King was asking O.J. Simpson, "Did you do it?" what you really want to see is O.J.'s face as the question is asked, not Larry King's. Of course, Larry has the benefit of using multiple cameras so the producer can cut from camera to camera at any time. We don't have that luxury. More often than not, usually, you would ask the question in the field, get the response, then come back and record asking the question again while shooting the noddies. Showing O.J.'s face while asking the question is a classic split edit, in this case called an "L-cut" for reasons that will become obvious momentarily. Figure 5.8 shows two clips on the timeline. O.J. declined to be interviewed for this book, so we'll have to use our doctor instead. The first clip shows me prompting, "Tell me about the quality of the small town practice." Then, both audio and video cut simultaneously to the physician as he responds, "You know, that was one of my chief concerns ..." Figure 5.8. Audio and video cut over from one clip to another simultaneously.In Figure 5.9, I've extended the video from the second clip over the audio from the first, allowing the viewer to watch the doctor as I ask the question. The L-cut gets its name from the shape the audio makes in the timeline when it's extended beneath the second track. You get this whenever you cut from one scene to another on the video track, but let the audio from the first scene continue. Figure 5.9. An "L-cut" edit is where the audio from the first clip continues under the second clip, forming an L shape.Sometimes you want the audio from the second clip to start while the video from the first clip is still showing, generally to presage the content of the second video. In Figure 5.10, for example the first video is Dr. Sumie commenting, "Patients really make the practice." And the second video clip is an examination where he's saying, "Breathe deeply, now." Figure 5.10. Creating a "J-cut," where the audio from the second video creeps under the video from the first. Here, I've cut the audio to the second clip before the video, so while the viewer is still watching Dr. Sumie nod with affirmation after commenting, "Patients really make the practice," they're listening to the examination under way. The audio presages the video, which is a much more interesting presentation to the viewer. Since the audio from the second clip creeps under the first clip roughly in the shape of a J, this is called a J-cut. When I'm editing, I use L-cuts and J-cuts as frequently as possible to avoid cutting audio and video simultaneously. Producing these split edits varies from program to program, but, as with insert edits, "unlink" the audio from both video files so that you can move the audio independently from the video. To produce an L-cut, you adjust only the video track, as shown in Figure 5.11. Regardless of what editing program you use, creating an L-cut always includes these steps:
Figure 5.11. Completing the L-cut.With a J-cut, you adjust only the audio track, as shown in Figure 5.12, exactly the same way you manipulate the video to create an L-cut. Specifically:
Figure 5.12. Completing the J-cut.Using TransitionsAs I mentioned earlier, the purpose of a transition is to clue the viewer of a change in scene or time. Unless your video includes changes in scene or time, you shouldn't insert transitions between the individual video sequences with one notable exception: to avoid a jump cut. Even then, it's better to use a cutaway or noddie rather than a transition. The best way to understand how transitions are used in business type footage is to watch interviews on the evening news, or programs such as 60 Minutes. You'll notice that transitions are rarely used; when they are used, they're nearly always-dissolves or fades to black. Inserting transitions is generally very simple. Typically they sit in their own library or collection bin, and you simply drag them into the timeline or story-board between the two clips. |
| < Day Day Up > |
EAN: 2147483647
Pages: 110