#77 Creating Narrations in Audition Creating narrations has two basic steps: using Windows controls to select your input source and control volume, and then using Audition to capture the audio. I'll assume your microphone is already installed; unfortunately, because of the almost infinite variety of microphones, sound systems, and connections, it's impossible to provide detail on getting this connected. If You're Not Hearing Audio As mentioned above, there are simply too many audio input configurations to provide you with any meaningful help in setting up or connecting your recording hardware. However, if you're having a problem, the first place to look is the Audio Hardware Setup dialog box accessed by choosing Edit > Audio Hardware Setup. |
1. | Start by identifying your input source. In Windows XP, click Start > All Programs > Accessories > Entertainment > Volume Control to open the Master Volume Control.
| 2. | Choose Options > Properties to open the Properties dialog box.
| 3. | From the Mixer device drop-down menu, choose your audio input (Figure 77a). If there is no Mixer device menu, click the Recording radio button.
Figure 77a. Select your input source from the Mixer device drop-down menu. 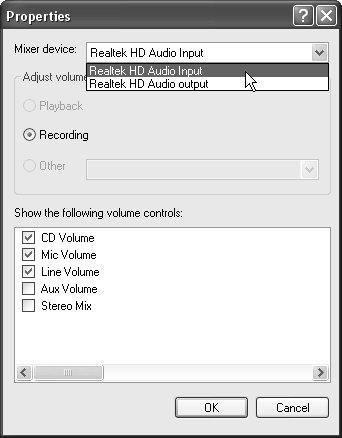
Audio-File Recording Strategy Audition will record into the same audio file until you close it. You can record over any portion of the file by moving the current-time indicator to the target spot and clicking Record. That said, it's best simply to record your second take at the end of the audio file, and then replace the first take during editing. |
| 4. | Be sure the Mic Volume checkbox is selected; you can also select any of the other checkboxes.
| | | 5. | Click OK to close the dialog box. Windows opens the Recording Control dialog box.
| 6. | In the Recording Control dialog box, select the Select checkbox below the Mic Volume control (Figure 77b). Leave the dialog box open; you'll use it to control incoming audio volume when testing your recording.
Figure 77b. Select the Select checkbox below the Mic Volume control. 
It's Better to Be Too Low than Too High If your audio volume is too low, you can use the Normalize tool to boost volume without introducing distortion. On the other hand, if it's too loud, the file is probably already distorted, which is impossible to fix. For this reason, it's better for your volume to be too low than too high. |
| 7. | In Audition, choose Options > Metering > Monitor Record Level. This turns on the Levels meter at the bottom of the interface (see Figure 73) so you can check incoming audio levels before recording.
| 8. | Speak into the microphone in a normal voice. The peak in the Levels meter should reach between 12 and 9 db, but should not reach 0 db, which is too loud and will produce clipping (and turn the box to the right of each Levels meter red). Use the Recording Control dialog box (see Figure 77b) to adjust volume levels.
| | | 9. | After setting the volume, select File > New. Audition opens the New Waveform dialog box (Figure 77c). Choose the parameters that match your project, which typically will be those shown in Figure 77c unless you recorded DV audio at 32kHz.
Figure 77c. Choose the audio parameters for your soon-to-be-recorded audio file here. 
Note | | | 10. | Click OK to return to Edit View.
| 11. | Click the Record button in the Transport controls (the red circle), and Audition will start recording.
| 12. | Click the Stop button in the Transport panel (the black square) to stop recording.
| | | 13. | Analyze the captured waveform (Figure 77d), and listen to your file with headphones. The peaks should come close to but not reach 0 dB. Regions that contain no speech should have as flat a line as possible, since fuzziness around the midline represents noise. Though you may be able to remove this with the Noise Reduction filter (#75), it's better if you can find the source of the problem and eliminate it before recording.
Figure 77d. A reasonably healthy waveform. The highs come close to 0 dB, while the quiet regions show only a touch of noise. 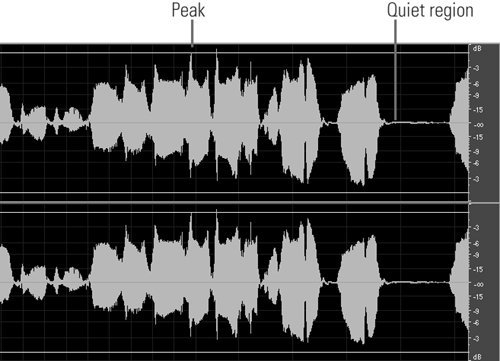
|
|