1 Choosing the Right Project Preset
#1 Choosing the Right Project PresetThe first step in starting a new Premiere project is choosing a project preset. Briefly, a project preset defines basic parameters that will govern any content you capture or import into your project. These include aspect ratio (e.g., 4:3 for standard TV); video resolution (e.g., 720x480 for standard-definition DV); video frame rate (e.g., 60i for 60 interlaced frames per second); and audio quality (e.g., 48kHz for DV-quality audio).
Most of the time, choosing a project preset is easy. If you shoot in standard (4:3) NTSC DV, you'll produce a standard NTSC DVD, so the correct preset is Standard DV-NTSC, which should also correspond to the audio setting used during your shoot. (I always shoot at 48kHz, which simplifies my preset selection). Sometimes, however, the choice gets more complicated. For example, suppose you shoot in HDV formatsay, 1080i, to be specificand want to produce a Standard Definition (SD) 16:9 DVD. Which project preset should you choose? Always choose the preset that corresponds with your ultimate output parameters. In other words, when producing an SD DVD from HDV video, you should use the Widescreen 48kHz DV-NTSC preset shown in Figure 1a. Here's why. Figure 1a. This is where you choose your project presets.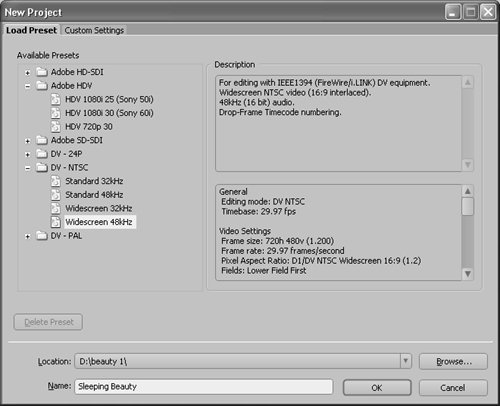 First, Premiere Pro produces higher-quality output when using this preset than when using the HDV 1080i 30 (Sony 60i) preset. Second, the Widescreen DV-NTSC preset provides a more accurate preview of the ultimate rendered video, which helps with details like title placement or with framing your shot when you're panning and zooming around an HDV image.
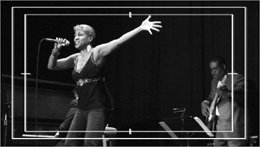
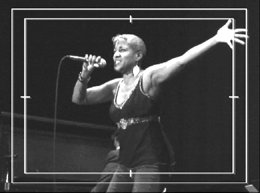
This principle is a bit easier to demonstrate when producing a 4:3 SD video from a 16:9 HDV stream, which I've done for several projects. If you use the HDV preset, Premiere Pro displays the complete HDV image in its native 16:9 resolution, which works well for full-resolution projects but provides little guidance regarding how the video will look at 4:3 (Figure 1b). Figure 1b. This is HDV video in an HDV project; it's kind of tough to figure out 4:3 positioning, isn't it? However, if you use the DV-NTSC Standard preset, Premiere Pro provides a completely accurate preview, making it simple to zoom and pan to the appropriate framing (Figure 1c). For these reasons, you should always use the preset that corresponds with your target output parameters. Figure 1c. The same video in an SD DV project, with a wonderfully accurate preview for framing. Now if I could just figure out how to apply the Rule of Thirds to that left arm...
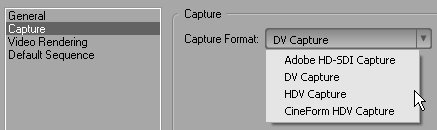
The only potential wrinkle in this approach is that when it's time to capture, Premiere Pro will look for a DV device rather than an HDV device, and initially may not recognize your HDV camcorder. To fix this problem, do the following:
|
EAN: 2147483647
Pages: 148