#49 Using After Effects' Keylight Plug-in The Keylight Effect is simple to use, and one of the most effective chroma key tools available in any product. It's included with the Professional version of After Effects, though you'll have to install it separately. Keylight Not Installed? Although Keylight ships with After Effects, it's included as a third-party plug-in from a British company called The Foundry (www.thefoundry.co.uk). Like other plug-ins, it doesn't install automatically with the software. To install Keylight, insert the first Adobe Production Studio DVD into your DVD-ROM drive. When you arrive at the main installation screen, click Install Third Party Plug-Ins. You can install Keylight from there. |
Assuming that you're producing your video in Premiere Pro, the simplest workflow is to start an After Effects composition in Premiere Pro (see #20), copy and paste the background and chroma key clips into the After Effects composition, apply the filter, and save the composition. It will then appear in your Premiere Pro project panel, where you can deploy it as you wish. Once you've created your After Effects composition, here's what you do to apply the Keylight effect in After Effects. 1. | In the timeline, click to select the chroma key clip.
| 2. | Choose Effect > Keying > Keylight to apply the Keylight effect.
| 3. | Click the eyedropper icon to the right of the chip next to the Screen Colour control (Figure 49a). Press and hold the Ctrl key, then click an area of the background where the light is about average value.
Figure 49a. Applying the Keylight filter with Adobe After Effects. 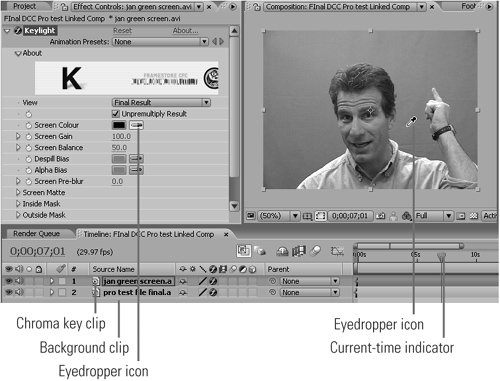
Note When you hold down the Ctrl key, After Effects samples an area of 5x5 pixels, further averaging the color values. | | | 4. | Click the View list menu and choose Status (Figure 49b).
Figure 49b. The Status view shows how "clean" the key is. We've still got some residue here. 
More Help with Keylight The Keylight effect has more dials and gauges than we can describe here, but if you have further questions, you'll find a very helpful PDF User Guide in your Windows Start menu at Start > Programs >The Foundry > Keylight 1.1 for After Effects 7.0 > Keylight 1.1 for After Effects 7.0 Documentation. |
| 5. | Adjust the Screen Gain control until the background is predominantly black save for a gray edge around the foreground subject.
| 6. | Adjust the Screen Balance control until the foreground subject is predominantly white.
| 7. | Click the View list menu and choose Final Result. Inspect the results by zooming in to the image using the Magnification ratio pop-up menu to check the edges between the foreground and background videos, and dragging the current-time indicator through the entire clip to check for rough spots.
|
|