#43 Customizing Effects with Keyframes Keyframes allow you to adjust the value of an effect over time, enhancing your ability to customize your productions. By placing a keyframe on the main timeline or on the timeline within the Effect Controls panel, you're essentially identifying a key frame at which Premiere Pro (or After Effects) will apply or modify an effect. By setting successive keyframes, you can chart the exact points in a clip at which the values of an effect will change, such as with a fade in or fade out. Almost Limitless Customizability You can add a keyframe per frame for any applied effect, which translates to near-limitless customizability over the duration of even a short project. |
Here are two techniques that enable you to fade in an overlay effect with keyframes. To perform the basic overlay effect described in #42, you'll need to start with two clips on the timeline, one on Video 1 and the other on Video 2 (see Figure 42a). Using Dissolves to Fade Effects You could also fade the effect in by dragging a dissolve transition to the start of the overlay clip. I like the additional control that keyframes provide, however, and prefer to do it this way. |
1. | In Premiere Pro, select the top clip in the Timeline, and click the Effect Controls panel.
| 2. | In the Effects Controls panel, click the Show/Hide Timeline view button to open the timeline video (Figure 43a).
Figure 43a. Set the initial keyframe with a value of zero so the overlay clip doesn't appear. 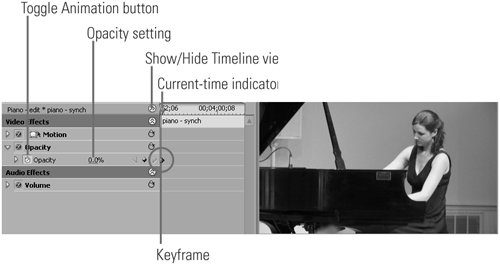
| 3. | Drag the current-time indicator all the way to the left to ensure that you're at the first frame of the clip.
| 4. | Click the Toggle Animation button to set a keyframe at the first frame.
| | | 5. | Set the Opacity value to 0%.
Note At 0%, the clip should be totally transparent, and you shouldn't see the overlay clip of the pianist's hands. Next, you'll fade that in. Rubber Band Controls You can set and adjust keyframes for audio the exact same way you adjusted the Opacity controls in Figure 43. These types of controls are commonly called rubber band controls. |
| 6. | Drag the current-time indicator approximately 1 second to the right.
| 7. | Set the Opacity value to 50% (or whatever value works for your production). Premiere Pro automatically creates a new keyframe (Figure 43b).
Figure 43b. Place the second keyframe where you want the overlay effect to appear at its final value (here 50%). 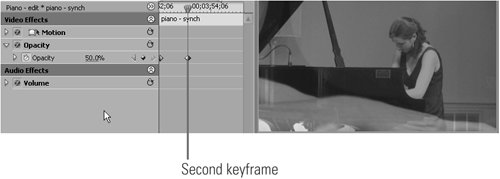
More on Customizing Effects with Keyframes Once you set the keyframes, Premiere Pro will automatically create all frames necessary to smoothly fade the overlay effect in from a value of zero to a value of 50%. Each time you apply an effect, Premiere Pro allows you to adjust it on the timeline, as with the Opacity controls shown in Figure 43c. As above, drag the current-time indicator to the desired keyframe location, then click the Add/Remove Keyframe button to add (or remove) a keyframe. Then drag the keyframe up or down to achieve the desired effect. Figure 43c. Premiere Pro also has Opacity controls on the timeline, which are very useful for making final adjustments to crossfades and other effects. 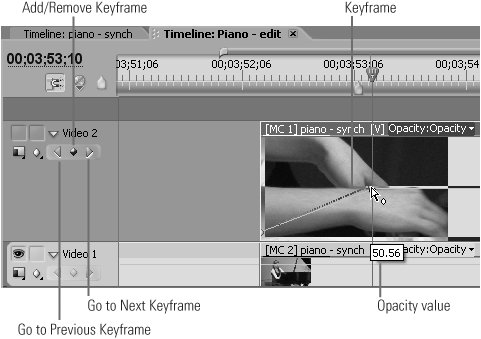
|
|
|