Flylib.com

Books Software


37 The Tao of Multi-Camera Editing


#37 The Tao of Multi-Camera Editing

The Multi-Camera Monitor is wonderfully functional and generally intuitive, but as with any tool, you'll work more effectively with some inside tips on its use. Here's a mlange of deep thoughts on how to use it most effectively.

Adjacent Clips from the Same Camera Angle

It's okay to have adjacent clips from the same camera angle on your edit timeline, but it adds work when you're applying effects separately to each instance of a camera angle, and can lead to errors when applying transitions between clips. Don't sweat about this when using the Multi-Camera Monitor, but consider fixing these on the timeline as described in #38.


  • During the course of the typical Multi-Camera edit, you'll open the Multi-Camera monitor many times. Consider each a separate Multi-Camera "session."

  • To save the edits made in each session, click the Stop button and click the X in the upper-right corner to close the Multi-Camera Monitor. Your angle selections will appear on the timeline ( Figure 37 ).

    Figure 37. Here's what your edit sequence will look like after selecting clips in the Multi-Camera Monitor.


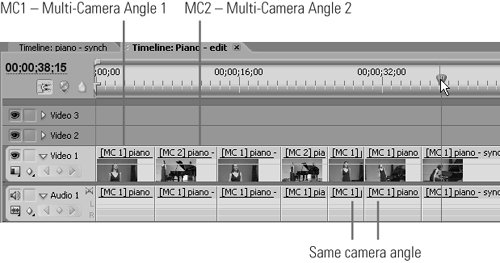
    Fixing Your Multi-Cam Mistakes

    If you make a big mistake in the Multi-Camera Monitor (like switching when you really didn't want to switch or switching to the wrong angle), there's an easy way to fix it. When you catch the error in preview, click the Stop button, then the Go to Previous Edit Point button, and then click the desired camera angle (even if it's the same angle as the previous segment). As you can see in Figure 37, you can have the same camera angle lying sequentially on the timeline and Premiere Pro will play right through the sequential video (and all angles) without a break.


  • If you click the X before clicking the Stop button, you'll lose all edits from that session. If, after closing the Multi-Camera Monitor, you click Undo before making your first edit on the timeline, you lose all edits from that session, but not from previous sessions.

  • When working in the Multi-Camera Monitor, your goal should be to get within one or two seconds of the desired switching point, then perfect the edit on the timeline, in which you'll find better tools for doing so.


#38 Editing a Multi-Camera Sequence on the Timeline

After selecting clips with the Multi-Camera Monitor, you can edit the clips on the timeline as normal. Here are the three most common edits you'll make.

Adding Transitions Quickly

Sometimes you'll want to add transitions to smooth the flow between camera angles or for artistic effect. A killer keystroke combination for this is the Page Down (PgDn) key for moving from cut to cut, followed by the Ctrl+D combination to insert the default transition. Choose the default transition by right-clicking the transition in the Effects panel, and set the default duration by choosing Edit > Preferences > General.


1.

To change camera angles in a clip in the edit sequence, select the clip, right-click, and choose Multi-Camera and the desired camera from the pop-up menu ( Figure 38a ).

Figure 38a. Change audio or video tracks on the timeline using this right-click control.


Note

  • Note that this will change the audio track to that of the selected clip unless you unlink the audio and video files (select the clip, right-click, and choose Unlink) .

2.

To fine-tune the timing of the camera-angle switch, use the Rolling Edit tool, as shown in Figure 38b . This tool displays the last frame of the first clip and the first frame of the second clip in the Program Monitor in real time as you change the edit point between the two clips.


Figure 38b. Premiere Pro has great tools for finalizing the timing of your camera-angle switches.


Audio Waveform

When editing a concert or similar event, sometimes the audio waveform provides better clues to the optimal timing of camera-angle switches than the frames in the Program Monitor. To use the waveform as a guide, twirl the Collapse/Expand track triangle in the track header of your audio track to reveal the waveform, and drag the track down to expand it.


3.

You can also delete any clip on the edit timeline and drag the adjacent clip across to close the gap ( Figure 38c ). Premiere Pro does a marvelous job of maintaining synch. (Have I mentioned that I really like this tool?)

Figure 38c. You can delete clips on the timeline and drag across the adjacent clip without losing synchronization.