Flylib.com

Books Software


13 Overlay vs. Insert Edits


#13 Overlay vs. Insert Edits

When you add content to existing footage on the timeline, you have two choices. You can push the content back the duration of the new content, which is called an insert edit , or you can replace the content with the new content, which is called overlay .

Which Tracks Shift During an Insert Edit?

Good question! An insert edit shifts all "unlocked" tracks. If there are tracks that you don't want to shift during the insert edit, lock those tracks by clicking the empty box immediately to the left of the track name on the left of the timeline. Premiere Pro will display a diagonal pattern on the locked tracks and prevent you from editing them in any way.


In #12, I used an overlay edit, which inserted the title directly above the start of Kimberly's performance. This means that the viewer will see the title while hearing Kimberly play, then see her play. Another option is to use an insert edit to insert the title and move the rest of the concert to the right. I could just use the Insert button at the bottom of the Source Monitor, but I'll drag the track down, this time to Video 1, to illustrate another Premiere Pro feature ( Figure 13a ).

Figure 13a. The Overlay icon means that the title will overwrite the selected video track.


Overlay Edits and Overwrite Edits

Premiere Pro's usage of the term overlay edit is industry-standard language. However, overlay edits often refer to edits involving multiple tracks and blending effects like transparency, chromakey, and picture-in-picture. We deal with all three types of overlay edits throughout Chapter 6.


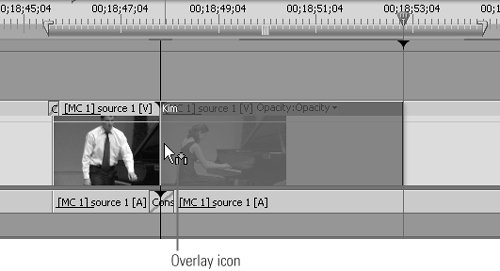
When you drag the image to the timeline, Premiere Pro defaults to an overlay edit, where the clip will overwrite any content on the selected track. You can see the tiny Overlay icon attached to the pointer in Figure 13a. If you release the clip at this point, you'll get the result shown in Figure 13b .

Figure 13b. See? The title overwrote the video of Kimberly playing.


However, if you press and hold the Ctrl key while dragging the clip to the timeline, Premiere Pro changes into Insert mode, shown by the tiny Insert icon attached to the pointer in Figure 13c . Premiere Pro also displays white triangles on the current-time indicator on all video and audio tracks. This indicates that all of these tracks will be pushed back as part of the insert edit.

Figure 13c. The Insert icon tells you that the dropped clip will push all unlocked tracks back, which is indicated by the white triangles.


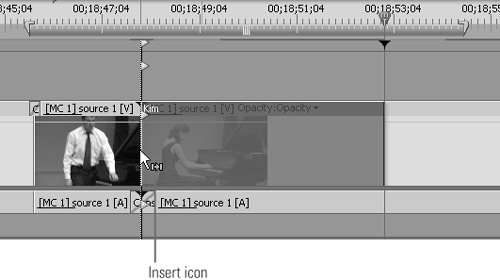
Release the mouse, and you'll get the results shown in Figure 13d . Kimberly is shown from the very first note of her performance, and all audio tracks are pushed back, just as the triangles promised .

Figure 13d. Here's what we want: the title inserted and Kimberly's performance shown from the first note.
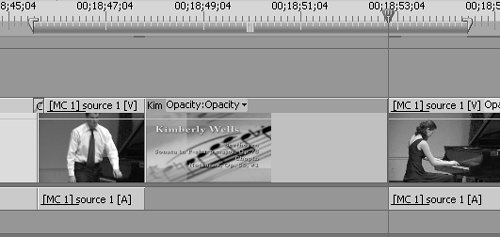


#14 Previewing with the Work Area Bar

Though Premiere Pro's unrendered real-time transitions are usually accurate enough, you should always check these scene transition points with rendered audio and video, just to be sure. You do so by rendering a specific area of your project known as the work area . The work area is designated by the gray bar found immediately beneath the time ruler above the timeline ( Figure 14a ).

Figure 14a. Let's render the transitions. Click and drag the handles of the work area bar so it's just outside all the edits you want to preview.


As a default, the work area stretches over the entire project, which means that the markers used to adjust the beginning and end of the bar are generally not visible when you're zoomed in as we are in Figure 14a.

To render a specific area, do the following:

1.

Double-click the work area bar to make the handles appear within the current viewable timeline area; Premiere Pro will insert handles at the edges of the timeline.

2.

Drag the handles over the target preview area.

3.

Click and drag the grab handle in the middle of the bar to move the work area bar itself. (If you click anywhere else, you'll just move the current-time indicator to that location.)

4.

Once you've set the work area bar in the desired area, press the Enter key to start the preview. If the area is as tiny as in our example, it should only take a few minutes to render before playing ( Figure 14b ).

Figure 14b. Preview should be only a minute or two away because you're rendering so few frames .


The Work Area Bar During Rendering

The work area bar can also limit the footage produced by Premiere Pro during actual rendering, and thus reduce the time required to render. For example, if you just want to render a short chunk of video to burn to DVD for a quick test, or get a representative sample of how your video will look at a given bit rate for streaming, you can set the work area as described here, and then choose to render only the work area. (See #71 for more details.)