#84 Rendering in After Effects Assuming that you're using After Effects for simple, discrete tasks, like those described in Chapters 4 and 6, rendering from After Effects is relatively simple, with many encoding chores handled by the Adobe Media Encoder, detailed in #81. This technique details the high-level workflow for rendering in After Effects, assuming that you've got your composition loaded and ready for output. Batch Encoding The Render Queue supports batch encoding. Simply queue multiple compositions as described above, and click the Render button to start encoding. |
1. | Choose Composition > Add to Render Queue. After Effects adds the composition to and will open the Render Queue (Figure 84a).
Figure 84a. After Effects' Render Queue. 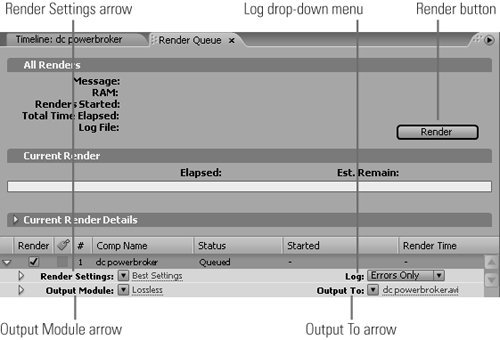
Note For most simple projects, you can accept the default settings for both Render Settings and Log. | | | 2. | Click the downward-pointing arrow next to Lossless in the Output Module. After Effects will open the Output Module Settings dialog box (Figure 84b).
Figure 84b. Choose your target format first, then click the Format Options button. Note the currently blank Audio Output checkbox. If you don't select this checkbox, you'll produce a silent movie. 
Producing Flash Files in After Effects After Effects doesn't use the Render Queue to produce FLV Flash videos. Instead, with the composition selected, choose File > Export > Flash Video (FLV), and After Effects will open the Flash Video Encoding Settings dialog box shown in Figure 82b. You can also produce SWF files by clicking File > Export > Macromedia Flash (SWF), with simple dialog boxes for setting relevant encoding parameters. |
| 3. | Click the Format drop-down menu and choose the target format.
| 4. | Click the Format Options button.
If you select RealMedia, MPEG2, MPEG2-DVD, or Windows Media, After Effects will open the Adobe Media Encoder window (Figures 81a, 81b, and 81c). Choose the target parameters as detailed in #81, Steps 49. For other formats, After Effects will open format-specific dialog boxes that are beyond the scope of this book.
| 5. | Click OK to close the dialog box and return to the Output Module Settings dialog box.
| 6. | In the Output Module Settings dialog box, select the Audio Output checkbox to encode audio with the video, and adjust audio settings as desired.
| 7. | Click the Format Options button and choose your output options and compression parameters. Click OK to close the dialog box.
| | | 8. | In the Output Module Settings dialog box, click OK to close the dialog box and return to the Render Queue.
| 9. | In the Render Queue, click the name in the Output To control to open the Output Movie To dialog box where you can name your file and designate a storage location. Click Save to close that dialog box.
| 10. | Click the Render button to start rendering.
|
|