Customize synchronization
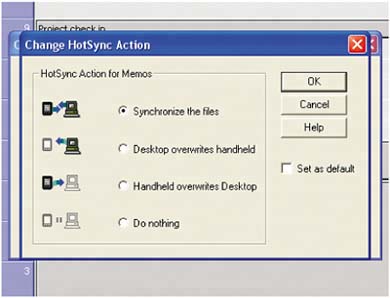
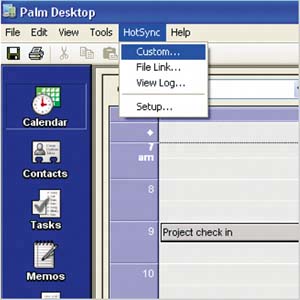
When you sync,
info
on your handheld and Palm Desktop is automatically exchanged and updated.
Conduits
control how the info is shared.
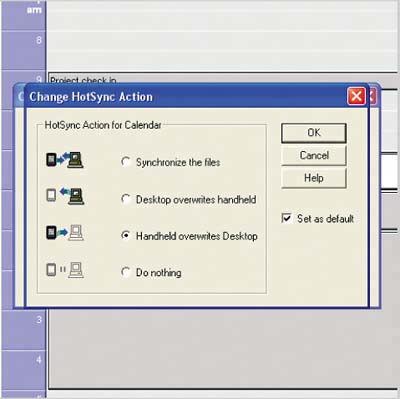
The relationship between your handheld and computer is characterized by one of four settings:
|
You can import info into Palm Desktop from most contact programs and from other applications such as Microsoft Excel. For details, see your Tungsten E Handbook, available from the Help menu of Palm Desktop or as a free download from www.palmOne.com/support/tungstene.
|
|
Be careful with your conduits. The default settings make sure the most current info syncs between your handheld and computer.
|
|
Change your conduits when there's an app you don't want to sync, or you want the info on your handheld to overwrite the info on your computer, or vice versa.
|
-
Conduits are settings that manage how your handheld's applications sync with your computer.
-
You set conduits in Palm Desktop, not on your handheld. Select
HotSync > Custom
(on a Mac, select
HotSync > Conduit Settings
).
-
Different users can have different conduit settings. The username shown in the Custom dialog box in Palm Desktop is the one being changed.
-
Conduits for palmOne
VersaMail
, Documents To Go, and other applications have custom settings
|
|
From the
HotSync
menu, select
Custom
(or
Conduit
Settings
on a Mac).
|
|
|
Select any conduit from the list and click
Change
(or
Settings
on a Mac).
|
|
|
Choose what you want the conduit to do. This affects only your
next
sync. To make the change permanent, select
Set as Default
.
|
|
|
-
Make photos sync with your home PC, but not with your work PC.
-
Set your email so that it won't sync, saving time.
-
Have your PC overwrite your handheld if your spouse
accidentally
beams you the wrong task list.
|
|
If you've set up your PC to sync with Palm Desktop, you can change to Outlook
anytime
. Insert your installation CD and select
Install Microsoft Outlook Conduits
.
|
|
If you like to keep your info extra safe, save a copy of your Palm Desktop data as a backup. Select
File > Save a Copy
and give the backup file a
name
and location. This saves a snapshot of the info at the moment you saved the copy.
|
|
Choose any list view from the View menu. Arrange it to your liking and choose
Memorize View
from the pick list in the
upper-left
corner. The new arrangement is now listed in the View pick list.
|
|