Data Retrieval
| Two utilities are built into SQL Server to allow for the interactive use of T-SQL. SQL Query Analyzer and the OSQL utility support using T-SQL interactively to view, process, and modify data. A third utility, the BCP utility, could be used to import or export large amounts of data. SQL Query Analyzer and OSQL are used to:
With SQL Query Analyzer, you can connect concurrently to numerous instances of SQL Server. However, the OSQL and BCP utilities enable you to work with only one instance at a time. Queries in SQL Server refer to a set of T-SQL statements that are issued to the database to retrieve data. The most common method of data retrieval is using the SELECT T-SQL statement. The SELECT statement is the basis for the majority of the activity performed in data retrieval. It is the first statement for a SQL developer to master, as its use is varied and can involve many options. The SQL SELECT StatementUsing the T-SQL SELECT statement is the most common way of accessing data. The majority of all data retrieval statements begins with these four fundamental parts of a SELECT operation:
The following code illustrates the use of the standard clauses within a SELECT query: EXAMPLE: SELECT * FROM Northwind.dbo.CUSTOMERS ORDER BY CompanyName (* retrieves all columns) SELECT statements can be made very complex with the use of options that can join many tables together and with functions that can calculate and summarize data at the same time. SELECT statements also can often be as simple as one line of code that retrieves the requested data. The complete SELECT syntax is very involved with many optional portions. The complete syntax reference can be found in SQL Server Books Online (BOL) under "SELECT, SELECT (described)." Many of the options are used only under special circumstances. Take the following one-line code, for instance. Notice the simplicity required to code it and also note that at least the first two sub-statements are specified. SELECT * FROM Pubs.dbo.AUTHORS This statement retrieves all columns and rows from the authors table in the Pubs database. The SELECT statement's syntax is relatively simple as shown in the following: Select [alldistinct] columnlist From tablelist Where condition(s) OrderBy columnname type The descriptions for the arguments are shown in Table 4.1 Table 4.1. The Arguments of the Basic SELECT Statement
The first portion of the SELECT statement identifies which columns are going to come from table list . When specifying column names, be sure to use a comma-delimited list and don't place a comma after the final column name. When specifying column names , you can use an asterisk (*), designating that all columns are to be returned from the specified table or tables. For example, if you created a table named Product with three columns Product_ID , Name , and Price and selected all columns from this table using the asterisk symbol, your resultset would first display the Product_ID column, then the Name column, and finally the Price column. When the asterisk is not used, however, columns are automatically rearranged in the output based on how you arrange the columns in the column list . NOTE Starting to Code Note the naming convention used to supply table names. Four part names, Server.Owner.Database.Object, are discussed in Chapter 3. If the database you are using is already set, then you need not supply the database name or owner name. Before you try any of these examples, make sure the database is Pubs . To do this, type USE PUBS before the first query or select the Pubs database from the drop-down list box at the top of the Query Analyzer. Anytime you create a data retrieval query, you have to specify where the data is coming from immediately after you specify which columns you want to access. When specifying table names in the SELECT statement, you may include one or more to collect information from more than one table. For example, examine the following basic query: SELECT au_id, au_fname FROM Pubs.dbo.Authors This query selects the au_id and au_fname columns from the Authors table residing in the Pubs database. Notice that the column names au_id and au_fname were delimited with a comma. The example was just a basic query, which could have been made much more complex. You may want to filter the data, perhaps to select all authors with first names having the letter P, or only those authors living in California. This example could have even been more basic if you used an asterisk in the column selection sub-statement, which would select all columns from the Authors table. EXAM TIP Faster Data Access If retrieving data seems to take forever, a good idea may be to implement an indexing strategy. Chapter 10 discusses indexes, including index implementation. Also, notice that the columns in the resultset, in the lower pane of the analyzer, were organized in the way they were specified in the column select list; that is, au_id was first displayed and then au_fname . Changing Column HeadersPart of delivering a sound application in a business environment is development that provides a user-friendly interface for accessing the database. By default, the column headers that are displayed in the resultset are the same as the columns specified in the column select list, such as au_id and au_fname . But why not change this column header to a more understandable title? You can alias a column header without problem and in doing so increase the readability of the data. You can change the name of a resultset column by specifying the keyword AS , this being the traditional SQL-92 ANSI standard. Changing the column name with an equals sign (=) or implied assignment is also an alternative syntax choice.
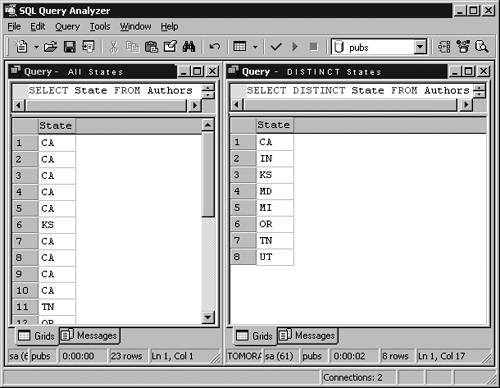
Column names should be changed in cases where they are not user friendly. A good example is au_id . You could change this into a more readable column such as Author's ID . Even though T-SQL is Microsoft's implementation of SQL and does allow for a variety of syntax choices, the method usually selected by experienced developers is ANSI SQL-92. The AS option is used more frequently because it fits the ANSI SQL standard. The way in which you change a column header to an alias is as follows : SELECT Au_id AS 'Author ID' FROM Authors. The original column name is Au_id and the alias assigned to the column is 'Author ID' . The alias certainly provides for a much more meaningful heading. This alias can also be used as a means of renaming a column under a view definition. NOTE Specifying AS It is not mandatory for you to explicitly specify AS . The same resultset could have been generated using an implied assignment without including AS , as follows: Select Au_id 'Author ID', Au_fname 'First Name', Au_lname 'Last Name' From Authors There actually is no difference in using the equals assignment except that this method was introduced in a more recent version of SQL. Use the equals assignment as follows: SELECT 'Author ID'=Au_id, 'First Name'= Au_fname, 'Last Name'=Au_lname FROM Authors String ConcatenationSometimes you need to show two columns as one by combining two columns together. When you do this, you are using a method called string concatenation . Concatenation can be thought of as joining strings together just as you can combine words into phrases. When done in a more involved application, concatenation can provide the means for taking individual string elements and combining them together as T-SQL syntax. NOTE Quotation Mark Usage As you probably have already noticed, most column aliases have been enclosed with single quotation marks. This enclosure needs to be made when the column alias includes spaces. The alias name needs to be enclosed with brackets when the alias is a reserved SQL Server keyword. The operator used to perform the concatenation is the plus (+) sign. One reason to concatenate two columns together might be, for example, when you want to have a column named Full Name , which is created by combining both the last name and first name values. The only way you could combine the two columns is to use concatenation. For additional readabilty, insert a comma as follows: SELECT Au_lname + ', ' + Au_fname As 'Full Name' FROM Authors This query concatenates the au_lname and au_fname columns to produce a new Full Name column with the name in the format "Smith, John." If you've programmed in Visual Basic before, this operator is equivalent to the ampersand (&). As you can see, more than two strings can be concatenated together. Another example of concatenation occurs when you want to create an address column that combines the zip , state , and street of a person. At other times concatenation is used to create a code, such as in a magazine subscription identifier. The DISTINCT KeywordA time may come where you will need to view or not view distinct records. Use of DISTINCT eliminates duplicate rows of any resultset. A SELECT query may return records with equal values, but using DISTINCT eliminates duplicates and leaves only singular values in the resultset. You might use the DISTINCT keyword when you need to know only whether a value exists, rather than how many records of a value exist. See Figure 4.1 for a contrast between listing all data values and DISTINCT data values. Figure 4.1. Limiting data to DISTINCT data values. This DISTINCT option, when specified, selects only the values that are unique throughout a pertaining row. The following statement selects all authors' states that are unique throughout the Authors table in the Pubs database. The finished resultset provides a list of states represented by the authors. No state would be listed more than once. SELECT DISTINCT State FROM Authors The DISTINCT keyword is optional with SUM , AVG , and COUNT . When DISTINCT is used, duplicate values are eliminated before the sum, average, or count is calculated. At some point you may want to use DISTINCT on just one column of a resultset. If you really think about it for a while, it's clear that this doesn't really make sense, at least not without using aggregate functions for the other columns. Rememberthe use of the keyword DISTINCT applies to the entire row, not just some columns. FROM Which Table?When running any data retrieval query, it is compulsory to specify where the data is coming from. Specifying which tables are going to be accessed can be done with the FROM clause. FROM table lists do not necessarily have to be just standard tables. It is also valid to specify derived tables, joined tables, views, user-defined functions that return tables, and system functions that return tables. A derived table is a subquery that retrieves rows from the database. A SELECT clause within a FROM clause of another SELECT , referred to by an alias, produces a derived table. The resulting rows take on a similar construct to that of a standard table. Joined tables are used when you would like to combine records from multiple sources. Joining is a process whereby you can retrieve data from two or more tables based on logical relationships between the tables. Joining is discussed in detail later in Chapter 5. The name of a view is often substituted for a table name. A view is stored as a query on the server and often provides necessary column restrictions and application considerations that makes it a beneficial data source. Views are discussed in detail in Chapter 7, "Working with Views." User-defined functions can generate recordset output and in that form be used in place of a table name. A function can declare an internal table variable, insert rows into the variable, and then return the variable as its return value. A class of user-defined functions known as in-line functions return the resultset of a SELECT statement as a variable of type table . User-defined functions are complex programming mechanisms that are covered in full in Chapter 9, "Stored Procedures and User-Defined Functions." System functions often generate a set of records that can be envisioned as a table. These rowset functions return an object that can be used in place of a table reference in a T-SQL statement. To increase the readability of queries, you can use table aliases similar to column aliases. Table aliases, however, are different. First, they are used to alias table names, and second, they don't make the user-interface more readable. Table aliases benefit the developer and save time as well as provide other coding benefits. Look at the following example: Use Pubs SELECT a.Au_id, a.Au_fname FROM Authors AS a It is also possible to have multiple table aliases assigned in the FROM statement. This is a very common practice to ease coding of columns from a variety of sources. It is also used in joining tables to provide more definition to the join operation. When using data from two or more tables, each table alias assignment is used in a prefix within the column list to ensure data pointers are defined to the correct table source: SELECT a.Au_id, ta.Title_id FROM Authors AS a INNER JOIN TitleAuthor AS ta ON a.Au_id = ta.Au_id This query selects Author ID from the Authors table and Title ID from the TitleAuthor table and groups them into one resultset. Joins are discussed in detail in Chapter 5. This is a powerful feature, especially when you need to create summary data. You can gather up the important information into a single resultset so that it can be coded more easily than it would be if you had to use the full table name as a prefix for every column name. Data is displayed unconditionally for the columns selected, except in instances where data rows have been filtered by a HAVING or WHERE condition, or a JOIN operation that limits the rows. The WHERE ClauseNow that you've seen the SELECT column list and FROM clause, it's time to move on to the additional optional specifications that enable you to further control what data is displayed. The WHERE clause is an optional specification that is used to limit the number of rows in the resultset based on defined restrictions. Restrictions are specified as conditional arguments, such as Salary>10000 , LastName LIKE 'G%' , or State = 'FL' . See "Filtering Data," later in this chapter. Most SELECT statements are used to display several columns of data from a table, which requires that conditions be met pertinent to the application. The general SELECT , FROM , and WHERE format is illustrated in Step by Step 4.1:
NOTE Analyzer Connections You can open the Query Analyzer directly by choosing Start, Programs, Microsoft SQL Server, or from within the Enterprise Manager from the Tools menu. When starting the Query Analyzer from the Enterprise Manager, connection information is passed through to SQL Server based on the registration data provided for the server. When starting the Analyzer from the Start menu, separate connection information can be supplied, which allows for security and alternate login use. Each reference to the Analyzer started from the Start menu can have different connection information supplied. The WHERE clause is always executed first to discover which rows should be looked at before other operations needed by a given SELECT clause. This acts as a layer of filtration in a basic SELECT query. The WHERE clause is easy to use, yet is very powerful. There is considerable benefit in creating resultsets to be used in reports . Many operators can be used in conjunction with the WHERE clause to provide completely flexible filtration. The WHERE and HAVING clauses in a SELECT statement control the rows from the source tables that are used to build the resultset. WHERE and HAVING are filters. They specify a series of search conditions, and only those rows that meet the terms of the search conditions are used to build the result set. HAVING is discussed later in Chapter 5, "Advanced Data Retrieval and Modification." To address it now would require that you first understand grouping of data, which falls out of the immediate scope of discussion. After data selection has been determined, the actual data sent is ready for an ordering process if one has been defined. The ordering of data is optional and if it is not present in a request, the data is sent in an order determined at the data source. ORDER DataPutting data in order provides for a more meaningful display of data and enables the data to be presented in a manner that meets additional reporting requirements set by most front-end applications. The ORDER BY clause tells SQL to sort the data before returning it in a resultset. Step by Step 4.2 shows you how to place a list into alphabetical order.
NOTE ASC/DESC In the sample query the order is identified as ASC (Ascending). ASC is the default and can be optionally provided with the command. DESC must be provided if a descending sequence is desired. ORDER BY determines the sequence of data based on column(s) selected and sequencing requested: ascending ( ASC ) or descending ( DESC ). Descending orders rows from highest to lowest; ascending orders rows from lowest to highest. The ORDER BY clause can include columns not mentioned in the SELECT list. There is no limit to the number of items in the ORDER BY clause; however, there is a limit of 8,060 bytes. The following is an example of its elementary use: SELECT Au_fname FROM Pubs.dbo.Authors ORDER BY Au_id DESC NOTE Ordering NULL Values When you are ordering rows that contain null values, the null-valued records are displayed first, provided that the default sort order is used (ASC). Basic conditions and sequences used in the standard query can be greatly enhanced over what you have seen thus far. But you need this initial understanding of the rudiments of the language if you are going to use advanced features appropriately. REVIEW BREAK: The Basic SELECT StatementYou have looked at the content of the basic element SELECT within the realm of T-SQL. Elements used in this command are useful in learning the concepts of the other commands and SQL elements. Many of the concepts of the SELECT statement can be applied in other statements. The SELECT options must always be used in the correct sequence, which can be summarized by use of the anagram, S F W G H O C (Select From Where Group Having Order Compute). A mechanism I have used for years goes somewhat like this:
Similar humorous statements have been constant reminders of correct syntax over the years. Nevertheless, the appropriate use of each of these options making up the seven letters in the acronym are crucial to the use of SQL Server. You have learned about SELECT , FROM , WHERE , and ORDER in this section, and this chapter provides additional information on how to further use these options as you read ahead. GROUP BY , HAVING , and COMPUTE (BY) are discussed in detail in Chapter 5, "Advanced Data Retrieval and Modification." |
EAN: N/A
Pages: 228