| This section begins with an overview of triggers, followed by an examination of how to create and manage triggers. Later, this chapter goes into depth with AFTER and INSTEAD OF triggers, but this section discusses triggers in general. When points that are specific to one type of trigger or another are discussed, we identify which type of trigger ( AFTER or INSTEAD OF ) they apply to. This section comes full circle, from the creation of a trigger, through altering and renaming the trigger, and finally dropping the trigger. Overview of Triggers SQL Server's capability in managing data extends to controlling data as it is manipulated in the table. There are two main types of triggers: AFTER and INSTEAD OF triggers. Triggers can be used for a number of tasks , including data validation. Triggers are pieces of T-SQL programming code (like stored procedures are) that execute when data is manipulated within a table. The data manipulation could be an INSERT , DELETE , or UPDATE . There is no way to force a trigger to execute without performing the associated data modification on the table. Triggers can be used to enforce the business rules in a database when constraints are not sufficient. Typically, triggers are a more CPU- intensive way to implement tasks, and you are usually better off to implement restrictions through constraints, such as FOREIGN KEY or CHECK constraints, because they do not cause performance to suffer as much. Most of the performance impact that triggers suffer from occurs when they reference tables that are not in memory. Triggers provide many advantages and benefits. The following list sums them up: -
Triggers are capable of enforcing complex restrictions as opposed to CHECK constraints, such as raising a user -defined error using the RAISERROR() command. -
Triggers can be used to track or log changes to a table. -
More than one AFTER trigger can be created on a table. With INSTEAD OF triggers, only one trigger of each type ( INSERT , UPDATE , or DELETE ) can be created on a table. -
Triggers consume relatively more performance than FOREIGN KEY constraints. If the trigger references only tables that are in memory, then performance is similar. -
Stored procedures, both local and remote, might be executed from triggers. When working with triggers, it is important to remember the order in which they execute. INSTEAD OF triggers execute instead of the attempted data modification ( INSERT , UPDATE , or DELETE ). The INSTEAD OF trigger could actually proceed to perform the modification to the table itself. Constraints are applied after the INSTEAD OF trigger, and AFTER triggers are executed after the constraints and data modification takes place. Creating Triggers Before you look at the syntax of the CREATE TRIGGER statement, you should be aware of a few facts about triggers. Then after you study the syntax of the CREATE TRIGGER statement, you can look at creating a trigger in both Query Analyzer and Enterprise Manager. -
Triggers can process all three actions: UPDATE , DELETE and INSERT . -
AFTER triggers apply to a single table and can be made column-level . -
AFTER triggers cannot be created on views or temporary tables. -
INSTEAD OF triggers are the only triggers that can be created on views. -
Triggers can be created with the SQL Server Enterprise Manager, the Query Analyzer, and programmatically through SQL-DMO. -
Triggers are database objects and follow object-naming conventions. -
Triggers can be created and altered by the sysadmin , db_owner and db_ddladmin roles, as well as the table owner. -
Triggers cannot use any of the following statements: CREATE DROP ALTER TABLE GRANT REVOKE DISK ALTER DATABASE LOAD DATABASE RESTORE DATABASE UPDATE STATISTICS SELECT INTO LOAD TRANSACTION RECONFIGURE Now it's time to examine the CREATE TRIGGER statement. The following lists the basic syntax of the CREATE TRIGGER and then gives an explanation to each argument: CREATE TRIGGER [owner.]trigger_name ON [owner.]{table_name view_name} [WITH ENCRYPTION] {FOR AFTER INSTEAD OF} {INSERT, UPDATE, DELETE} [NOT FOR REPLICATION] AS [IF UPDATE (column)] [{AND OR} UPDATE (column)] sql_statements -
Trigger_name . The name of the new trigger; most follow the naming rules for identifiers. -
Table_name . The name of the table on which the trigger is executed. -
WITH ENCRYPTION . Encrypts the contents or description of the trigger by encrypting the record in the syscomments table. This prevents anyone (including you) from being able to read the trigger definition and seeing what the trigger does. As with views, this might be done for security or to protect your development investment or intellectual property. -
AFTER . Specifies that the trigger be executed after all operations specified in the triggered SQL statement have executed in success. This trigger fires after any constraints or rules that are on the table. FOR might also be used to create an AFTER trigger. FOR is supported for backward compatibility. -
INSTEAD OF . Specifies that the trigger is fired rather than the triggering SQL statements. This allows the trigger to execute prior to constraints and rules that might be on the table. -
{INSERT, UPDATE, DELETE} . Specifies which actions invoke the trigger. -
[NOT FOR REPLICATION] . Specifies that the trigger should not fire when a replication process changes the underlying table. -
IF UPDATE ( column ) . Specifies that the trigger applies to updates in only certain columns . AND operators and OR operators can be used to have these statements apply to updates in multiple columns. This statement applies only to AFTER triggers because there can be only one INSTEAD OF trigger for the UPDATE action. -
AS SQL Statements . Specifies the course of action, such as rejecting the values being entered, for example. Here you might need to use some programming logic, which is explained in Chapter 6. In many cases you might have to create two sections of code in your trigger: one to handle single record inserts , updates, or deletes, and one to handle multi-record modifications. This chapter shows this type of code to let you see what might be necessary when creating your own triggers. Because triggers are an important tool for validating input, and because practice makes perfect, follow Step by Step 8.1 to see how to create an INSERT trigger using Query Analyzer. The differences between INSERT , UPDATE , and DELETE triggers are covered later in this chapter. STEP BY STEP 8.1 Creating an INSERT Trigger Using Query Analyzer -
Open the SQL Server Query Analyzer by selecting it from the SQL Server 2000 group under Programs on the Start menu. -
You will create a trigger on the Order Details table in the Northwind database. To create a new trigger, enter and execute the following code: [View full width] [View full width] USE Northwind GO CREATE TRIGGER PriceCheck ON [Order Details] FOR INSERT AS DECLARE @counter int SET @counter = @@ROWCOUNT DECLARE @unitprice money DECLARE order_details_insert_cursor CURSOR FOR SELECT UnitPrice FROM inserted IF @counter = 1 BEGIN IF(SELECT UnitPrice FROM inserted)> 300 --If the price entered is greater than 300 BEGIN -- print a warning PRINT 'Cannot Enter Price Greater Than 300 --Take back the command ROLLBACK TRANSACTION END END ELSE BEGIN OPEN order_details_insert_cursor FETCH NEXT FROM order_details_insert_cursor INTO  @unitprice WHILE @@FETCH_STATUS = 0 BEGIN IF @unitprice > 300 --If the price entered is greater than 300 BEGIN -- print a warning PRINT 'Cannot Enter Price Greater Than 300' --Take back the command ROLLBACK TRANSACTION RETURN --Exit trigger immediately END FETCH NEXT FROM order_details_insert_cursor INTO @unitprice END CLOSE order_details_insert_cursor END DEALLOCATE order_details_insert_cursor @unitprice WHILE @@FETCH_STATUS = 0 BEGIN IF @unitprice > 300 --If the price entered is greater than 300 BEGIN -- print a warning PRINT 'Cannot Enter Price Greater Than 300' --Take back the command ROLLBACK TRANSACTION RETURN --Exit trigger immediately END FETCH NEXT FROM order_details_insert_cursor INTO @unitprice END CLOSE order_details_insert_cursor END DEALLOCATE order_details_insert_cursor -
To see that the trigger was created, enter the following query as displayed in Figure 8.1, which purposely defies the trigger: INSERT INTO [Order Details] VALUES (11076, 32, 320, 12, 0) Figure 8.1. Seeing an INSERT trigger in action. 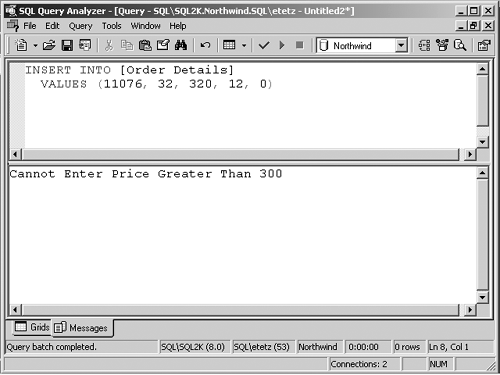 | Having a clear understanding of how to create an UPDATE trigger is important when you want to control what takes place as data is updated. Step by Step 8.2 takes you through the process of creating an UPDATE trigger using Enterprise Manager. STEP BY STEP 8.2 Creating an UPDATE Trigger Using Enterprise Manager -
Open the SQL Server Enterprise Manager by selecting it from the SQL Server 2000 group under Programs on the Start menu. -
To create an UPDATE trigger on the Jobs table, expand the Console Root through your SQL Server Group, your Server Instance, Databases folder, Pubs database, and select Tables. Right-click on the Jobs table and select All Tasks, Manage Triggers, as seen in Figure 8.2. Figure 8.2. Trigger management with Enterprise Manager. 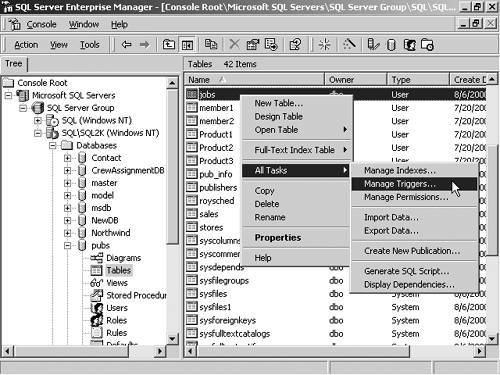 -
After you have found the Trigger Properties dialog box (see Figure 8.3), enter the following code under the name of <new> : [View full width] [View full width] CREATE TRIGGER LevelCheck ON Jobs FOR UPDATE AS DECLARE @counter int SET @counter = @@ROWCOUNT DECLARE @maxlevel tinyint DECLARE @minlevel tinyint DECLARE jobs_update_cursor CURSOR FOR SELECT max_lvl, min_lvl FROM inserted IF @counter = 1 --If only one record was inserted, then run this code block BEGIN IF(SELECT max_lvl FROM inserted) < (SELECT min_lvl from inserted) --If the maximum level is smaller than the minimum level BEGIN --Print a warning RAISERROR ('How can the maximum level be smaller than the minimum level?', 16, 1) WITH LOG, NOWAIT PRINT 'Correct your mistake!' --Take back the command ROLLBACK TRANSACTION PRINT 'Transaction Cancelled' END END ELSE --If more than one record was inserted, then work with the cursor BEGIN OPEN jobs_update_cursor FETCH NEXT FROM jobs_update_cursor INTO @maxlevel, @minlevel WHILE @@FETCH_STATUS = 0 BEGIN IF @maxlevel < @minlevel BEGIN --Print a warning RAISERROR ('How can the maximum level be smaller than the minimum level?', 16, 1) WITH LOG, NOWAIT PRINT 'Correct your mistake!' --Take back the command ROLLBACK TRANSACTION PRINT 'Transaction Cancelled' RETURN --Exit trigger rather than continuing END FETCH NEXT FROM jobs_update_cursor INTO @maxlevel, @minlevel END CLOSE jobs_update_cursor END DEALLOCATE jobs_update_cursor Figure 8.3. Creating an UPDATE trigger in Enterprise Manager. 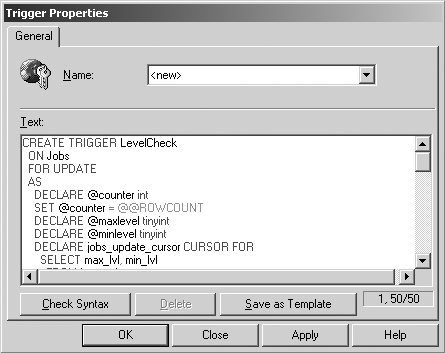 -
To ensure the syntax is correct, use the Check Syntax button. If it is successful, then use the OK button to create the trigger. To test the new trigger, enter the following query in Query Analyzer as displayed in Figure 8.4, which purposely defies the trigger: UPDATE Jobs SET min_lvl=100, max_lvl=20 WHERE job_id=1 Figure 8.4. The UPDATE trigger not allowing the update. 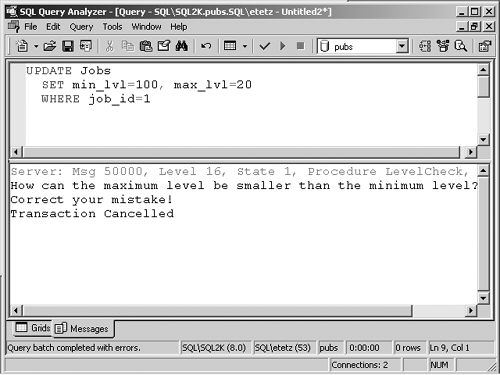 | NOTE When to Create Triggers Avoid creating triggers, if you can. For simple tasks, constraints perform the task faster and with less CPU overhead. Triggers should be used only in situations when constraints do not offer the power or flexibility required.
Now that you know how to create a trigger, you can examine how to modify or alter the trigger to meet your ever-changing needs. Altering Triggers You might need to make slight changes to the way a trigger processes because policies or procedures change in your organization. This is not a problem. You can easily change the way a trigger processes by either deleting and then re-creating the trigger, or by altering the trigger via a one-step process using ALTER TRIGGER . ALTER TRIGGER is the preferred method because the ID in the syscomments table remains the same. If you have other scripts on your server that have been coded to look for the trigger by its object_ID , then these scripts fail if the object_ID is changed; coding your scripts with these types of dependencies is generally a bad practice. The syntax for ALTER TRIGGER is: ALTER TRIGGER [owner.]trigger_name ON [owner.]{table_name view_name} [WITH ENCRYPTION] {FOR AFTER INSTEAD OF}{INSERT, UPDATE, DELETE} [NOT FOR REPLICATION] AS [IF UPDATE (column)] [{AND OR} UPDATE (column)] sql_statements The syntax for ALTER TRIGGER is comparable to the CREATE TRIGGER statement and has all the same arguments, so refer to the syntax of the CREATE TRIGGER statement earlier in this chapter to find out what each option does. To edit a trigger with Query Analyzer, see Step by Step 8.3. STEP BY STEP 8.3 Editing a Trigger Using ALTER TRIGGER in Query Analyzer -
Open the SQL Server Query Analyzer by selecting it from the SQL Server 2000 group under Programs on the Start menu. -
For this example, you will edit the trigger you created in Step by Step 8.1. Type the following into Query Analyzer: [View full width] [View full width] USE Northwind GO ALTER TRIGGER PriceCheck ON [Order Details] FOR INSERT AS DECLARE @counter int SET @counter = @@ROWCOUNT DECLARE @unitprice money DECLARE order_details_insert_cursor CURSOR FOR SELECT UnitPrice FROM inserted IF @counter = 1 BEGIN IF(SELECT UnitPrice FROM inserted)> 500 --If the price entered is greater than 500 BEGIN -- print a warning RAISERROR ('ERROR: PRICE CANNOT EXCEED 500', 16,1) WITH LOG --Take back the command ROLLBACK TRANSACTION PRINT 'TRANSACTION CANCELLED' END END ELSE BEGIN OPEN order_details_insert_cursor FETCH NEXT FROM order_details_insert_cursor INTO @unitprice WHILE @@FETCH_STATUS = 0 BEGIN IF @unitprice > 500 --If the price entered is greater than 500 BEGIN -- print a warning RAISERROR ('ERROR: PRICE CANNOT EXCEED 500', 16, 1) WITH LOG --Take back the command ROLLBACK TRANSACTION RETURN --Exit trigger immediately END FETCH NEXT FROM order_details_insert_cursor INTO @unitprice END CLOSE order_details_insert_cursor END DEALLOCATE order_details_insert_cursor -
Run the command. | To edit the same trigger with Enterprise Manager, follow Step by Step 8.4. STEP BY STEP 8.4 Alter a Trigger Using Enterprise Manager -
Open the SQL Server Enterprise Manager by selecting it from the SQL Server 2000 group under Programs on the Start menu. -
To edit a trigger on the Order Details table, expand the Console Root through your SQL Server Group, your Server Instance, Databases folder, Northwind database, and select Tables. Right-click on the Order Details table and select All Tasks, Manage Triggers. -
After you have found the Trigger Properties dialog box, select PriceCheck from the Name drop-down menu, and alter the text to resemble the following (if you have completed Step by Step 8.3, use this as an opportunity to confirm that the trigger was altered): [View full width] [View full width] CREATE TRIGGER PriceCheck ON [Order Details] FOR INSERT AS DECLARE @counter int SET @counter = @@ROWCOUNT DECLARE @unitprice money DECLARE order_details_insert_cursor CURSOR FOR SELECT UnitPrice FROM inserted IF @counter = 1 BEGIN IF(SELECT UnitPrice FROM inserted)> 500 --If the price entered is greater than 500 BEGIN -- print a warning RAISERROR ('ERROR: PRICE CANNOT EXCEED 500', 16,1) WITH LOG --Take back the command ROLLBACK TRANSACTION PRINT 'TRANSACTION CANCELLED' END END ELSE BEGIN OPEN order_details_insert_cursor FETCH NEXT FROM order_details_insert_cursor INTO @unitprice WHILE @@FETCH_STATUS = 0 BEGIN IF @unitprice > 500 --If the price entered is greater than 500 BEGIN -- print a warning RAISERROR ('ERROR: PRICE CANNOT EXCEED 500', 16, 1) WITH LOG --Take back the command ROLLBACK TRANSACTION RETURN --Exit trigger immediately END FETCH NEXT FROM order_details_insert_cursor INTO @unitprice END CLOSE order_details_insert_cursor END DEALLOCATE order_details_insert_cursor -
To save your changes, press the OK button and exit Enterprise Manager. | In addition to modifying triggers by altering the content, there might be times that you will have to change the name of the trigger to better reflect its purpose. Renaming Triggers Triggers might also be renamed by any user who has the correct permission and by the database owner. Triggers must follow the rules for naming identifiers. You are not likely to have to rename a trigger very often, but you might end up with a naming conflict with another item you want to add to the database. If policy or procedures prevents you from being able to rename the new item, you might have to rename your trigger. WARNING Careful Renaming When renaming a trigger, any references to the trigger name inside of the trigger or on dependent objects are not updated, and have to be updated manually or they will not work. You should run sp_depends 'trigger_name' to find out where the trigger is referenced before you rename the trigger.
To rename a trigger, use the sp_rename system stored procedure. The syntax for sp_rename is as follows : sp_rename [ @objname = ] 'object_name', [ @newname = ] 'new_name' [ , [ @objtype = ] 'object_type' ] In this example, 'object_name' is the original name of the trigger, 'new_name' is the new name given to the trigger, and 'object_type' is the object being renamed. A trigger comes into the OBJECT value, so it is adequate to specify OBJECT as the value for 'object_type' when renaming triggers. Rather than renaming a trigger, you might want to delete it and re-create the trigger with a new name. The next topic is deleting or dropping triggers. Dropping Triggers Deleting triggers is as easy as renaming them. Deleting a trigger does not affect the underlying table or data contained in the table. To remove triggers using the SQL Server Query Analyzer, you have to use the DROP TRIGGER statement. The syntax is as follows: DROP TRIGGER { trigger_name } [,...n ] The only argument you must specify is trigger_name , which is the trigger or triggers to delete. Deleting many triggers at a time is possible when a comma is used to separate trigger names . To drop and rename a trigger, follow Step by Step 8.5. STEP BY STEP 8.5 Renaming and Dropping Triggers -
Open the SQL Server Query Analyzer by selecting it from the SQL Server 2000 group under Programs on the Start menu. -
To rename the trigger you created in Step by Step 8.2, enter the following: sp_rename 'LevelCheck', 'RT', OBJECT -
To drop the renamed trigger, enter the following: DROP TRIGGER RT -
Execute the statements as displayed in Figure 8.5. Figure 8.5. Renaming and dropping a trigger. 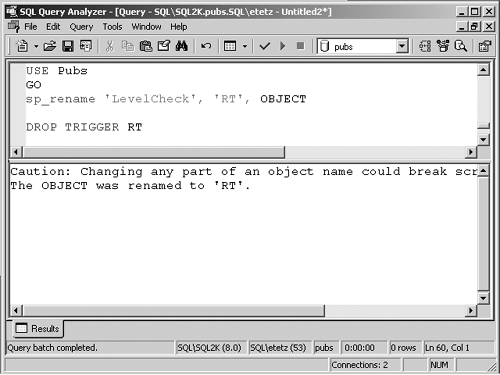 | WARNING Careful Trigger Deletion When dropping a trigger, you should first find out whether any tables or objects reference it. To find out what objects reference a trigger, run sp_depends ' trigger_name ' before you drop the trigger. If you do not check to see what objects reference the trigger, then you risk having those objects fail to function. After you have deleted the trigger, then you cannot perform this check.
You have now seen the mechanics of creating and managing triggers. The next things to look at are the actions that triggers can be associated with and why you might want to use them.  |