Chapter 4: Programmability Features
The new development features found in SQL Server 2005 are the accumulation of many man-years worth of effort by both the SQL Server development team and the .NET Framework development team. The most significant of these new development features is the integration of the .NET Common Language Run-time (CLR). The integration of the CLR brings with it a whole host of new capabilities, including the capability to create database objects using any of the .NET compatible languages, including C#, VB.NET, and Managed C++. In this chapter, you’ll get an introduction to those new .NET CLR integration features as well as see some examples showing how they are used. Next, the chapter will address a topic that’s more familiar to SQL Server DBAs and developers: the new features found in T-SQL. Then, the chapter will take a walk on the client side and present some of the new development features found in the updated .NET Framework Data Provider for SQL Server that ships with SQL Server 2005.
Common Language Run-time (CLR) Integration
Undoubtedly the most significant new feature in the SQL Server 2005 release is the integration of the Microsoft .NET Framework. The integration of the CLR with SQL Server extends the capability of SQL Server in several important ways. While T-SQL, the existing data access and manipulation language, is well suited for set-oriented data access operations, it also has limitations. Designed more than a decade ago, T-SQL is a procedural language, not an object-oriented language. The integration of the CLR with SQL Server 2005 brings with it the ability to create database objects using modern object-oriented languages like VB.NET and C#. While these languages do not have the same strong set-oriented nature as T-SQL, they do support complex logic, have better computation capabilities, provide easier access to external resources, facilitate code reuse, and have a first-class development environment that provides much more power than the old Query Analyzer.
The integration of the .NET CLR with SQL Server 2005 enables the development of stored procedures, user-defined functions, triggers, aggregates, and user-defined types using any of the .NET languages. The integration of the .NET CLR with SQL Server 2005 is more than just skin deep. In fact, the SQL Server 2005 database engine hosts the CLR in-process. Using a set of APIs, the SQL Server engine performs all of the memory management for hosted CLR programs.
The managed code accesses the database using ADO.NET in conjunction with the new SQL Server .NET Data Provider. A new SQL Server object called an assembly is the unit of deployment for .NET objects with the database. To create CLR database objects, you must first create a DLL using Visual Studio 2005. Then, you import that DLL into SQL Server as an assembly. Finally, you link that assembly to a database object such as a stored procedure or a trigger. In the next section, you’ll get a more detailed look at how you actually use the new CLR features found in SQL Server 2005.
Assemblies
To create .NET database objects, you must write managed code and compile it into a .NET assembly. The most common way to do this would be to use Visual Studio 2005 and then create a new SQL Server project and compile it into a DLL. More details about how you actually go about creating a new managed code project with Visual Studio 2005 are presented in the section “.NET Stored Procedures” later in this chapter.
After the assembly is created, you can then load the assembly into SQL Server using the T-SQL CREATE ASSEMBLY command, as you can see here:
CREATE ASSEMBLY MyCLRDLL FROM '\\SERVERNAME\CodeLibrary\MyCLRDLL.dll'
The CREATE ASSEMBLY command takes a parameter that contains the path to the DLL that will be loaded into SQL Server. This can be a local path, but more often it will be a path to a networked file share. When the CREATE ASSEMBLY is executed, the DLL is copied into the master database.
If an assembly is updated or becomes deprecated, then you can remove the assembly using the DROP ASSEMBLY command as follows:
DROP ASSEMBLY MyCLRDLL
Because assemblies are persisted in the database, when the source code for that assembly is modified and the assembly is recompiled, the assembly must first be dropped from the database using the DROP ASSEMBLY command and then reloaded using the CREATE ASSEMBLY command before the updates will be reflected in the SQL Server database objects.
You can use the sys.assemblies view to view the assemblies that have been added to SQL Server 2005, as shown here:
SELECT * FROM sys.assemblies
Since assemblies are created using external files, you may also want to view the files that were used to create those assemblies. You can do that using the sys.assembly_files view, as shown here:
SELECT * FROM sys.assembly_files
SQL Server .NET Data Provider
If you’re familiar with ADO.NET, you may wonder exactly how these new CLR database procedures will connect with the database. After all, ADO.NET makes its database connection using client-based .NET data providers like the .NET Framework Data Provider for SQL Server, which connects to SQL Server database, or the .NET Framework Data Provider for Oracle, which connects ADO.NET applications to Oracle databases. While that’s great for a networked application, going through the network libraries isn’t the most efficient connection mode for code that’s running directly on the server. To address this issue, Microsoft created the new SQL Server .NET Data Provider. The SQL Server .NET Data Provider establishes an in-memory connection to the SQL Server database.
A reference to the new SQL Server .NET Data Provider is automatically added to your Visual Studio 2005 applications when you create a new SQL Server project. To create a new SQL Server project type, you first open up Visual Studio 2005 and then select the File | New Project option from the menu. Then, from the New Projects dialog, select the project type (e.g., Visual Basic Projects, Visual C# Projects), and then scroll through the list of templates until you see the SQL Server project template shown in Figure 4-1.
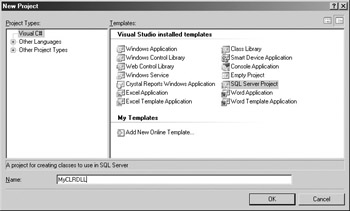
Figure 4-1: Creating a New SQL Server Project with Visual Studio 2005
| Note | The creation of SQL Server projects is supported in Visual Studio 2005 (code named Whidbey), which is scheduled to be released at the same time as SQL Server 2005. |
After you select the SQL Server Project template, give your project a name and click OK to create the project. All of the required references will automatically be added to your SQL Server project. The new SQL Server .NET Data Provider is added as the sqlaccess reference that you can see highlighted in Figure 4-2. Plus, you can see the System.Data reference, which provides support for ADO.NET and its data-oriented objects such as the DataSet and the SQL Server data types.
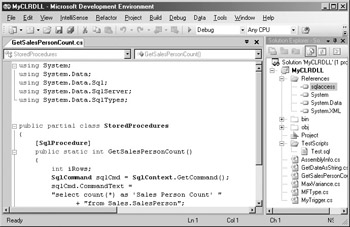
Figure 4-2: The SQL Server .NET Data Provider Reference
In addition to adding the proper references, one of the important things that Visual Studio 2005’s SQL Server templates automatically do for you is add the correct import directives. When you’re creating SQL Server CLR database objects, you should be sure to include an import statement for the System.Data.SqlServer namespace in your project. The System.Data.SqlServer namespace contains the .NET classes that compose the SQL Server .NET Data Provider. The import directive enables you to refer to the classes in the System.Data.SqlServer namespace using just their short class names rather than their much longer fully qualified names, which are always prefixed with the namespace name (e.g., System.Data.SqlServer). For a C# project, the import directive is as follows:
using System.Data.SqlServer;
For a VB.NET project, you import the System.Data.SqlServer namespace as follows:
Imports System.Data.SqlServer
Unlike typical ADO.NET projects where you must explicitly open a connection to a named SQL Server instance using the connection object’s Open method, the SQL Server .NET Data Provider implicitly makes a connection to the local SQL Server system, and as you’ll see in the following examples, there’s no need to create an ADO.NET Connection object and invoke its Open method.
| Note | Strictly speaking, Visual Studio 2005 is not needed in order to create .NET database objects for SQL Server 2005. You can develop CLR database objects using the .NET Framework 2.0 and the .NET Framework SDK. However, Visual Studio 20005 provides project templates and project deployment options that give it significant advantages over manually creating these objects using just the .NET SDK. |
.NET Stored Procedures
Stored procedures are one of the most likely database objects that you’ll want to create using one of the managed .NET languages, because stored procedures often contain complex logic and embody business rules that are difficult to express in T-SQL. To create a CLR stored procedure in Visual Studio 2005, you can use the Project | Add Stored Procedure option to display the Visual Studio installed templates dialog that’s shown in Figure 4-3.
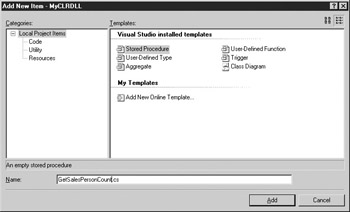
Figure 4-3: Adding a CLR stored procedure
From the Add New Item dialog, select the Stored Procedure option from the list of templates displayed in the Templates list and then provide the name of the stored procedure in the Name field that you can see at the bottom of the screen. Here, you can see that the stored procedure will be named GetSalesPersonCount. Visual Studio 2005 will add a new class to your project for the stored procedure. The generated class file is named after your stored procedure name and will include all of the required import directives as well as stub code that names the stored procedure. It’s up to you to fill in the rest of the code that makes the stored procedure work. The following example illustrates the source code required to create a simple CLR stored procedure:
using System; using System.Data; using System.Data.Sql; using System.Data.SqlServer; using System.Data.SqlTypes; public partial class StoredProcedures { [SqlProcedure] public static int GetSalesPersonCount() { int iRows; SqlCommand sqlCmd = SqlContext.GetCommand(); sqlCmd.CommandText = "SELECT COUNT(*) AS 'Sales Person Count' " + "FROM Sales.SalesPerson"; iRows = (int)sqlCmd.ExecuteScalar(); return iRows; } }; The first important point to note in this code is the directive that imports the System.Data.SqlServer namespace. This enables the MyCLRDLL project to use the SQL Server .NET Data Provider without always needing to reference the fully qualified name. The second thing to notice is the [SqlProcedure] attribute that precedes the method name; it tells the compiler this method will be exposed as a SQL Server stored procedure. Next, you can see that the default class name for this stored procedure is set to StoredProcedures. This class contains a static method named GetSalesPersonCount that returns an int data type. For C#, the method must be defined as static. For VB.NET code, the method would need to be defined as Shared. The code here essentially retrieves the number of rows from the table Sales.SalesPerson in the sample AdventureWorks database. Notice that within the class, the Open method was not used. This is a radical departure for the client-based ADO.NET code. Instead, the SQL Server .NET Data Provider automatically opens a connection to the local server on your behalf.
After the CLR stored procedure source code has been compiled into an assembly, you can then add that assembly to the database and create the CLR stored procedure. You can do this in two ways: If you’re developing in Visual Studio 2005, then you can simply use the Build | Deploy Solution option to install the new CLR stored procedure in the SQL Server database. Or, you can perform the deployment steps manually. To help you understand how CLR objects are used in the database, I’ll explain the manual deployment steps in the next section.
After generating the DLL, the next step is to use that DLL to create a new SQL Server object called an assembly. The following code illustrates creating an assembly for the MyCLRDLL.DLL:
CREATE ASSEMBLY MyCLRDLL FROM '\\MyFileShare\Code Library\MyCLRDLL.dll'
The CREATE ASSEMBLY command uses the first argument to name the assembly. Here, I’ve named it MyCLRDLL, which happens to be the same name as the actual .NET DLL, but using the same names isn’t a requirement. The argument after the FROM clause tells the CREATE ASSEMBLY statement where to find the physical DLL on the disk. This could be on the local drive, or it could be a UNC path.
| Note | At the time of this writing, the first time you manually run the CREATE ASSEMBLY command the Microsoft.VisualStudio.DataTools.SqlAttributes.dll also needs to be present in the directory that contains the .NET DLL that you want to add as an assembly. |
When the assembly is created, the DLL is copied into the target SQL Server database and the assembly is registered. The following code illustrates creating the GetSalesPersonCount stored procedure that uses the MyCLRDLL assembly:
CREATE PROCEDURE GetSalesPersonCount AS EXTERNAL NAME MyCLRDLL.StoredProcedures.GetSalesPersonCount
The EXTERNAL NAME clause is new to SQL Server 2005. Here, the EXTERNAL NAME clause specifies that the stored procedure GetSalesPersonCount will be created using a .NET assembly. An assembly can contain multiple classes and methods; the EXTERNAL NAME statement uses the following syntax to identify the correct class and method to use from the assembly:
Assembly Name.ClassName.MethodName
In the case of the previous example, the registered assembly is named MyCLRDLL. The class within the assembly is StoredProcedures, and the method within the class that will be executed is GetSalesPersonCount.
After the CLR stored procedure has been created, it can be called exactly like any T-SQL stored procedure, as the following example illustrates:
DECLARE @mycount INT EXEC @mycount = GetSalesPersonCount PRINT @mycount
.NET User-Defined Functions
Creating .NET-based user-defined functions (UDFs) is another new feature that’s enabled by the integration of the .NET CLR. User-defined functions that return scalar types must return a .NET data type that can be implicitly converted to a SQL Server data type. Scalar functions written with the .NET Framework can significantly outperform T-SQL in certain scenarios because unlike T-SQL functions, .NET functions are created using compiled code. User-defined functions can also return table types, in which case the function must return a result set.
To add a UDF using Visual Studio 2005, you can use the Project | Add User-Defined Function menu option shown in Figure 4-4.
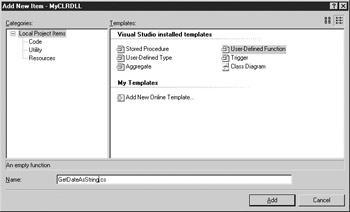
Figure 4-4: Adding a CLR user-defined function
You can either add this to an existing project as I did (adding it to the sample MyCLRDLL that I created in the earlier example), or create a new SQL Server project. The following example shows a simple UDF named GetDateAsString that performs a basic date-to-string conversion:
using System; using System.Data.Sql; using System.Data.SqlTypes; public partial class UserDefinedFunctions { [SqlFunction] public static SqlString GetDateAsString() { DateTime CurrentDate = new DateTime(); return CurrentDate.ToString(); } }; Here, notice that the System.Data.SqlServer namespace was not needed, as this particular function does not perform any data access. Next, you can see that by default, Visual Studio 2005 generated the UserDefinedFunctions class to contain all of the methods that this assembly will expose as UDFs. You can also see that the [SqlFunction] attribute is used to identify the GetDateAsString method as a UDF. The code here simply converts the system date to a string data type.
To create the function, the assembly must first be created as you saw in the stored procedure example. If you’re using Visual Studio 2005, you can simply select the Build | Deploy Solution option. If you’re doing this manually and this is included in an assembly with other CLR objects, you’ll first need to drop those objects, then drop the assembly, and finally re-create the assembly and objects. Since this method was added to the MyCLRDLL that was already used in an assembly and a stored procedure, the DROP PROCEDURE statement and the DROP ASSEMBLY statement must first be run to delete the dependent database objects before the updated .NET DLL can be reloaded into an assembly. After the existing objects are deleted, the following CREATE ASSEMBLY statement can be run to reload the new DLL:
CREATE ASSEMBLY MyCLRDLL FROM '\\MyFileShare\Code Library\MyCLRDLL.dll'
Then the CREATE FUNCTION statement is used to create a new SQL Server function that executes the appropriate method in the assembly. The following listing illustrates how the CREATE FUNCTION statement can create a .NET user-defined function:
CREATE FUNCTION GetDateAsString() RETURNS nvarchar(256) EXTERNAL NAME MyCLRDLL.UserDefinedFunctions.GetDateAsString
For user-defined functions, the CREATE FUNCTION statement has been extended with the EXTERNAL NAME clause, which essentially links the user-defined function name to the appropriate method in the .NET assembly. In this example, the GetDateAsString function is using the assembly named MyCLRDLL. Within that assembly, it’s using the UserDefinedFunctions class and the GetDateAsString method within that class.
After the function has been created, it can be called like a regular SQL Server function. You can see how to execute the GetDateAsString function in the following example:
SELECT dbo.GetDateAsString()
.NET Triggers
In addition to stored procedures and user-defined functions, the new .NET integration capabilities found in SQL Server 2005 also provide the ability to create .NET user-defined triggers (UDTs). To add a UDT using Visual Studio 2005, you can use the Project | Add Trigger menu option, as shown in Figure 4-5.
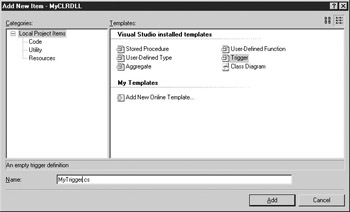
Figure 4-5: Adding a CLR trigger
As with the other CLR database objects, you select the Trigger option from the list of templates and then provide the name of the trigger in the name prompt. Visual Studio 2005 will generate a stub file that you can add your code to. The following example code listing illustrates a simple CLR trigger named MyTrigger:
using System; using System.Data; using System.Data.Sql; using System.Data.SqlServer; using System.Data.SqlTypes; public partial class Triggers { // Enter existing table or view for the target // and uncomment the attribute line [SqlTrigger (Name="MyTrigger", Target="Person.ContactType", Event="FOR INSERT")] public static void MyTrigger() { SqlTriggerContext oTriggerContext = SqlContext.GetTriggerContext(); SqlPipe sPipe = SqlContext.GetPipe(); SqlCommand sqlCmd = SqlContext.GetCommand(); if (oTriggerContext.TriggerAction == TriggerAction.Insert) { sqlCmd.CommandText = "SELECT * FROM inserted"; sPipe.Execute(sqlCmd); } } } Like the other examples, the stub file includes the appropriate import directives as well as generating a class, in this case appropriately named Triggers, and a method with its appropriate method attribute. This code example makes use of a couple of new ADO.NET objects: the SqlTriggerContext object and the SqlPipe object. The SqlTriggerContext object provides information about the trigger action that’s fired and the columns that are affected. The SqlTriggerContext object is always instantiated by the SqlContext object. Generally, the SqlContext object provides information about the caller’s context. Specifically, in this case, the SqlContext object enables the code to access the virtual table that’s created during the execution of the trigger. This virtual table stores the data that caused the trigger to fire.
Next, a SqlPipe object is created. The SqlPipe object represents a conduit that passes information between the CLR and the calling code. Here, the SqlPipe object enables the extended trigger to communicate with the external caller. Then the SqlContext object is used to determine if the trigger action was an insert operation. If so, then the contents of the virtual trigger table are retrieved and sent to the caller using the SqlPipe object’s Execute method.
Once the code has been created, you can either deploy it to the database using the Visual Studio 2005 Build | Deploy solution option or manually drop and re-create the assembly and any dependent objects as you saw in the stored procedure and UDF examples earlier in this chapter. To manually create a CLR trigger, you can use the CREATE TRIGGER state that you can see in the next example. The following code shows how to create the extended trigger on the Person.ContactType table in the AdventureWorks database:
CREATE TRIGGER MyTrigger ON Person.ContactType FOR INSERT AS EXTERNAL NAME MyCLRDLL.Triggers.MyTrigger
Much as in the other .NET examples, the extended trigger is created using the CREATE TRIGGER statement. The CREATE TRIGGER statement has been extended with the AS EXTERNAL NAME clause, which associates the trigger to a method in an assembly. Here, the EXTERNAL NAME clause points to the assembly named MyCLRDLL. Within the Triggers class of that namespace, the MyTrigger method contains the code that will be executed when this extended trigger is fired.
The .NET trigger will be fired for every insert operation that’s performed on the Job table. For example, the following INSERT statement will add a row to the Person.ContactType table, which will cause the .NET trigger to fire:
INSERT INTO Person.ContactType VALUES(102, 'The Big Boss', '2004-07-20 00:00:00.000')
The example trigger, MyTrigger, performs a select statement on the inserted row value. Then it uses the SqlPipe object to send the results back to the caller. In this example, the trigger will send the contents of the inserted row values back to the caller.
CLR User-Defined Data Types
Another important new feature in SQL Server 2005 that is enabled by the integration of the .NET CLR is the ability to create true user-defined types (UDTs). Using UDTs, you can extend the raw types provided by SQL Server and add data types that are specialized to your application or environment.
In the following example, you’ll see how to create a UDT that represents a gender code: either M for male or F for female. While you could store this data in a standard one-byte character field, using a UDT ensures that the field will accept only these two values with no additional need for triggers, constraints, or other data validation techniques.
If you’re using Visual Studio 2005, the best way to create a UDT is to use the SQL Server templates. To create a new UDT, you right-click your project in Visual Studio 2005 and select Add | Add Class from the context menu. This will display the Add New Item dialog that you can see in Figure 4-6.
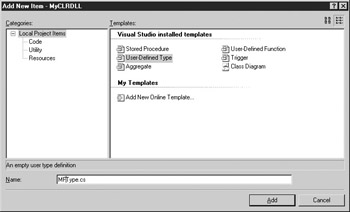
Figure 4-6: Creating a .NET SQL Server UDT
Select User-Defined Type from the list of SQL Server templates. Enter the name that you want to assign to the class and then click Open to have Visual Studio generate a stub file for the UDT. The stub file implements the four methods that SQL Server 2005 requires for all UDTs. These methods are generic to fulfill the SQL Server UDT contract requirements—it’s up to you to add the code to make the UDT perform meaningful actions. The four required UDT methods are listed in Table 4-1.
| Method | Description |
|---|---|
| IsNullable | This required method is used to indicate if the object is nullable. SQL Server 2005 requires all UDTs to implement the nullability, so this method must always return true. |
| Parse | This required method accepts a string parameter and stores it as a UDT. |
| ToString | This required method converts the contents of the UDT to a string. |
| Default constructor | This required method creates a new instance of the UDT. |
You can see the completed MFType class that is used to implement a UDT for M (male) and F (female) codes in this listing:
using System; using System.Data.Sql; using System.Data.SqlTypes; [Serializable] [SqlUserDefinedType(Format.SerializedDataWithMetadata, MaxByteSize=512)] public class MFType: INullable { string m_value; public override string ToString() { string s = "null"; if (m_value != null) { s = m_value.ToString(); return s; } else return m_value.ToString(); } public bool IsNull { get { if (m_value == null) return true; else return false; } } public static MFType Null { get { MFType h = new MFType(); return h; } } public static MFType Parse(SqlString s) { if (s.IsNull || s.Value.ToLower() == "null") return Null; MFType u = new MFType(); u.Value = s.ToString(); return u; } // Create a Value Property public SqlString Value { get { return (m_value); } set { if (value == "M" || value == "F") { m_value = value.ToString(); } else { throw new ArgumentException ("MFType data type must be M or F"); } } } } The first section of this code is essentially a template that’s required by all user-defined types. The class’s attributes must be serializable, the class must implement the INullable interface, and the class name is set to the name of the UDT. You can optionally add the IComparable interface. In this example, MFType is the class name. A string variable named m_value is declared to hold the contents of the code. Next, you can see the required ToString method. The ToString method checks to see if the contents of the m_value variable are null. If so, then the string “null” is returned. Otherwise, the m_value’s ToString method returns the string value of the contents.
The next section of code defines the IsNull property. This property’s get method checks the contents of the m_value variable and returns the value of true if m_value is null. Otherwise, the get method returns the value of false. Next, you can see the Null method, which was generated by the template to fulfill the UDT’s requirement for nullability.
The Parse method accepts a string argument, which it stores in the object’s Value property. You can see the definition for the Value property a bit lower down in the code. The Parse method must be declared as static, or if you’re using VB.NET, it must be a Shared property.
The Value property is specific to this implementation. In this example, the Value property is used to store and retrieve the value of the UDT. It’s also responsible for editing the allowable values. In the set method, you can see that only the values of M or F are permitted. Attempting to use any other values causes an exception to be thrown that informs the caller that the “MFType data type must be M or F.”
Very much like a CLR stored procedure or function, after the code is completed, it is compiled into a DLL. That DLL is then imported as a SQL Server assembly using the CREATE ASSEMBLY statement or the Visual Studio 2005 Deploy Solution option. (The Visual Studio 2005 Deploy Solution option creates both the assembly and the UDT.)
To manually add the UDT to a database, you can use a CREATE TYPE statement similar to this one:
CREATE TYPE MFType EXTERNAL NAME MyCLRDLL.MFType
As when creating the other .NET database objects, the EXTERNAL NAME keyword is used to specify the assembly and the namespace for the UDT. In this case, since the UDT itself is implemented as a class, no method name is required. The value of MyCLRDLL identifies the assembly, and the value of MFType specifies the UDT’s class. To see the UDTs that have been created for a database, you can query the sys.Types view, as shown here:
SELECT * FROM sys.Types
Once the UDT is created, you can use it in T_SQL much like SQL Server’s native data types. However, since UDTs contain methods and properties, there are differences. The following example shows how the MFType UDT can be used as a variable and how its Value property can be accessed:
DECLARE @mf MFType SET @mf.Value='N' PRINT @mf.Value
In this listing, the UDT variable is declared using the standard T-SQL DECLARE statement. You can access the UDT’s members by prefixing them with the (.) symbol. In this listing, the SET statement is used to attempt to assign the value of N to the UDT’s Value property. Because N isn’t a valid value, the following error is generated:
.Net SqlClient Data Provider: Msg 6522, Level 16, State 1, Line 2 A CLR error occurred during execution of 'MFType': System.ArgumentException: MFType data type must be M or F at MFType.set_Value(SqlString value)
Just as UDTs can be used as variables, they can also be used to create columns. The following listing illustrates creating a table that uses the MFType UDT:
CREATE TABLE MyContacts (ContactID int, FirstName varchar(25), LastName varchar(25), Gender MFType)
While creating columns with the UDT type is the same as when using a native data type, assigning values to the UDT is a bit different than the standard column assignment. Complex UDTs can contain multiple values. In this case, since the UDT uses a simple value, you can assign values to it exactly as you can any of the built-in data types. This example shows how to insert a row in the example MyContacts table that contains the MFType UDT:
INSERT INTO MyContacts VALUES(1, 'Michael', 'Otey', 'M')
To retrieve the contents of the UDT using the SELECT statement, you need to use the UDT.Member notation, as shown here, when referencing a UDT column:
SELECT ContactID, LastName, Gender.Value FROM MyContacts
CLR User-Defined Aggregates
A user-defined aggregate (UDAGG) is another new type of .NET database object that was introduced in SQL Server 2005. Essentially, a user-defined aggregate is an extensibility function that enables you to aggregate values over a group during the processing of a query. SQL Server has always provided a basic set of aggregation functions like MIN, MAX, and SUM that you can use over a query. User-defined aggregates enable you to extend this group of aggregate functions with your own custom aggregations. Like native aggregation functions, user-defined aggregates allow you to execute calculations on a set of values and return a single value. When you create a UDAGG, you supply the logic that will perform the aggregation. In this section, you’ll see how to create a simple UDAGG that calculates the median value for a set of numbers.
To create a new UDAGG using Visual Studio 2005, select the Project | Add Aggregate option from the menu to display the Add New Item dialog that you can see in Figure 4-7.
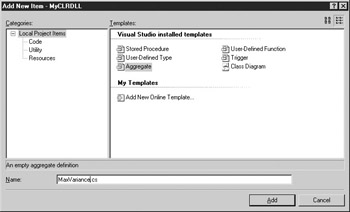
Figure 4-7: Adding a user-defined aggregate
Select Aggregate from the list of SQL Server templates and then enter the name for the class and click Open. Visual Studio will generate a stub file for the Aggregate class. Much like a UDT, the Aggregate class’s stub file implements four methods that SQL Server 2005 requires for all user-defined aggregates. The four required methods for all UDAGGs are listed in Table 4-2.
| Method | Description |
|---|---|
| Init | This required method initializes the object. It is invoked once for each aggregation. |
| Accumulate | This required method is invoked once for each item in the set being aggregated. |
| Merge | This required method is invoked when the server executes a query using parallelism. This method is used to merge the data from the different parallel instances together. |
| Terminate | This required method returns the results of the aggregation. It is invoked once after all of the items have been processed. |
You can see the example MaxVariance class that is used to implement a user-defined MaxVar aggregate in the following listing:
[Serializable] [SqlUserDefinedAggregate(Format.SerializedDataWithMetadata, MaxByteSize = 512)] public class MaxVariance { int m_LowValue; int m_HighValue; public void Init() { m_LowValue = 999999999; m_HighValue = -999999999; } public void Accumulate(SqlInt32 Value) { if (Value > m_HighValue) m_HighValue = (int)Value; if (Value < m_LowValue) m_LowValue = (int)Value; } public void Merge (MaxVariance Group) { if (Group.GetHighValue() > m_HighValue) m_HighValue = Group.GetHighValue(); if (Group.GetLowValue() < m_LowValue) m_LowValue = Group.GetLowValue(); } public SqlInt32 Terminate () { return m_HighValue - m_LowValue; } // Helper methods public int GetLowValue() { return m_LowValue; } public int GetHighValue() { return m_HighValue; } } At the top of this class, you can see the serialization attribute that’s required by UDAGG classes. Next, two variables are declared to hold the minimum and maximum values that are encountered by the aggregate. After that, in the Init method the two variables are assigned high and low values, ensuring that they will be assigned values from the list. While the Init method is called just once, the Accumulate method is called once for each row in the result set. In this example, the Accumulate method compares the incoming value with the values stored in the m_HighValue and m_LowValue variables. If the incoming value is higher than the current high value, it is stored in the m_HighValue variable. If the value is lower than the value of m_LowValue, it is stored in the m_LowValue. Otherwise, no action is performed by the Accumulate method for this UDAGG.
| Note | Because UDAGGs are serialized, you need to be aware of the total storage requirement of the UDAGG. The UDAGG is serialized following each invocation of the Accumulate method, and it cannot exceed the maximum column size of 8000 bytes. |
The Merge method is used when the UDAGG is processed in parallel, which typically won’t be the case for most queries. If the Merge is called, its job is to import the current aggregation values from the parallel instance. You can see here that it does that using two helper methods that essentially export the values in the m_HighValue and m_LowValue variables. These values are compared to the exiting values, and if they are higher or lower, they will replace the current values in m_HighValue and m_LowValue.
The Terminate method is called once after all of the results have been processed. For this example, the Terminate method simply subtracts the lowest value found from the highest value found and returns the difference to the caller.
After compiling the .NET class into a DLL, you can import the DLL as a SQL Server assembly using either the Visual Studio 2005 Deploy Solution option or manually using the CREATE ASSEMBLY statement and CREATE AGGGRATE statements. The manual CREATE AGGREGATE statement is shown here:
CREATE AGGREGATE MaxVariance(@MyInt int) RETURNS int EXTERNAL NAME MyCLRDLL.MaxVariance
This example shows the creation of an aggregate named MaxVariance. This aggregate can be used with integer data types, and it returns an integer value. In the EXTERNAL NAME clause, you can see that the code for this UDAGG is found in the MaxVariance class of the MyCLRDLL assembly.
You can use the UDAGG just like SQL Server’s built-in aggregate functions. One small difference is that the UDAGG needs to be prefixed with the schema name to allow the system to locate it. The following line illustrates using the MaxVariance UDAGG:
SELECT dbo.MaxVariance(MinQty) FROM Sales.SpecialOffer
The result of this UDAGG will be the difference between the high and low values found in the Sales.SpecialOffer column.
.NET Database Object Security
No discussion of the new CLR features would be complete without the security issues associated with using .NET assemblies and the SQL Server CLR. Unlike T-SQL, which doesn’t have any native facilities for referencing resources outside the database, .NET assemblies are fully capable of assessing both system and network resources. Therefore, securing them is an important aspect of their development. With SQL Server 2005, Microsoft has integrated the user-based SQL Server security model with the permissions-based CLR security model. Following the SQL Server security model, users are able to access only database objects—including those created from .NET assemblies—to which they have user rights. The CLR security extends this by providing control over the type of system resources that can be accessed by .NET code running on the server. CLR security permissions are specified at the time the assembly is created by using the WITH PERMISSION_SET clause of the CREATE ASSEMBLY statement. Table 4-3 summarizes the options for CLR database security permissions that can be applied to SQL Server database objects.
| CRL Security | External Access Allowed | Calls to Unmanaged Code |
|---|---|---|
| SAFE | No external access | No calls to unmanaged code |
| EXTERNAL_ACCESS | External access permitted via management APIs | No calls to unmanaged code |
| UNSAFE | External access allowed | Calls to unmanaged code allowed |
Using the SAFE permission restricts all external access. The EXTERNAL_ACCESS permission enables some external access of resources using managed APIs. SQL Server impersonates the caller in order to access external resources. You must have the new EXTERNAL_ACCESS permission in order to create objects with this permission set. The UNSAFE permission is basically an anything-goes type of permission. All system resources can be accessed, and calls to both managed and unmanaged code are allowed. Only system administrators can create objects with UNSAFE permissions.
When to Use CLR Database Objects
Database objects created using the CLR are best suited for replacing extended stored procedures that require access to external system resources, for creating database objects that require complex logic, or for creating database objects that are potentially transportable between the database and the data tier layer of an application. They are not as well suited to raw data access and update functions as T-SQL.
EAN: 2147483647
Pages: 80