Oracle JDeveloper 10g Structure
| | ||
| |
Oracle JDeveloper 10 g Structure
One of the basic advantages that any IDE should provide to developers is increased levels of productivity. Oracle JDeveloper 10 g excels in this area, particularly with the enhancement of its code generation tools as well as advanced integration of its visual modeling components . In this section, we will cover the basic structural segments of Oracle JDeveloper 10 g , what each is utilized for, and how to navigate between them effectively.
After Oracle JDeveloper 10 g is installed, click the jdevw.exe executable to load the application. You will be greeted with the Oracle JDeveloper 10 g splash screen, and eventually the default Oracle JDeveloper 10 g work environment is displayed.
The main display areas can be seen in Figure 13-1. Oracle JDeveloper 10 g consists of the Applications Navigator, Structure pane, Editor pane, and message log. The function of each of these components will be discussed, as well as some additional panes and tabs included within.
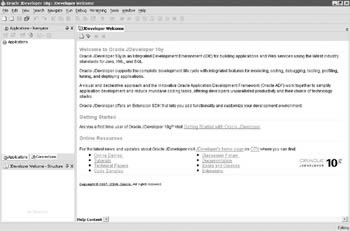
Figure 13-1: The initial Oracle JDeveloper 10g screen
Applications Navigator
The Applications Navigator is the main navigation point for visually identifying and managing the resources for your projects. It is the root position for all of the code that developers work with while developing applications in Oracle JDeveloper 10 g. Applications are the highest level of organization for project code. In previous versions of Oracle JDeveloper 10 g , these were called workspaces and had their configuration information maintained by a .jws (Oracle JDeveloper workspace) file on the file system. This file still exists in Oracle JDeveloper 10 g , even though workspaces are now referred to as applications. In reality, the term application is more suitable than workspace, particularly considering the role that this entity plays in the organization of project code.
Adding code to the Applications Navigator is easy. Click File New to bring up the New Gallery. From here, select General in the drill-down on the left and Application Workspace on the right. This takes you into the New Application Workspace Wizard, as shown in Figure 13-2.
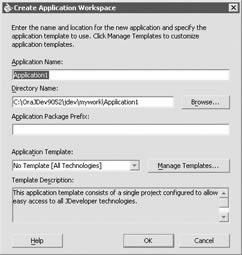
Figure 13-2: The Create Application Workspace dialog box
Here, developers are prompted for information including the name you would like associated with the application, the physical path to the source code, the application package prefix (this will be applied as the base prefix for any Java code included herein), and the application template.
| Note | Of special importance is the application template. This is a new feature added with Oracle JDeveloper 10g that allows for an added measure of productivity. Templates essentially allow you to dictate a basic structure for the starting application. They also allow for management of the available technologies, structure, naming, and various other configuration details for the application and default projects. |
You can also take a shortcut into the Application Workspace Wizard by simply right-clicking the word applications at the highest level of the Applications Navigator drill-down and selecting New Application Workspace.
Should you already have an existing application, you can add it to the Applications Navigator by clicking File Add To Applications and then navigating to the location of the .jws file that contains the details of the application you wish to add. As a shortcut, you can also click the green + in the far upper left of the Applications Navigator pane.
After the application, the next highest level of organization is a project. An application can consist of multiple projects. A project is utilized to segment subsystems or distinct units of work out into a set of logical groupings that provides for greater organization. As a developer, you view projects in the Applications Navigator by drilling down into the application that contains the project you are looking for. Like applications, projects have a file that resides on the file system that is utilized to maintain configuration information about that project. This file has the name of the project with a .jpr suffix.
| Tip | While on the topic of the file system, within the project folder on the file system you will find two additional subfolders , called classes and src. The src folder contains the folder tree that holds all of your source code for this project. The classes folder is a mirror of the src folder, with the exception that it contains the compiled code based on the code in the src folder. |
There are several properties that can be managed from the project level that are of importance when doing development in Oracle JDeveloper 10 g. To access the project properties as shown in Figure 13-3, you can right-click the project in question and select Project Properties. Alternatively, you can select the project you wish to manage and click Tools Project Properties or just double-click the project. There is also a shortcut at the top of the Applications Navigator you can use by selecting the project in question and clicking the icon that is third from the left.
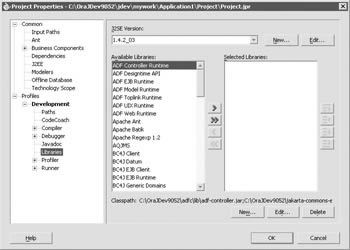
Figure 13-3: The Project Properties dialog box
Most of the options are fairly self-explanatory; one option to pay particular attention to is the libraries option. This option allows you to configure what external libraries will be tied to your project.
| Note | Libraries are simply a way of binding a representative name to a set of code that is not directly a part of this project. In addition to all of the default libraries that come bundled with Oracle JDeveloper 10g, you can also create your own libraries when you wish to integrate custom-developed or third-party source trees. To do this, you simply select the New button in the dialog and follow the steps to bind a name to the source you wish to have comprise this library. Note that if you are utilizing source control, the type of library you select ( user , project, or system) can have a bearing on how easily other people can pick up your code from source control and work with it. When creating a user library, it binds the library path to the absolute path on your machine, and this path may end up being different when a collaborator on your project pulls down and attempts to utilize your code during development. Project libraries, on the other hand, create the library as a relative path based on the project you re creating it from (which makes it more portable through a source control tool). |
There are two additional tabs in the Applications Navigator pane to be aware of. The first one is the Connections tab. This tab segregates out the external connection information that you have configured for Oracle JDeveloper 10 g. This can include connections to an Application Server (like Oracle Application Server 10 g ), a database, a CVS server, a designer work area (for Oracle Designer repository), a SOAP server, a UDDI Registry (for web services), or a WebDAV server.
| Note | WebDAV is a standard used to save data to a web site (as opposed to just reading it from a site). The IETF WWW Distributed Authoring and Versioning working group is responsible for a set of WebDAV standards (see http://www.ietf.org/html. charters /webdav-charter.html and http://www.ics.uci.edu/pub/ietf/webdav/). |
Several excellent features are provided for each of the connection types. We will touch briefly on how to configure a connection to a database in the walk-through development of a simple web app later in the chapter.
The second additional tab of interest is the Run Manager tab. This tab allows you to keep track of the active processes that Oracle JDeveloper 10 g has spawned. When you wish to do local testing or debugging, Oracle JDeveloper 10 g loads your code into a local stand-alone version of the OC4J container that it spawns.
| Note | See 2 for more information on OC4J. |
When you reach a condition where you wish to bring down the local instance (for example, when you re done testing) you would navigate to the Run Manager tab and right-click the OC4J instance, selecting Shutdown.
Editor Pane
The Editor pane is exactly what it sounds like. It is the area where developers will be doing their actual coding. Whenever you wish to modify a file that is contained within your Applications Navigator, it is loaded into the Editor pane and edited as you choose. Loading something into the Editor pane also has a noticeable effect on your environment. First of all, the Structure pane in the lower left-hand corner becomes populated with the relevant information regarding the structure of the file you are editing. In addition, two other panes become visible on the right-hand side of the interface. These are the component palette and the property inspector. We will cover the functions of these panes in subsequent sections of this chapter.
The editor contains several productivity enhancements that would be expected of a fully realized IDE, including intelligent prompting for the completion of typed keywords, predictive dereferencing, and the ability to set bookmarks and breakpoints. If you have experience with other IDEs , none of these features should be new to you.
The absolute basics include compiling and running your code from the editor. To compile a source loaded into the editor, you right-click anywhere in the pane and select Make. The options to run and debug are also present in this pop-up menu. All of these options are also available from the Run and Debug menu options along the main toolbar at the top of the page. Setting a breakpoint is accomplished by clicking the line number of the line you wish to include a breakpoint at.
If you open multiple files within the editor, you can toggle between them by hitting CTRL-TAB or by selecting the tab at the top of the Editor pane with the name of the file you wish to work with. To close a file in the editor, hover over the tab for that file at the top of the editor and click the x that appears in the tab.
One of the nicer productivity enhancements made to the editor in 10 g was the ability to split large documents into multiple panes and have them both available within the editor at the same time. To do this, select the Window Split Document option. When you re finished, select Window Unsplit Document to return to normal viewing. Also, if you have more than one document open, you can open up a new, separate Editor pane by selecting Window New Tab Group.
Property Inspector
Those developers familiar with Microsoft Visual Studio should feel a familiarity with the property inspector added to Oracle JDeveloper 10 g. With this dialog, the properties of elements selected within the editor can be manipulated irrespective of the explicit source. This is particularly important with the new emphasis being placed on visual building and model-driven development in Oracle JDeveloper 10 g. To utilize the property inspector, you will need to have a file open in the Editor pane in design mode, as shown in Figure 13-4, and select a component with configurable properties. You can then edit the properties for that particular component and Oracle JDeveloper 10 g will make modifications to the source, as needed. Design mode in the editor will be covered later in this chapter, when we walk through development of a simple web interface utilizing the ADF and Visual Builder capabilities.
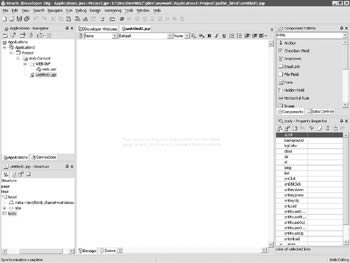
Figure 13-4: Oracle JDeveloper10g in design mode
Component Palette
The component palette is an essential part of the visual design process for client- facing elements in Oracle JDeveloper 10 g. The component palette gives you a drop-down selection of technologies with canned functionality for the items listed on the palette for the selected technology (see Figure 13-5). When working on client-facing code, you can click an icon in the component palette and have Oracle JDeveloper 10 g insert the appropriate code segment where your cursor is in your active source.
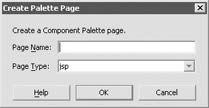
Figure 13-5: The Create Palette Page dialog box
This can be done in design mode or source mode. When you re working in design mode, it is often a part of WYSIWYG (what you see is what you get) design and development. This, in conjunction with the property inspector and ADF framework (which we will cover later), makes Oracle JDeveloper 10 g an excellent option for a RAD (Rapid Application Development) or rapid prototyping IDE.
One of the other included tabs in the component palette is the Data Controls tab. This contains items either that you have developed through the ADF framework as ADF BCs (ADF business components) or that you have explicitly requested Oracle JDeveloper 10 g to construct data controls for based on code you have developed. We will be covering the Data Controls tab in greater detail in the walk-through creation of a simple web app.
Developers can also utilize the component palette to provide a way to disseminate reusable components to your project team. One of the major benefits of JSP development is that it provides for an architecture where presentation developers can be productive without necessarily having to understand Java. The idea is that JSP development can be done entirely with HTML and custom tags (which are, at heart, no more complex in usage than a standard HTML tag). Template JSP pages can be created that include the standard Java basics within them, and once a comprehensive custom tag library is developed that covers the needs of the project, the only skill required is to understand these concepts and the business requirements to develop.
How does the component palette help accomplish this? One of the capabilities of the component palette is to allow a project architect to disseminate the project s custom tag library to all of the presentation developers, while affording them access to it through a point-and-click interface. With the appropriate technology selected in the Technology drop-down, simply right-click the field of the palette. Suppose we want to create a page that contains all of the custom tags for our project. In this case, we will indicate that we want to Add Page from the pop-up menu. At this point, we will be prompted to input a name for our palette page and the technology it will contain (we will select JSP). Once this is completed, we are presented with a fresh component palette page that we can add the appropriate technology components to, in this case, JSP custom tags.
Now that we have our component palette page created, we can proceed to add custom tags to that page. The actual tags themselves will still need to be developed (third-party taglibs can be included easily as well). Once the taglib is developed, all developers have to do is to right-click the new page created in the preceding step and select Add Component from the pop-up menu. At this point, a list of registered taglibs appears in a drill-down menu. Select the New button on the right-hand side of the dialog to register your newly created taglib (or third-party taglib) in the dialog box shown in Figure 13-6.
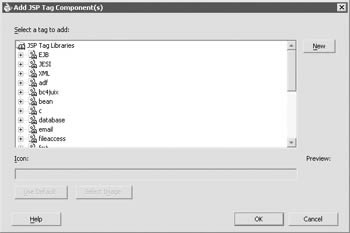
Figure 13-6: The Add JSP Tag Components dialog box
You are then presented with another dialog box that prompts you for information about your taglib. This information is the same information that you would provide when registering your taglib in the web.xml file of a web application. This stands to reason, as the idea behind the component palette is to allow you to click your way to an application. The component palette needs this information so that it knows what to add to your web application when you request it to insert a particular tag into one of your pages.
Once you have registered your taglib, the dialog containing the registered taglibs will now also contain your newly registered taglib. Locate your taglib and drill into it to list the available tags to be added to the project palette. Select the tag you would like to add (using SHIFT and CTRL as normal for multiselecting) and click OK. A confirmation dialog will come up asking you Install jsp tag(s)? Click Yes and your new tag should appear in the component palette.
Congratulations! You ve just configured your project to take advantage of one of the biggest and most underused productivity tools provided for JSP development.
Structure Pane
The Structure pane is where you can see the structure of the selected item or active code in the Editor pane (if applicable ). This can vary widely depending on what has been selected. For example, if you were using the Connections tab in the Applications Navigator to browse a connection to the database, one of the things you can do while exploring this connection is to view the tables that exist in the database (see Figure 13-7). If you were to drill down into the tables and actually select a table in the navigator, you would see a listing of the fields in the table within the Structure pane.
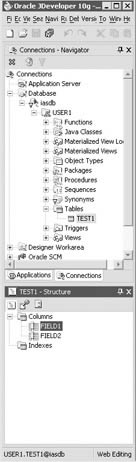
Figure 13-7: The Connections view of the Oracle JDeveloper 10g Navigator
Example of Navigating Tables with the Structure Pane
As an example of how flexible the Structure pane is, if you shift your focus to an HTML source in the Editor pane, the Structure pane will reflect the structure of the HTML code displayed there. The Structure pane can be of assistance when doing web development in several ways. First of all, as HTML is an interpreted language, there is no compiler to do syntax checking. Most developers have had the experience of trying to put together HTML pages with the type and test method. This is where you are trying to get a page to look a certain way but for some reason it stubbornly refuses. Eventually, the development gets bogged down into changing a line or two, reloading the page and checking it, changing a few more lines, reloading again, ad nauseam.
The Structure pane can help developers avoid this fate by providing not only a visual cue of the structure of the page but also a substitute for a compiler over this interpreted language. This is provided in the drill-down called HTML Errors that appears at the top of the Structure pane when interrogating an HTML source. As you drill into this, it will list the warnings and errors that the pane has detected in the active source. From here, you can double-click the message and be taken to the location in the source that generated the message. This functionality isn t limited to HTML; when the focus is on a JSP page, the only difference is that the drill-down with the message is called JSP Errors.
The Structure pane really isn t doing anything magical . HTML and JSPs are both tag-based code structures. All the Structure pane is doing is interpreting the tags it finds much as a browser would; instead of rendering the directives, it creates a structure navigator based on the tag hierarchy. However, it also aids developers by allowing selection of these elements to perform editing and customizations on the code without having to perform them directly on the source itself. For example, when working with a table, we can perform operations directly from the Structure pane such as merging or splitting cells , inserting or deleting rows or columns , modifying spans , or even inserting explicit HTML. When dealing with larger pages, this can be an extremely handy time saver.
Message Log
There really isn t a great deal to say about the message log. As is implied , the message log is an area where all of your message windows will be docked . This is where you will see compilation errors and compiler statistics when you compile. It is where you will see any output that would be generated to standard out by your Java programs. It is also where you will see the container messages from the embedded OC4J instance that is used for stand-alone testing. The rule of thumb is: if it would ordinarily go to standard out, there will be a tab in the message log to report on it.
| Tip | If the Allow Program Input option is selected in the project options, you can also enter in the parameters requested from an application (stdin.readLine();). |
| | ||
| |
EAN: 2147483647
Pages: 192