Component 1: Oracle Reports
| | ||
| |
Component #1: Oracle Reports
During the installation of Oracle Application Server 10 g, a component called a Reports Server was automatically created, if the Business Intelligence and Forms option was chosen . The Reports Server component of Oracle Application Server 10 g allows administrators to take an existing Oracle Report (either an .rep or .rdf file) and view it over the Web via a web browser. To view the report in OracleAS Portal, at least one Reports Server must be up and running, as we will associate the Oracle Report with an Oracle Applications Server 10 g Reports Server when we turn the Oracle Report into an OracleAS Portal portlet. As you will see, we are not limited to just one Reports Server. We can have numerous servers running to handle the load of reports being generated, or Reports Servers with specific functions, security, and priorities.
Upon installation of Oracle Application Server 10 g, a Reports Server called rep_<hostname> was created. Most of the administrative duties of Oracle Application Server 10 g can be handled graphically through the Enterprise Manager Application Server Control web site. To view the status of this Reports Server, enter the Enterprise Manager Application Server Control web site for your installation. Point your browser to
http://<hostname>:1810
where the hostname is the name of the machine where the middle tier (also referred to as the Application Server) is installed. For the examples in this chapter, a server named xpas10g is used, so the URL to reference this server would look like
http://xpas10g:1810
The login user for the Enterprise Manager web site is ias_admin. The password is set during installation of the Oracle Application Server 10 g mid-tier instance. If the infrastructure and middle tier are installed on the same machine, you will see a Farm page similar to Figure 11-1. If the infrastructure and the middle tier are on different servers, you will see a screen similar to the one in Figure 11-2.
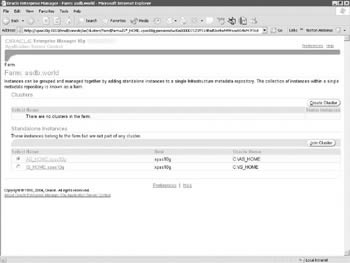
Figure 11-1: The Enterprise Manager Application Control Farm page
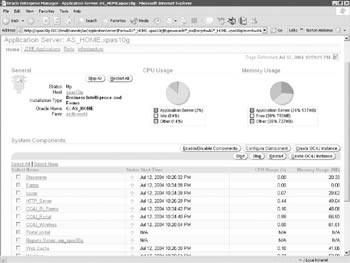
Figure 11-2: The Enterprise Manager Web Page for the middle tier
In this example, I have two instances of Oracle Application Server 10 g installed on my server. One is called IS_HOME (for InfraStructure home) and one called AS_HOME (for Application Server home). The names of these Oracle Application Server 10 g instances are arbitrary and are set during installation of Oracle Application Server 10 g . The Forms, Reports, and Discoverer Servers are deployed in the middle tier, so click the Application Server link (AS_Home.xpas10g in the preceding example). You will be taken to a screen similar to the one in Figure 11-2.
This screen lists all of the components that make up the middle tier (application server) for my installation. In the preceding example, there is a component called Reports:rep_xpas10g. This is the Reports Server that was installed automatically during the Oracle Application Server 10 g installation on my server. If you want to test to see if the Reports Server is, in fact, up, point your browser to
http://<Middle-tier server>:<port>/reports/rwservlet/showjobs?server=<server_name>
For the example server in this chapter, the URL would look like this:
http://xpas10g:7778/reports/rwservlet/showjobs?server=rep_xpas10g
If the infrastructure and middle tier are on the same machine, the port number is probably 7778. If they are on separate machines, the port number is probably 7777. You should see a page similar to Figure 11-3.
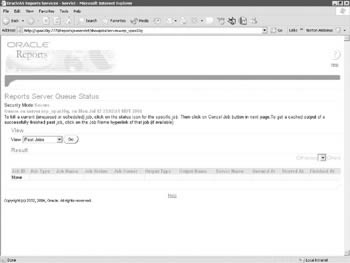
Figure 11-3: The showjobs page for the Reports Server
To test that all of the pieces are in place to actually serve up Oracle Reports in your browser, point your browser to the Welcome page for the Application Server (Figure 11-4).
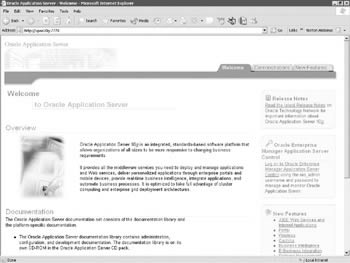
Figure 11-4: The main page of the Application Server
http://<Middle-tier server>:<port>
For the example server in this chapter, the URL would look like this:
http://xpas10g:7778
Click the Demonstrations tab, then the Business Intelligence And Forms link, then the Reports Services link, and finally the Test A Paper Report On The Web link. You should see a screen similar to Figure 11-5.
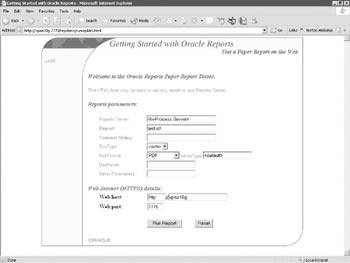
Figure 11-5: Testing the Reports Server
Replace the Reports Server name with the name of the Reports Server you want to test. In my example, it s rep_xpas10g. Replace the connect string with any valid connect string and change DesFormat to HTML 4.0. Leave the report name as test.rdf. Click Run Report. If you see a report in your web browser, the Reports Server is working.
The reports component in OracleAS Portal is a very powerful way to develop web-based reports in a very short period of time. It does, however, have some serious limitations. Since the major components of Portal (Forms, Reports, Charts) are built using wizards, a significant amount of control is handled by the code generator. Any development environment that uses code generators as its primary way of developing application components will hide many of the component details away from the developer. In many cases, this is not a prohibitive factor for your development needs. In other cases, developers will need total control of their components and this development environment will fall short of their development needs. If, for whatever reason, this limitation prohibits the development of OracleAS Portal reports, developers can integrate existing reports developed in Oracle Reports into OracleAS Portal.
Reports Integration Method #1: Using the Portal URL Component
The simplest way to incorporate an Oracle Report into Portal is by way of a URL. This is not the native way of supporting Oracle Reports in OracleAS Portal, and while it is the quickest way to get an Oracle Report onto an OracleAS Portal page, it does not have the ability to use any of the Oracle Reports “specific functionality built into OracleAS Portal.
If you successfully ran the report from the Getting Started with Oracle9 i Reports screen in Figure 11-5, you noticed that a new window popped up with a URL similar to
http://xpas10g:7778/reports/rwservlet?destype=cache&desformat=HTMLCSS& server=rep_xpas10g&report=test.rdf&userid=system/manager@iasdb
This URL can be used to create an OracleAS Portal component (a URL component) that can then be placed on an OracleAS Portal page. Assuming you ve already created a Database Provider in OracleAS Portal (if not, review Figure 11-6), I used the name test_reports_url. When we get to the next step in this process, we ll use this URL component and place it on a page.
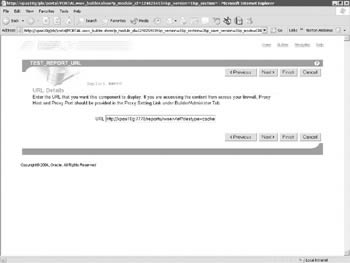
Figure 11-6: Specifying the reports URL
On the second step of the wizard, enter the URL from above (http://xpas10g:7778/reports/rwservlet?destype=cache&desformat=HTMLCSS& server=rep_xpas10g&report=test.rdf&userid=system/manager@iasdb), replacing the server name (xpas10g) with your server name and the Reports Server (rep_xpas10g) with your Reports Server name, and a valid connection string for the userid parameter. Click Finish and then Run As Portlet on the component summary page. You should see the report in your web browser. Click the Access tab on the component summary page and make sure Publish To Portal is checked.
Securing the Reports URL
If you looked closely at the URL used to run the test report over the Web, you noticed that there was sensitive information in it; information we certainly don t want exposed in a URL for the entire world to see. How can we hide this information? The Reports Server can make use of something called a keymap file. This file hides the details of the report from the user s eyes by referencing a key in a file on the server. The keymap file for the Reports Server is called cgicmd.dat and is located in <Middle_Tier_Home>/reports/conf. Here s an example of some of the entries in that file:
orqa: report=breakb.rdf destype=cache desformat=html server=repserver breakbparam: report=breakb.rdf destype=cache desformat=html server=repserver userid=scott/tiger@mydb
The key name is to the left of the colon. The parameters associated with that key are to the right of the colon . The example contains two keys: orqa and breakparam. The orqa key uses the following parameters:
-
report=breakb.rdf
-
destype=cache
-
desformat=html
-
server=repserver
-
userid=scott/tiger@mydb
Note that in the keymap file, the parameters are separated by spaces (in the URL they were separated by ampersands). Our URL in this example looks like this:
http://xpas10g:7778/reports/rwservlet?destype=cache&desformat=HTMLCSS& server=rep_xpas10g&report=test.rdf&userid=system/manager@iasdb
We want to hide everything after the question mark, so we could create an entry in the cgicmd.dat file that looks like this:
test_report: destype=cache desformat=HTMLCSS server=rep_xpas10g report=test.rdf userid=system/manager@iasdb
We could then reference the keymap file with the following URL:
http://xpas10g:7778/reports/rwservlet?cmdkey=test_report
To see all of the parameters that can be specified in the keymap file, look at the syntax for rwclient and rwservlet in Chapter 6 of this book. The most common parameters used are listed in Table 11-1.
| Parameter | Description |
|---|---|
| ARRAYSIZE | Use ARRAYSIZE to specify the size (in kilobytes) for use with ORACLE array processing. Generally, the larger the array size , the faster the report will run. |
| AUTHID | Use AUTHID to specify the user name and, optionally , the password to be used to authenticate users to the restricted Oracle9 i AS Reports Server. User authentication ensures that the users making report requests have access privileges to run the requested report. |
| BUFFERS | Use BUFFERS to specify the size of the virtual memory cache in kilobytes. You should tune this setting to ensure that you have enough space to run your reports, but not so much that you are using too much of your system's resources. |
| DESFORMAT | Specifies the format for the job output. In bit-mapped environments, use DESFORMAT to specify the printer driver to be used when DESTYPE is FILE. In character-mode environments, use it to specify the characteristics of the printer named in DESNAME. |
| DESNAME | Use DESNAME to specify the name of the cache, file, printer, Oracle9 i AS Portal, or e-mail ID (or distribution list) to which the report output will be sent. To send the report output by e-mail, specify the e-mail ID as you do in your e-mail application (any SMTP-compliant application). You can specify multiple user names by separating them with commas, and without spaces. |
| DESTYPE | Use DESTYPE to specify the type of device that will receive the report output. If you have created your own pluggable destination via the Reports Destination API, this is how the destination you created gets called. |
| REPORT | Use MODULE or REPORT to specify the name of the report to run. |
| RUNDEBUG | Use RUNDEBUG to turn on error messages/warnings that would otherwise not be displayed. For example, with RUNDEBUG=YES, you might get the error message Frame 1 overlaps but does not contain Frame 2. This situation may or may not be acceptable, depending on the job being run. |
| SCHEDULE | Use SCHEDULE to set the day, time, and frequency a report should be run. The default is to run the report once, now. Time values are expressed according to a 24- hour day (i.e., one o'clock is expressed as 13:00). |
| SERVER | Use SERVER to specify the name of the Reports Server you want to use to run this report. |
| SSOCONN | Use SSOCONN to specify one or more connect strings to use to connect to one or more data sources in a single sign-on environment. |
| TRACEOPTS | TRACEOPTS indicates the tracing information that you want to be logged in the trace file when you run the report. |
| USERID | Use USERID only if you're not using single sign-on. Use USERID to specify your Oracle user name and password, with an optional database name for accessing a remote database. If the password is omitted, then a database logon form opens automatically before the user is allowed to run the report. |
If you want users to log on to the database, then omit the password portion of the USERID keyword from the report request. If you want users to log on every time they run report requests, then use the Reports key mapping file, cgicmd.dat, to specify the run-time command, and include the %D argument in the relevant key mapping entry. You can also use the SSOCONN parameter to reference a database resource for your OracleAS Portal user.
Things get a little confusing here: OracleAS Portal uses users created in Oracle s implementation of LDAP (Lightweight Directory Access Protocol) called Oracle Internet Directory. These LDAP users are not users in the database, even though the security information about these users is stored in the infrastructure database (confusing enough?). In order for these nondatabase, LDAP users to have privileges to see (query) and potentially enter (insert), modify (update), and remove (delete) data in an Oracle database, a database resource must be set up for each of these LDAP users. The database resource is named, and then referenced with the SSOCONN parameter described in Table 11-1. LDAP users are commonly set up either in OracleAS Portal or by accessing the Oracle Internet Directory Delegated Authentication Server directly at: http://<infrastructure server>:<port>/oiddas.
This serves to hide the implementation details from the end user. The cgicmd.dat file is not read dynamically, however, so every change to it requires administrators to stop and start the OC4J_BI_FORMS component in the middle tier.
To put this component on a page, go back to the OracleAS Portal Navigator and click the Page Groups tab. If you don t have a page group defined, create one now. Edit the root page for your page group . You can edit the page in one of three ways: Graphical Mode, Layout Mode, or List Mode. Select Layout Mode and then click Add Portlets in the main region of the page (Figure 11-7).
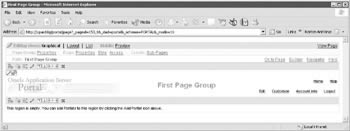
Figure 11-7: Adding a portlet to a region
Click New and then the name of your database provider. You should see Test_Report_URL (or whatever you named your URL) as one of the portlets that can be placed on this region. If it is not displayed, type test_report_url in the search field and click Go. Once it is displayed, single-click it to move it to the right-hand side ( Selected Portlets ) of the page. Your Portal page now has an Oracle Report integrated into it. Back on the Edit Page screen, click the Graphical link on the top left of the page. You should see the report (albeit clumsily placed) on the page.
Reports Integration Method #2: Using the Native Portal Method
Using the URL component is a quick way to get an Oracle Report on an OracleAS Portal page, but we can t use any of OracleAS Portal s native support for Oracle Reports to enhance our functionality with this method. If you re logged into OracleAS Portal as a user with administration privileges, you ll see an Administer tab on the builder page (Figure 11-8).
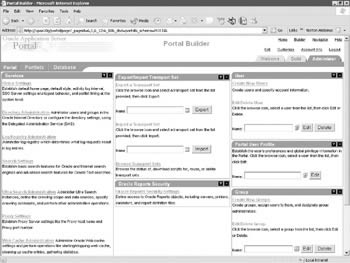
Figure 11-8: The Portal subtab of the Administer tab
If you click the Administer tab, and then on the Portal subtab on the top left of the screen, you will see a link on the bottom right that says Oracle Reports Security Settings. Clicking that link will take you to a page that looks like Figure 11-9.
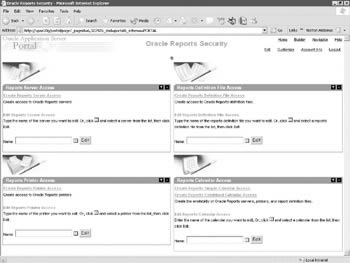
Figure 11-9: The Oracle Reports Security Page
On this screen, we can define access to Reports Servers, access to .rdf files, access to printers, and access to report calendars. By using these features of OracleAS Portal, developers can use OracleAS Portal s security mechanisms and added functionality to restrict access to the various components of Oracle Reports. For example, an OracleAS Portal Calendar Access object can be created that limits access to nonbusiness hours so that no report can be run during business hours, consuming precious system resources. That calendar object can then be associated to any combination of Reports Servers, .rdf files, and reports printers. If an attempt is made to access a Reports Server, .rdf file, or reports printer outside of the reports calendar access period (i.e., during working hours), the request fails and an error message is generated. Developers also have the ability to restrict access to any of these components according to the user and group privileges for the OracleAS Portal user.
When an .rdf file is defined in the Reports Definition File Access portlet, it must be associated with a Portal DB Provider. If that report has Publish To Portal checked in the Access tab of the component summary screen, then that report will show up as an available portlet to be placed on an OracleAS Portal page in the OracleAS Portal portlet repository. Depending on when the page is viewed , the report will then be displayed (if it falls within the calendar parameters associated with the Reports Server and .rdf file) or will display an error with absolutely no developer or system administration intervention whatsoever.
You can use keymap file entries when you define entries in the Reports Definition File Access portlet, but it s tricky to find and a little confusing to use. Click Create Reports Definition File Access. In step 1 of the wizard, give the report a meaningful name. On the second step of the wizard, you ll start entering characteristics of the report: its name on disk, the Reports Server you want to use, etc. Here s the tricky part: when we get to the final step, we can specify a keymap entry to use; any parameters specified in that keymap entry will override anything you enter in these screens. To prove this, leave the Oracle Reports File Name field blank. Click Finish to generate the report definition file access for Portal.
Wait a minute ”if we re finished, how do we specify what keymap file entry we want to use? If you click either the Run or Run As Portlet link on the component summary screen, you ll get the following error message:
REP-50004: No report specified on the command line
This makes sense, since we left the Oracle Reports File Name field blank. On the component summary screen, you ll see a link that says Customize. Clicking this link will take you to the screen shown in Figure 11-10.
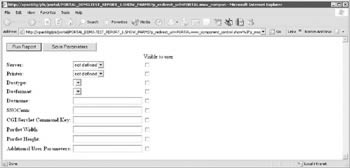
Figure 11-10: The Configure page for OracleAS Portal Reports access
In the CGI/Servlet Command Key field, enter test_report (or a suitable name for a key in your cgicmd.dat file) and click Save Parameters. Click the x in the top right to close the window and return to the Component Summary screen. Now click either Run or Run As Portlet and you should see your report. By saving the parameter, the key specified in the CGI/Servlet field will always be used when this report is run in OracleAS Portal. The values have been taken from the cgicmd.dat file and have overridden the report s attributes that were specified in step 2 of the wizard.
Reports Server Administration
As mentioned earlier, we are not limited to just one Reports Server. There is an executable called rwserver located in the <Middle_Tier_Home>/bin directory. This program can be used to stop, start, or create a Reports Server and, if running on the Windows platform, create a Reports Server as a Windows service. To start a Reports Server,
rwserver server=<Reports Server>
| Tip | If the Reports Server you specify does not exist, a new one will be created. |
To stop a Reports Server,
rwserver server=<Reports Server> shutdown=immediate
To create a Reports Server as a Windows service, use the install keyword:
rwserver server=<Reports Server> install autostart=yes
Oracle provides the rwservlet executable to display information about your Reports Server. These are the most common parameters passed to rwservlet:
-
showjobs Displays a web view of Reports Server queue status.
Example syntax:
http://xpas10g:7778/reports/rwservlet/showjobs?server=rep_xpas10g
-
showenv Displays the rwservlet configuration file (rwservlet.properties).
Example syntax:
http://xpas10g:7778/reports/rwservlet/showenv
-
showmap Displays rwservlet key mappings.
Example syntax:
http://xpas10g:7778/reports/rwservlet/showmap
-
showmyjobs Displays the Reports Server queue status for a particular user.
Example syntax:
http://xpas10g:7778/reports/rwservlet/showmyjobs
| | ||
| |
EAN: 2147483647
Pages: 192