Oracle Application Server Portal Page Design
| | ||
| |
Devoting one section of one chapter to Oracle Application Server Portal page design does not do it justice . The Oracle Application Server Portal page design mechanism is an extremely sophisticated environment giving page designers incredible flexibility to control every aspect of how their portal pages are presented to end users. This section will cover the basics of Oracle Application Server Portal page design. We encourage you to experiment with the various features contained in the product.
Up until this point, we have looked at creating various Oracle Application Server Portal components . How do we take them and place them on a page our end users can view? The answer lies in the Oracle Application Server Portal Design Page. To create a new page, enter the Navigator by clicking the Navigator link on the top right of any Oracle Application Server Portal page. Up to this point, all of our Oracle Application Server Portal examples have utilized the Providers tab on this page. To create a new page that can hold content, however, we will select the Page Groups tab (Figure 10-21).
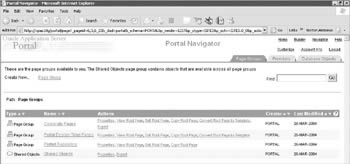
Figure 10-21: The Page Groups tab displayed in the Navigator
Page Groups
All pages must be associated with a Page Group.The Page Group tab on the Navigator allows us to create new page groups, where we can then create Subpages, Templates, Categories, Navigation Pages, Perspectives, Styles, Attributes, Page Types, and Item Types. Each of these components will be discussed later in this chapter in the sections Styles, Templates, Navigation Pages, and Categories and Perspectives. For now, click the Create New Page Group link on the top left of the screen. The Create Page Group wizard is simple: It consists of one page that prompting for a name, display name , and language. Only English will appear in the Default Language drop-down box unless you have installed other language packs for Oracle Application Server Portal. Every page group has at least one page associated with it called the root page, and this page is created automatically for you when the page group is created. After entering the necessary information, you are automatically taken to the Page Layout screen for the root page of the group you have just created (Figure 10-22).
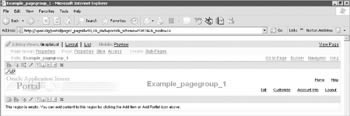
Figure 10-22: The Edit Page screen of Oracle Application Server Portal
The Edit Page Window
You can edit a page in Oracle Application Server Portal one of three ways, based on the link selected on the top left of the screen:
-
Graphical This will display a rough estimate of how the page will look as you add regions , content, and portlets to it.
-
Layout This will display a layout page for adding regions, content, and portlets to a page (developers who have used earlier versions of Oracle Portal will be familiar with this page).
-
List This provides a convenient way for developers to manage content on a page. It is not much use for managing portlets.
Click the Graphical link on the top left of the page. By default, there are two regions created for you on the page: a banner region along the top of the page and an empty region below that. The banner region is considered a navigation page, which is one of the subcomponents of a page group listed above. After adding some portlets to our page, we will look at editing that part of the page. In the region below the banner, there is a set of nine icons along the top of the empty region. Moving your pointer over each one without clicking on it will bring up a tool tip telling you what action clicking each icon will perform. The first (left most) icon is the Add Item icon. Next to that is the Add Portlet icon.
Adding Portlets
A region, as we will soon discover, can contain items (content) or portlets but not both. If that s the case, why are both the Add Item and Add Portlet icons available for this region? The answer lies in the fact that, by default, the region is created as undefined, meaning we can place either items or portlets in the region now. As soon as we place either an item or portlet in the region, the region type becomes defined as that type. Place a portlet on the region by clicking the Add Portlet icon in the region below the banner.
The Add Portlets page (Figure 10-23) is displayed. From this page, we can select portlets that will be placed in the region we have selected. There are two ways to search for portlets that you would like to place in the region: If you know the name of your portlet (or a part of the name), type that in the search text box at the top of the screen and click Go. You can also search for portlets by looking through the categories provided to you by Oracle (portlets provided by Oracle are called seeded portlets):
-
Portlet Builders
-
Portal Community News
-
Portal Content Tools
-
Administration Portlets
-
Published Portal Content
-
Shared Portlets
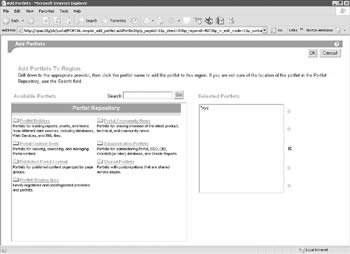
Figure 10-23: The Add Portlets page
Or, as another option, you can search for portlets you have created by looking in the Portlet Staging Area category.
Clicking on the portlet will move it to the right-hand side of the screen. Go to the Portlet Staging Area and click the name of the provider you have been creating your portlets under. You will see a list of the portlets you have created up to this point. Single-click on one of them and it will display on the right side of the page. Click OK to return to the Page Edit mode of your page with the portlet displayed graphically (Figure 10-24).
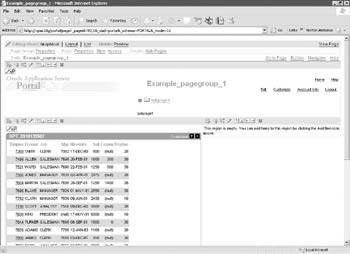
Figure 10-24: The Edit Page screen with a portlet rendered
Click the View Page link on the top right of the screen to see how the page will be displayed when end users request it. Click the Back button of your browser to return to the Edit Page window. Click the pencil icon (fourth from the left) in the region where you have just added your portlet. This displays the Edit Region page (Figure 10-25).
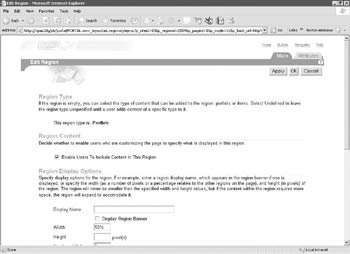
Figure 10-25: The Edit Region page
Regions
Regions are sections of a page. They can contain either items or portlets, but not both. They can be sized so that they take up a certain number of pixels on a page or a certain percentage of the page. Each region has its own set of attributes that affect how it displays items or portlets contained within it. The Edit Region page allows you to set attributes for a region on the page. The Main tab allows you to define whether the region is titled and how much space on the page it will take up. When we add regions to our pages in the next step, the Oracle Application Server Portal engine will automatically resize existing portlets so that they can fit on the page. The Oracle Application Server Portal engine will evenly divide the page depending on where we add regions, so we can return to this page to change the region size if we do not want evenly sized regions. The Attributes tab allows you to define what will be displayed along with which portlets or content are in the region. When we look at adding items (content) in the next section, we will revisit this page. Click Close to return to the Page Edit page.
Next to the pencil icon for the region there are four icons. These icons are used to add regions to the page. A region will be added in the direction that the arrow is pointing in the four icons. For this example, click the icon with the arrow pointing to the right (the eighth icon from the left). As we mentioned before, the Oracle Application Server Portal engine will automatically size the new and existing regions equally (Figure 10-26).
Figure 10-26: The page with two equally-sized regions on it
Changing the attributes for one of the regions will resize the others it affects automatically. To see an example of this, click the pencil icon for the left most region. Change the Width field on the Main tab to 66 percent. Click OK to redisplay the page (Figure 10-27). As you can see, the leftmost region now takes up 66 percent of the screen and the right-most region takes up 33 percent of the screen. To verify this, click the pencil icon on the right-most region and note how it has automatically been resized to have a width of 33 percent.
Figure 10-27: A page with a style applied to it
| Tip | Because the rightmost region is an undefined region, the page properties will not display. Click the radio button next to Items and click the Apply button. The other attributes for the page will then display. |
We now have a page with two regions on it: a portlet region on the left-hand side that takes up two- thirds of our page and an item region on the right-hand side that takes up one-third of our page. The colors and fonts that are displayed by default are pleasant enough, but we want to make our Portal distinctive . To change the colors and fonts that are displayed, we need to apply a Style to the page.
Styles
A Style is a set of colors and fonts that are used to define the look of a web page. By default, there are numerous styles provided for you when Oracle Application Server Portal is installed. You are not limited to the seeded styles: you can create your own styles and then apply them to pages if you d like. To create a new Style, click on the Navigator link on the top right of any Oracle Application Server Portal screen. Click the Page Groups tab and then the link of the page group you have created in this chapter. Click the Style link. You ll notice that there are no styles there. What about the seeded styles? To see those, you ll have to navigate up to the root of the Page Groups section by clicking the Page Groups link in the breadcrumb menu. From there, click the Shared Objects link, then the Styles link. This will display all of the seeded styles available for you. If you choose to create a Style here, it will be available to all pages across all page groups. If you choose to create a Style under a specific page group, it will only be available for that page group.
| Note | The preceding sentence is true for all objects in the Shared Objects section of the Page Groups tab: Templates, Categories, Navigation Pages, Perspectives, Styles, Attributes, Page Types, and Item Types. |
Return to the page group by clicking the Page Groups link in the breadcrumb menu, then clicking the link of the page group we have been working with. From here, click the Styles link and then the Create New Style link to create a new style. After defining the name and display name, you are automatically taken to the Properties tab for the new style. Here, you can define virtually every aspect of how things will appear on your page. The first drop-down box on the top left of the screen under the header Style Element Type lists the four types of elements you can affect on the page: Items, Tabs, Portlets, and Common. Depending on what is selected there, the second drop-down box under the header Style Element Properties will change to reflect the first selection. The elements under the color palette will also change depending on what is selected in the first two drop-down boxes. Table 10-2 lists what can be specified on this page.
| Style Element Type | Style Element Properties |
|---|---|
| Items | Group By Banner, Group By Text, Group By Link, Default Attribute, Sub Page Title Associated Functions, Author, Base Item Type, Category, Create Date, Creator, Date Updated, Description, Display Name, Display Name and Image Link, Display Name Link, Document Size, Expiration Period, Expire Date, Help URL, Image or Display Name Link, Item Content, Keywords, Last Updated By, Page, Page Group, Perspectives, Portlet ID, Portlet Name, Provider ID, Provider Name, Publish ID, Score |
| Tabs | Active Tab Color, Active Tab Text, Inactive Tab Color, Inactive Tab Text |
| Portlet | Portlet Header Color, Portlet Header Text, Portlet Header Link, Portlet Header Style, Portlet Subheader Color, Portlet Subheader Text, Portlet Subheader Link, Portlet Body Color, Portlet Heading1, Portlet Text1, Portlet Heading2, Portlet Text2, Portlet Heading3, Portlet Text3, Portlet Heading4, Portlet Text4 |
| Common | Background, Region Banner, Region Banner Text |
Experiment by changing some of the properties to something distinctive (it s easiest to change something in the Common section such as Background Color) and saving the Style by clicking the Close button. Return to the root page of the page group by clicking the Page Group link in the breadcrumb menu and then clicking the Edit Root Page link next to the page group you ve been working with. Click the Style link on the top of the page to be taken to the Style tab for the page. Select the style you ve just created from the Choose Style drop-down box. Click the OK button to return to the graphical editing view for the page. Click the View Page link on the top right of the screen (Figure 10-27).
Templates
A template can be used to predefine the tabs and regions on a page. It can be associated with a page when it is created, or it can be associated afterwards. If a template is associated with a page after items and portlets have been placed on it, you will be asked which regions and tabs on the template move the items and portlets. It is much easier to associate a template to a blank page right after it has been created.
| Note | Pages can also be detached from templates. |
Create a new template by clicking on the name of the page group we have been working with in this chapter, then clicking on the Templates link. Click on the Create New Template link on the top left of the page. Give the template a meaningful name, display name, and description, then click the Make available for use in this page group check box and click Next >. If you would like to restrict the Style to maintain a consistent look and feel, deselect the Enable Pages to Use a Different Style checkbox. When you click Finish, you will be taken to a page that looks very similar to the Edit Page screen (Figure 10-28).
Figure 10-28: The Edit Template Page screen
On this screen, you can define regions and tabs, as well as place items and portlets, although the last two actions are rare. Experiment by adding some tabs and regions to this template. Changes are saved automatically as you add regions or tabs to the template. When you re finished, click the Navigator link in the top right of the screen. Click the name of the page group in the breadcrumb menu and then click the Pages link. Click the Create New Page link on the top left of the screen. Leave Page Type as standard and enter meaningful information for the name, display name, and description fields. Click Next >. On the second page of the wizard, select the template you created in the previous step. Automatically, the screen repaints to display what the new subpage will look like (Figure 10-29). Clicking Finish after this step will display the page in graphical edit mode. Note that the developer has no way to delete or add regions (they are locked by the template). It is also impossible to add portlets or items to the existing tabs as they have not been defined as portlet or item regions in the template.
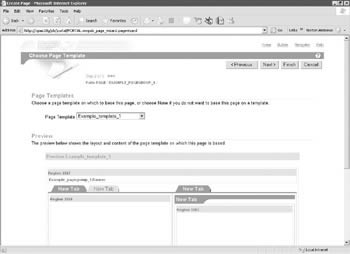
Figure 10-29: The Create Page Wizard after a template has been selected
Navigation Pages
Navigation pages are a special type of subpage that are intended to be used as a navigation area for your portal pages. When you create a navigation page, the steps and attributes of the navigation page are exactly the same as a subpage except for the following:
-
Navigation pages can only be standard pages; subpages can be either standard or URL-type pages and can have their attributes modified.
-
Navigation pages can be created from other navigation pages by selecting another page in the Copy From drop-down box.
-
By default, navigation pages are published as portlets with the intent of placing them on a page.
-
No banner region is created automatically.
Let s add a navigation window on the left-hand side of the page. Click the Navigator link on the top right of the page, then click the name of the page group you have created in this chapter. The page of the Navigator that is displayed lists all of the components that can be created that are associated with a page group. For now, click the Navigation Pages link. By default, there are two navigation pages created for each page group: a banner (which is displayed by default on the root page) and a navbar (which is not displayed by default on the root page). Create a new navigation page by clicking the Create New Navigation Page link. Enter the name and display name and click Create. Click Close to return to the Navigator, then click the Edit link next to the navigation page you just created (Figure 10-30).
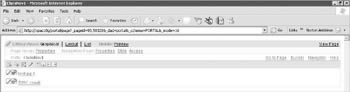
Figure 10-30: The edit screen for the navigation page
As you can see, this page looks very similar to the edit page screen except for the fact that there is no banner region created automatically. You can place either items or portlets on the default region, and you have full capabilities to create other regions and place tabs on them, but it is far more common to maintain one region and place items (usually links to other Oracle Application Server Portal pages or components) in this region. Click the Add Item icon on the top left of the page, select Page Link from the Content Item Types drop-down box and click Next >. Click the notepad icon next to the Path text box and select an Oracle Application Server Portal page from the list by clicking Return Object next to our selection. Return to Step 2 of the add item wizard, fill in the fields on this page with meaningful values, and click Finish.
After returning to the edit page screen, click the Navigator link on the top right of the screen. Click Page Groups in the breadcrumb menu of the navigator, then click the Edit Root Page link next to the page group we have been working with in this chapter. Add the navigation page by creating a new region on the left of the screen. Click the Add Portlet icon for that new region and search for the navigation page you just created. Place it in the region by single-clicking on it. Click OK to return to the page.
Page Properties and Page Group Properties
Both pages and page groups have properties associated with them that affect how the page looks and behaves. A Page Group setting will affect all pages (root and subpages) associated with that page group. At the top of the Edit Page screen, there are two links: a Properties link next to Page Group: and a Properties link next to Page:. Click the Properties link next to Page Group: (Figure 10-31).
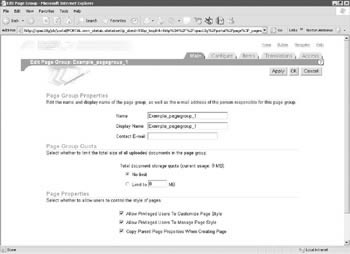
Figure 10-31: The properties page for the page group
Along the top of the page, there are five tabs:
-
Main This tab can be used to change the page name, display name, or quotas for the size of items that can be placed on pages in the page group. It can also be used to allow or deny end users from using or modifying page styles.
-
Configure The tab can be used to allow or deny different page types and different types of content on the page.
-
Items The tab allows you to enable/disable item versioning, set characteristics for unpublished (unviewable) items, and purge expired items.
-
Translations This tab allows you to manage different language packs that may have been installed.
-
Access This tab allows you set permissions on the pages.
Click OK to return to the edit page screen. Click on the Properties link next to Page (Figure 10-32).
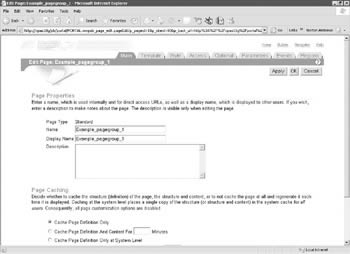
Figure 10-32: The properties page for the page
This page shows a slightly different set of properties. Along the top, there are now eight tabs:
-
Main This tab allows you to change the name/display name of the page and control its caching behavior.
-
Template This tab allows you to attach the page to or detach the page from a template.
-
Style This tab allows you to select a style for the page.
-
Access This tab allows you to set access privileges for the page. You can use this tab to override settings made in the Access tab of the Page Group properties described above.
-
Optional This tab allows you to publish your page as a portlet (which can then be placed on other pages), set default WebDAV properties, enable/disable item versioning, specify page images, and enable/disable links to subpages.
Note WebDAV stands for WWW Distributed Authoring and Versioning and is a standard used to save data to web site (as opposed to just reading it). WebDAV is very useful when you have a large amount of content you wish to publish on your site.
-
Parameters This tab allows you to define parameters for your page. You can then pass those parameters in calls to the page from the various packages in the Portal API.
Tip The Portal API is described in the Portal Development Kit (PDK), downloadable from http://portalcenter.oracle.com.
-
Events This tab allows you to define events for your page. Events can be used to trigger certain actions when various events happen on the page.
-
Regions This tab allows you to define a default item and default portlet region for the page.
| | ||
| |
EAN: 2147483647
Pages: 192