OracleAS Portal Forms
| | ||
| |
One of the basic OracleAS Portal components is that of an OracleAS Portal Form. A form allows end users to interact directly with the database and can be designed to query, insert, update, or delete data, or most likely, to enable the end user to perform a combination of these activities. The OracleAS Portal wizard used to create an OracleAS Portal Form, like all of the other wizards discussed in this chapter and the next, can be used to create a component that can be run by itself over the Web and accessed via a web browser. These components run outside of OracleAS Portal s security and page structure and can be used to create components that are not placed on OracleAS Portal pages. Running the OracleAS Portal components in this manner is commonly referred to as full-page or stand-alone mode. As this is unusual, the focus of this chapter and the next will be on the creation of OracleAS components that are designed to be used as portlets (i.e., those to be placed on an OracleAS Portal page).
As you have seen in the preceding chapter, an OracleAS Portal component cannot exist by itself ”it must be associated with a provider. An OracleAS Portal provider is a way of grouping OracleAS Portal components together. If you have not created an OracleAS Portal database provider, return to Chapter 8 and follow the steps to do so now. If you already have a provider, select the Navigator link on the top right of any OracleAS Portal screen, the Providers tab, the Locally Built Providers link, and then the provider you have created. You will see a screen similar to Figure 9-2.
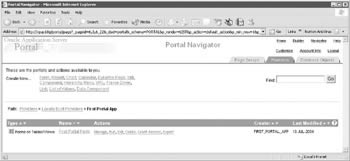
Figure 9-2: The OracleAS Portal Navigator with the First Portal App provider selected
| Note | There are two types of providers in OracleAS Portal: database providers and web providers. Database providers store the PL/SQL code that constitutes the components associated with the provider in the infrastructure database that is installed as part of the Oracle Application Server 10g installation. Web providers use code stored on the server (commonly Java) to build OracleAS Portal application components. A web provider is a web-based application that communicates with the portal using the HTTP or HTTPS protocol. Since the web provider communicates using HTTP, it can be installed on any web application server that the portal can contact. A discussion of web providers is beyond the scope of this book. For more information, see: http://www.oracle.com/technology/products/ias/portal/html/primer_pdkjava_provider_framework_v2.html. |
Clicking the Create New... Form link will bring you to a screen similar to Figure 9-3.
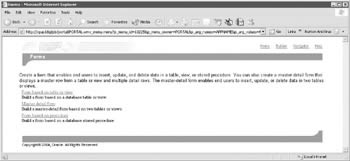
Figure 9-3: The first page of the Create New Form Wizard
As you can see from this wizard page, we can create three basic types of OracleAS Portal Forms using the OracleAS Portal Form Wizard. If you need a form to select and modify a record from a single table or view, choose the first selection, Form based on a table or view.
| Note | If you select a view to serve as the basis of your OracleAS Portal form, the options available to the end user, with regard to updating, deleting, and inserting records, will be determined by how the view was created. An updatable join view is a join view that involves two or more base tables or views, where UPDATE, INSERT, and DELETE operations are permitted. The data dictionary views ALL_UPDATABLE_COLUMNS, DBA_UPDATABLE_COLUMNS, and USER_UPDATABLE_COLUMNS contain information that indicates which of the view columns are updatable. In order to be inherently updatable, a view cannot contain any of the following constructs: set operators; DISTINCT operators; an aggregate or analytic function; a GROUP BY, ORDER BY, CONNECT BY, or START WITH clause; a collection expression in a SELECT list; a subquery in a SELECT list; or a join (with some exceptions). |
As its name implies, selecting Form based on a table or view will start the OracleAS Portal Forms Wizard and will prompt you to answer questions regarding how you would like an OracleAS Portal Form that is based on a single table or view to display and behave.
The OracleAS Portal wizards are basically glorified code generators. By specifying the attributes of your OracleAS Portal components, you are instructing the wizard how to generate code within the Oracle database (the infrastructure database that is installed when installing the Infrastructure piece of Oracle Application Server 10 g ). Beginning OracleAS Portal developers sometimes mistakenly draw an analogy between the OracleAS Portal wizards and the template generators used by other complex development tools such as Oracle JDeveloper 10 g or Microsoft C#. While the process of answering questions about your application and then having the code generators generate code is the same, there is a fundamental difference between the two: the application code generators in the Oracle JDeveloper 10 g and Microsoft C# tools are used to generate code that the developer is expected to then modify for his or her particular needs. The OracleAS Portal wizards are designed to generate all of the necessary PL/SQL code that your OracleAS Portal pages will use when displaying your work.
Is it possible to go back and modify the PL/SQL code generated by the OracleAS Portal wizards to customize your application? Yes, it is possible, but it would definitely be a challenge for even the most experienced PL/SQL / OracleAS Portal developer. Why? The code that the OracleAS Portal wizards generate takes into account all of the constructs available to you as a developer, such as templates, styles, custom colors, etc. Support for all of these pieces results in a lot of overhead when generating the final PL/SQL code. As an example, if you have created the basic OracleAS Portal form in the preceding chapter, open another browser window and log in to OracleAS Portal. Select Navigator, then the Providers tab, then the Locally Built Providers link, and then the link of the provider you have already created. Select the Manage link next to the OracleAS Portal Form you created in the preceding chapter. With the Develop tab selected, click the Package Body link in the middle of the screen. You will see the PL/SQL code that has been generated for this form (a sample is shown in Figure 9-4). If you remember, the OracleAS Portal Form we created was very simple and had almost no special conditions placed in it, and still, over 1,000 lines of PL/SQL code are generated! So while it is possible to modify the generated PL/SQL code, OracleAS Portal was designed so that you use the wizards to make modifications to your OracleAS Portal components.
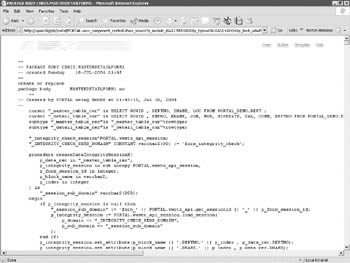
Figure 9-4: The PL/SQL code generated for a simple OracleAS Portal Form
| Caution | Additionally, it is critical to note that any changes that are made to the package outside of the OracleAS Portal Wizards (e.g., in JDeveloper) will be overwritten (i.e., lost!) as soon as the wizard is invoked again on this package. |
After the generators have done their work, you can edit the OracleAS Portal component at any time to make changes. The editing procedure allows you to revisit the wizard pages (all represented on a single OracleAS Portal page as tabs along the top right of the screen) and make the necessary modifications to your OracleAS Portal components. Clicking OK on any of these screens signals the OracleAS Portal engine to generate a new version of your OracleAS Portal component.
Note how JavaScript code is created within our OracleAS Portal components. It may be a little confusing for developers to understand how this code is stored and executed in our OracleAS Portal components. As you will see, certain screens of the wizards allow you to embed JavaScript code to enhance the functionality of our OracleAS Portal components. Where is this code stored? It is actually stored as part of the PL/SQL code that is generated when the OracleAS Portal Component Wizard completes. This code is then executed by the OracleAS Portal engine when the component is run on a page. There is no need to write HTML code with JavaScript in it ”the code is embedded in the OracleAS Portal component and is stored, as part of a PL/SQL package for that component, in the infrastructure database of your Oracle Application Server 10 g installation.
Table 9-1 lists the OracleAS Portal wizard pages, showing how your choice of OracleAS Portal Form type will affect which pages are displayed.
| Portal Wizard Page | Form Based on a Table or View | Master Detail Form | Form Based on a Procedure |
|---|---|---|---|
| Form Name and Portal DB Provider | Step 1 of 8 | Step 1 of 11 | Step 1 of 8 |
| Table(s) or View(s) | Step 3 of 8 (if you remember from Chapter 8, there is no step 2 in the Forms wizards) | Step 3 of 11 | N/A |
| Procedure | N/A | N/A | Step 3 of 8 |
| Join Conditions | N/A | Step 4 of 11 | N/A |
| Form Layout | Step 4 of 8 | Step 5 of 11 | Step 4 of 8 |
| Formatting and Validation Options | Step 5 of 8 | Steps 6/7 of 11 (one page for the master table, one page for the detail table) | Step 5 of 8 |
| Form Layout Editor “ Custom Layout | Step 6 of 8 (displayed if, on step 4 of 8, Custom layout is selected) | Steps 8 of 11, 9 of 11 (displayed if, on step 5 of 11, Custom layout is selected) | Step 6 of 8 (displayed if, on step 4 of 8, Custom layout is selected) |
| Form Text | Step 7 of 8 | Step 10 of 11 | Step 7 of 8 |
| Additional PL/SQL Code | Step 8 of 8 | Step 11 of 11 | Step 8 of 8 |
As you can see, many of the wizard pages are common to all OracleAS Portal Form types. The first wizard page prompts the developer for a name, a display name, a description, and what Portal database provider the form will be associated with:
-
The name field is what OracleAS Portal will use to store the information about your form internally. As such, it cannot contain spaces or any special characters .
-
The display name is what will be displayed when you view the OracleAS Portal objects in the Navigator.
-
The comment field is a text field to enter comments about this particular OracleAS Portal component.
-
The Portal DB Provider field lists the different providers that can be used. By default, the OracleAS Portal Provider selected in the previous screens will be highlighted as the default.
The next page of the wizard asks for information about the table/view, master/detail table/views, or procedure you will base your form on. If you are creating a master/detail form, the next page of the wizard will prompt you for a join condition. If you are using parent key/foreign key constraints to maintain referential integrity in your database, OracleAS Portal will automatically populate those fields for you. For this example, select the PORTAL_DEMO.DEPT table.
The next page of the wizard, the Form Layout page (Figure 9-5), is where many of the options that determine how our form will look and act can be specified.
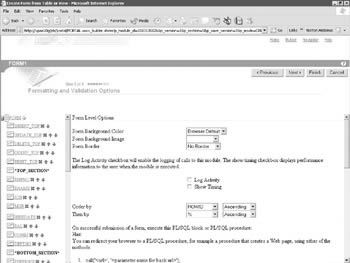
Figure 9-5: The Form Layout page of the OracleAS Portal Form Wizard
The left side of the window includes a hierarchical representation of all of the objects that are placed on the form. Depending on which object is selected (highlighted in yellow), the options provided for that object will appear in the right-hand side of the window. In Figure 9-5, the Form object is selected, so the right-hand pane displays options that can be set for the entire form (form background color , form background image, the order of rows to be returned to the form, etc.).
You will notice that the OracleAS Portal has automatically generated a set of buttons (one under the group Top Section and another set under the group Bottom Section in the left-hand frame). These buttons represent the standard actions that can be performed on data entered into a form: insert, update, delete, query, and reset (which clears all of the fields on the form). Next to each of these buttons is a red x and two blue up and down arrows (except for the first element on the page, the insert_top button). Clicking the red x will remove the component from the form. This makes it easy to create an OracleAS Portal Form with specific functionality. Suppose your requirements specify that an end user can insert new records and query existing records, but cannot delete or update existing records. You can create a form with the update and delete buttons removed (remember to remove them from both the top and bottom sections), which would remove that functionality from the completed form. The blue up and down arrows allow you to move form elements around. After you click one of these arrows, the OracleAS Portal page you are currently developing will redraw itself showing the reordered form components.
Click the INSERT_TOP form element on the left-hand side of the page and note how the right-hand side changes to reflect the options for the INSERT_TOP form element. The right-hand pane will also change depending on the item type selected from the drop-down box next to it. For this example, INSERT_TOP is defined as a button. We can specify what is to be displayed on the button by changing the label for the button, and below that is a check box to create the button on a new line.
The bottom half of the screen allows us to enter event handlers for this button. Event handlers will perform actions when a specific action is initiated (similar to a trigger in a database). For items of type Button, there are three JavaScript event handlers available: onClick, onMouseDown, and onMouseUp. In the text box to the right of the JavaScript event handlers is the JavaScript code that will execute when the specific event occurs. Any code written here will become part of the PL/SQL package that the OracleAS Portal wizard will generate.
| Note | While onClick and onMouseDown seem to be the same, there are subtle differences. The onMouseDown event handler is defined as executes JavaScript code when the user depresses a mouse button, and onClick is defined as executes JavaScript code when an object on a form is clicked. For buttons, both of these are the same, but for radio buttons, only onClick is defined. |
Below the JavaScript event handlers are the PL/SQL event handlers. These handlers respond to specific events for the form components and execute PL/SQL code in response. It is important to note that if an onClick Javascript event and a PL/SQL event are defined for a particular button, both events will be executed when the end user clicks the button. In the case of the INSERT_TOP button, there is no code defined for the query, update, delete, reset, pagination next, pagination previous, or custom PL/SQL events. The insert PL/SQL event includes this code:
- Type your PL/SQL code here... doInsert;- This is the default handler - ...and here, thanks...
This piece of code calls the default procedure for OracleAS Portal (named doInsert) that takes the values currently displayed on the form and attempts to insert them into the database. If, for whatever reason, you need other functionality to go along with your application when you insert records, you can add the necessary PL/SQL code here. Do not put PL/SQL code in more than one PL/SQL event for a button.
Click the DEPTNO field in the left-hand side of the screen. This field is defined as a text box. On the right-hand side, we can set values for the label; decide if the label should be treated as an HTTP link; set the height, width, and font to be used; set default values and/or format masks; determine whether predefined JavaScript validations (isAlpha, isDate, isNum, isNull, etc.) should be applied; and enable a new set of JavaScript event handlers, where we can further define functionality at the form level.
Three of the most important attributes are the three check boxes in the middle of the page: mandatory, updatable, and insertable. Mandatory will reflect whether the field is defined as NOT NULL in the database. Updatable and insertable allow you to prohibit the end user from modifying fields in a way that is not appropriate. For example, a field like DEPTNO may be used as a parent key to the employee table. Altering that value may create orphan records in the EMP table. As part of the requirements for your application, it may be advantageous to deselect the updatable attribute for that field.
The bottom section of the Formatting and Validation options has the same buttons as the top sections (insert, update, delete, query, reset) plus two additional buttons: Previous and Next. These buttons allow the end user to scroll through a set of records, one by one. The PL/SQL events tied to each of those buttons correspond to the Pagination Previous and Pagination Next PL/SQL events. Once again, each of these events has a default handler ”doPrevious and doNext, respectively. These default handlers provide OracleAS Portal with the default functionality needed to scroll through a result set of database records.
You are not limited to the top and bottom buttons, along with the fields from the table(s) or view(s) you have selected for your form. Clicking the green plus sign next to the Form entry in the left-hand frame on the page will allow you to add form elements. These form elements can be used for page formatting items such as horizontal lines or images, or else for buttons to upload objects like images or sounds to your database.
If, in the fourth step of the wizard, you selected a custom layout, clicking Next> on the Formatting and Validation Options screen will bring you to the Form Layout Editor “ Custom Layout page of the wizard. This page allows you to write your own HTML code to format how the fields will appear on your screen. If Tabular is chosen on the fourth page of the wizard, records will be returned in a tabular format similar to those in Figure 9-6.
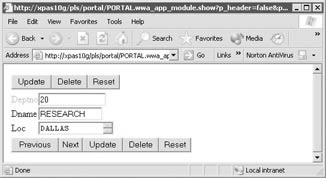
Figure 9-6: Records returned in a tabular format
The next step of the Forms Wizard provides you with the opportunity to use a template to display your form; enter the display name for your form; and enter header, footer, help, and about text for your form. If you click the Preview Template button, you will see an example of how the colors and background of the form will be displayed. On the top right, there are three icons displayed: the house icon will return the user to a specified URL, the question mark icon will display whatever is entered in the Help Text field, and the book icon will display anything that is entered in the About Text field. You can use HTML tags (like <b> for bold) to format the data in the Help Text and About Text fields.
| Note | In regard to the Form Text page, there is a similar page for almost every type of OracleAS Portal component that we can create ( reports , calendars, etc.). Earlier in this chapter, it was mentioned that an OracleAS Portal component can be displayed as a portlet (something to be placed on a page) or stand-alone. The options on this page of the wizard are only applicable for OracleAS components in stand-alone mode. Anything entered here will not be used if the OracleAS Portal component is displayed as a portlet. |
The final page of the wizard allows developers to add PL/SQL code that fires at various times during the life of a portlet and a page. The six options available are
-
Before displaying the page
-
Before displaying the form
-
After displaying the form
-
After displaying the page
-
Before processing the form
-
After processing the form
all of which should be self-explanatory.
At this point, when Finish is clicked, there is a noticeable lag time before the Manage screen (Figure 9-7) appears. During this time, the OracleAS Portal Form Wizard generates the necessary PL/SQL code in the Oracle Application Server 10 g infrastructure database. After the PL/SQL code has been generated, clicking the Package Body link in the middle of the Manage page will show you what was generated.
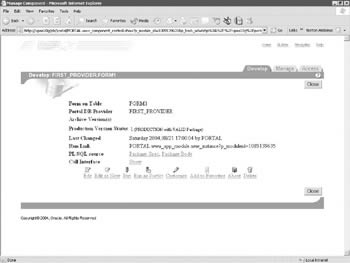
Figure 9-7: The Manage screen for OracleAS Portal components
To see what the new OracleAS Portal Form looks like, you can click either the Run or Run as Portlet link on the Manage page. If you click Run, you will see the OracleAS Portal Form run as a web form (stand-alone mode). This will give you an opportunity to test the various icons and see the effects of choosing different templates for the OracleAS Portal Form. Most developers, however, use Oracle Portal to develop components to be used as portlets. Click the Run As Portlet link to see how your form will look as a Portlet.
| Caution | It is important to note here that running the OracleAS Portal Form as a portlet will display the portlet using default, generic settings for things like color, font type, and font size . In the next chapter, we will see how setting parameters at the page level greatly affects the look of your OracleAS Portal pages. |
The Edit and Edit As New links on the bottom left of the Manage page allow developers to modify their OracleAS Portal components after they have been generated. By using the Edit As New link, developers can take advantage of OracleAS Portal s versioning mechanism: clicking this link will copy your component and allow you to begin working on a new version. When you generate the new component, the Manage page will show a current (production) version and an archived version. OracleAS Portal will keep as many archived versions as you wish, if you repeatedly modify your component by using the Edit As New link. If you select the Edit link, the current version of the component is edited, which can be dangerous if you modify an OracleAS Portal component and then need to undo the changes.
The Manage tab allows you to perform various maintenance activities on your form:
-
Export Allows you to export the OracleAS Portal component by creating a transport set (the metadata for the OracleAS component) and an export file (the definition of the OracleAS component).
-
Copy Allows you to copy the OracleAS component; can be used to copy components to another provider.
-
Rename Renames the component within the current provider.
-
Generate Regenerates the code composing the component; useful if generation failed because of permission issues in the database.
-
Monitor OracleAS Portal introduces a monitoring mechanism called the log registry; this registry can be used to monitor various OracleAS components; if this OracleAS Portal component was selected for monitoring in the Log Registry, clicking this link would list a report of all accesses .
The Access tab allows developers to set privileges for their components. The first check box, Publish As Portlet, adds the component to the portlet registry. The portlet registry is used to place portlets on a page. If Publish As Portlet is not checked, the page designer will not see the portlet in the Add Portlets section when constructing a page.
| Note | Page design and construction are discussed in the next chapter. |
The second check box, Inherit Privileges From Portal DB Provider, will change the look of this page depending on its state. If it is checked, any privileges that have been defined at the provider level will cascade down to the component level. If it is not checked, then the developer is given the option to define privileges for that component. If the state of the check box is changed (from unchecked to checked or from checked to unchecked), the page will automatically redraw itself and present the developer with the appropriate options. Clicking Close at this point will return you to the Navigator page, displaying your completed component (Figure 9-8).
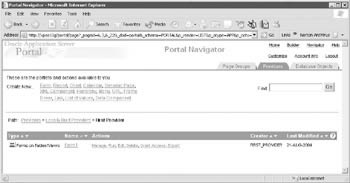
Figure 9-8: The Navigator page listing the completed form
From this page, you can use the links to the right of the component name to perform various actions:
-
Manage Brings you to the Manage page.
-
Run Runs the component in stand-alone mode.
-
Edit Edits the component. (Note: This does not perform an Edit As New, so you will be editing the production version of the component. To use versioning, select the Manage link and then the Edit as New link.)
-
Delete Deletes the component (if you have multiple versions, you will be prompted for which version[s] you wish to delete).
-
Grant Access Brings you directly to the Access tab of the Manage page for the component.
-
Export Brings you directly to the export page for the component.
| Note | The Forms component of OracleAS Portal is extremely powerful, yet it does not contain all of the functionality of the Oracle Forms 10g product. See Chapter 11 for a discussion of integrating forms created in Oracle Forms 10 g with OracleAS Portal. |
| | ||
| |
EAN: 2147483647
Pages: 192