Creating Your First Oracle Application Server Portal Objects
| | ||
| |
Now that our Oracle Application Server Portal development user has the ability to create a provider, let s go ahead and start creating some Oracle Application Server Portal components. We ll finish the chapter by taking some components and placing them on an Oracle Application Server Portal page.
| Note | This chapter is a rudimentary trip through Oracle Application Server Portal. In the next chapter, we will discuss the various development options available to developers in depth. |
If you are not logged in already, log in as the development user created earlier in this chapter. Select the Navigator link and click the Create New Database Provider link. Give your Provider a name (no spaces or special characters ), a display name, and select a database schema to use for this application (see Figure 8-22). Click OK.
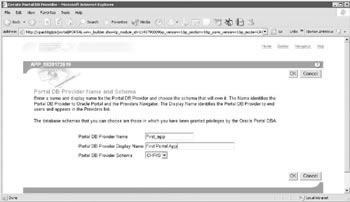
Figure 8-22: The Create Portal DB Provider screen
Back in the Oracle Application Server Portal Navigator screen, click the link with your provider s name. You are taken to a navigator page where you can build the following Oracle Application Server Portal objects:
-
Form The form displays a customized form that can be used as an interface for updating tables, executing stored procedures, and generating other customized forms. You can build three types of forms:
-
A form based on a table or view enables end users to insert, update, and delete data in a database table or view.
-
A master-detail form displays a master row and multiple detail rows within a single HTML page. The form contains fields for updating values in two database tables or views.
-
A form based on a procedure enables end users to insert, update, and delete data in a database stored procedure.
-
-
Report The report displays data you select from the database table or view in a report. It can have a tabular, form, or custom layout.
-
Chart The chart displays data you select from a database table or view as a bar chart. You can also create Java-based image charts .
-
Data component The data component displays data in spreadsheet format.
-
Calendar The calendar displays data you select from a database table or view as a calendar.
-
Dynamic page The dynamic page displays dynamically-generated HTML content on a web page.
-
Hierarchy The hierarchy displays data you select from a database table or view as a graphical hierarchy of items containing up to three levels.
-
Menu The menu displays an HTML-based menu containing hyperlinked options to other menus , Oracle Application Server Portal database portlets, or URLs.
-
Frame driver The frame driver displays a web page with two frames . End-user queries in one frame control the contents of the other frame.
-
Link The link displays a clickable link that provides a hypertext jump between Oracle application Server Portal database portlets and other database portlets, database portlet customization forms, or any HTML page.
-
List-of-values (LOVs) LOVs enable end users to choose entry field values in a form or database portlet customization form. You can use LOVs when creating database portlets to preselect the possible values in an entry field. The end user clicks the mouse to select a value rather than type it. You can also build LOVs based on other LOVs. LOVs are assigned to fields on a Form or Report and are the only Oracle Application Server Portal components not placed directly on a page
-
URL The URL displays the contents of a URL.
-
XML Component The XML component displays an XML page.
Building Your First Oracle Application Server Portal Form
An Oracle Application Server Portal Form is one of the fundamental developer pieces to query, insert, update, and delete data from an Oracle database. To begin creating your first Oracle Application Server Portal Form, click the Form link in the top left of the screen. The first page of the Form wizard (see Figure 8-23) provides the developer with options to create an Oracle Application Server Portal form based on a single table or view, a master-detail form, or a form based on a PL/SQL procedure stored in the database. For this example, select Form based on a table or view. You should then see a screen similar to the one in Figure 8-24.
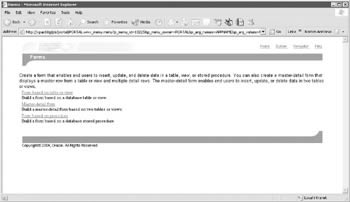
Figure 8-23: The first page of the Oracle Application Server Portal Form wizard
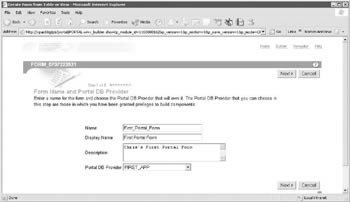
Figure 8-24: The first step of the Oracle Application Server Portal Create Form wizard
There are a couple of common elements on this page that we will see time and time again as we develop our Oracle Application Server Portal components. There is a marker at the top of the page that shows us where we are in terms of the number of steps to create our Oracle Application Server Portal component; in this case, Step 1 of 8. Different components (forms, reports , graphs, etc.) have different numbers of steps and, depending on options selected on the first couple of steps of the wizards, we may skip over later steps in the wizards. Oracle will take the choices we make in these steps and generate PL/SQL code after the final step and store the result in the infrastructure database as a PL/SQL package. Afterwards, we can go back and modify any of our Oracle Application Server Portal components, and Oracle will regenerate the necessary PL/SQL code to reflect our changes.
| Note | There are two important things to note at this time: 1) If you decide to make changes to your Oracle Application Server components, Oracle Application Server Portal gives developers the option of keeping as many versions of the generated component as desired so that they can be recovered; and 2) The steps of the wizard that are documented in this section are only available in this form when you create an Oracle Application Server Portal component for the first time. If and when you go back to modify the component, the screens look a little different. |
On this page, Step 1 of the Oracle Application Server Portal Forms wizard, we specify some basic elements of our form:
-
Name This is the name that Oracle will use internally to store the form in the database. It cannot contain any spaces or illegal characters ( , , ; , etc); this field is required.
-
Display Name This is what will be displayed in the Oracle Application Server Portal Navigator and on the screen when it comes time to place our Oracle Application Server Portal Form on a page; this field is required.
-
Description This is a text description of the form; this field is not required.
-
Portal DB Provider Like the one-to-many relationship analogy between line items and orders we discussed earlier in this chapter in the section Logging in to Oracle Application Server Portal for the First Time, all Oracle Application Server Portal components must be associated with a provider. Any attributes defined for the provider will cascade down to the Oracle Application Server Portal components associated with this provider. The individual components can, of course, override any of the attributes at the individual Oracle Application Server Portal component level.
The first page of most of the components you can create in Oracle Application Server Portal look very similar to this one. Clicking Next> takes up to a page where we specify what table we will use to populate our Oracle Application Server Portal form upon execution. If you look carefully , you ll see that, at the top of the screen, we are now at Step 3 of 8 (see Figure 8-25).
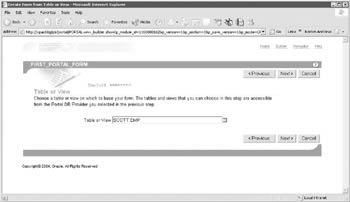
Figure 8-25: Step 3 of the Oracle Application Server Portal Form wizard
What happened to Step 2? We mentioned earlier that decisions made in early wizard steps affect later steps. You may be thinking that on the first page, if we had selected a Master-detail form or a Form based on a procedure, we would not have skipped over Step 2 of the wizard, but you d be wrong. There doesn t appear to be any way to see Step 2 in any of the Oracle Application Server Forms wizards. This is probably a minor bug.
Here, developers specify the table or view that will be used to drive the data when the Oracle Application Server Portal Form is executed. For this example, click the small icon to the right of the Table or View text box. A window similar to the one in Figure 8-26 will be displayed.
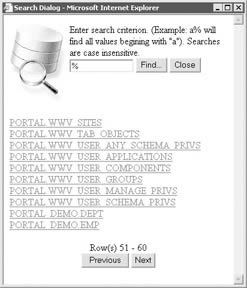
Figure 8-26: The search dialog
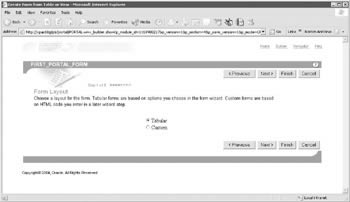
Figure 8-27: Step 4 of the Oracle Application Server Portal Form wizard
Click the Next button at the bottom of the page until the PORTAL_DEMO.EMP table is displayed. Click that table to select it, and then click Next> back on the screen that is displaying Step 3 of 8. In Step 4 of the Oracle Application Server Portal Form wizard, developers select the layout of the form. Selecting Tabular will display results in a format based on the information you provide in this wizard. Custom layouts are based on HTML code that you supply in the Custom Layout steps. Because developers can specify their own HTML code, developers can create a more elaborate and sophisticated layout than you could using a structured layout. For this example, select Tabular.
Before clicking Next>, it is important to note the existence of the Finish button on this page of the wizard. Up until this point, the Finish button has not been displayed. This is due to the fact that all of the wizard steps up until this point have been mandatory. From this point on, all of the steps in the wizard are optional ”that is, we can step over them and accept default values for our Oracle Application Server Portal form. One annoying thing to note: the Finish button is located exactly where the Next> button was on the earlier steps in the wizard. I mention this because, as you get more and more proficient with the wizards, you will begin stepping through them very quickly. On more than one occasion, I have inadvertently clicked the Finish button when I meant to click Next>. Not a huge deal, but it can be very time-consuming . Do not click Finish at this point for this example. Click Next>.
In Step 5 of the wizard (see Figure 8-28), there is a lot going on. This page in the wizard allows developers to modify attributes of all elements ( buttons , display fields, check boxes, LOVs, etc.) displayed on the form. All of the form elements are displayed on the left-hand side. As a quick example of what we can do on this step on the wizard, click the EMPNO link on the left-hand side of the window. The EMPNO field is probably a primary key in our table and, therefore, not something we want end users to be able to update. After EMPNO is selected, the right-hand part of the screen changes to reflect the attributes that can be modified for this selected form element (see Figure 8-29).
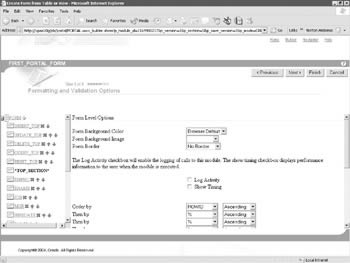
Figure 8-28: Step 5 of the Oracle Application Server Portal Form wizard
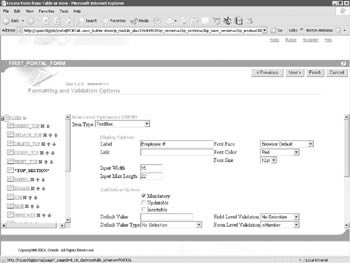
Figure 8-29: Step 5 of the Oracle Application Server Portal Form wizard with the EMPNO field selected
In the Label field, change EMPNO to Employee # and uncheck the Updatable and Insertable boxes. Click Next>.
The next screen (see Figure 8-30) is Step 7 of the wizard. Here is a real example of how decisions made earlier in the wizard steps affect the order in which the wizard steps are presented to us (unlike the skipping over of Step 2 discussed earlier). If we had selected a Custom layout in Step 4 of the wizard, we would have been taken to Step 6, where we would have had to specify the HTML code for the layout of our form. Since we selected Tabular in that step, we bypassed Step 6. In Step 7 of the Oracle Application Server Portal Form wizard, we can specify a template (used to specify things like background and foreground colors, fonts, etc.), for the text that will appear in the header or footer of the form, text that will appear in a pop-up window if the user clicks the Help icon on the form, and text that will be displayed in a pop-up window if the user clicks the About icon on the form.
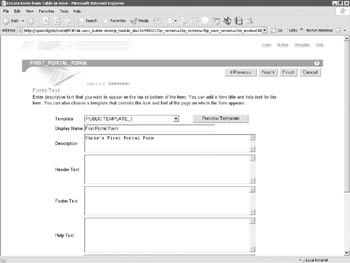
Figure 8-30: Step 7 of the Oracle Application Server Portal Form wizard
Templates take a little explaining. If you place your Oracle Application Server Portal form on a page, the template you select will never be displayed; the page attributes will determine what the Oracle Application Server Portal form looks like. If that s the case, what purpose do templates serve? When you generate an Oracle Application Server Portal component, developers have the option of turning that component into a portlet (to be placed on an Oracle Application Server Portal page) or the individual Oracle Application Server Portal component can be referenced via a URL and displayed outside of the context of an Oracle Application Server Portal page. If the latter is chosen , the template selected in this step will be used to determine how the Oracle Application Server Portal form is displayed in your browser. It is also important to note that Oracle Application Server Portal Pages can have page templates associated with them, which are different from the template that can be specified on this page.
To see an example of a template, click the Preview Template button. You ll see a window similar to the one in Figure 8-31.
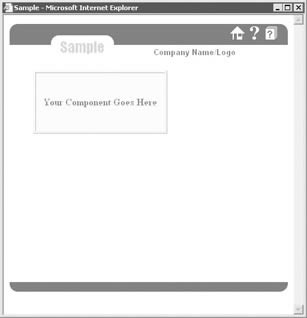
Figure 8-31: The preview template window
| Note | Page templates enforce the structure or how the real estate of an Oracle Application Server Portal page should be allocated for all pages that are associated with that template. User interface, or UI, unstructured templates enable developers to build rich custom interfaces that will support JavaScript and stylesheets. Oracle Application Server Portal developers are not limited to the default templates provided by Oracle as part of the standard Oracle Application Server Portal installation. They can create their own templates that can be used here. |
The three icons in the top right are generated automatically. Clicking the large question mark icon will display a window with whatever text you type in the Help Text text box in Step 7 of the Oracle Application Server Portal form wizard. Clicking the small question mark icon that looks like it s on the cover of a book will display a window with whatever text you type in the About Text text box. The Home icon will redirect user s browsers to a home page which can be specified programmatically. Close the preview window and click Next> on the wizard page.
| Note | You can use HTML tags, like <b> to bold display text, in any of the text boxes in Step 7 of the Oracle Application Server Portal form wizard. |
The next page of the Oracle Application Server Portal Form wizard is the final one: Step 8 of 8 (see Figure 8-32). On this page, we can specify triggers that fire (execute) PL/SQL code as the user progresses through the form.
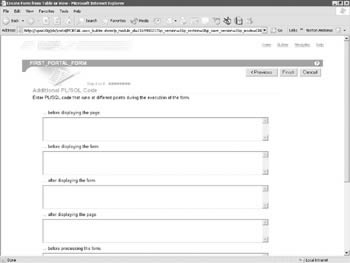
Figure 8-32: Step 8 of the Oracle Application Server Portal Form wizard
Clicking Finish as this point will send the infrastructure database into a frenzy, as the wizard will begin generating the PL/SQL code to reflect the selections you have made in the steps of this wizard. After a few moments, your browser will be directed to the Manage Component screen, which should look like the screen in Figure 8-33.
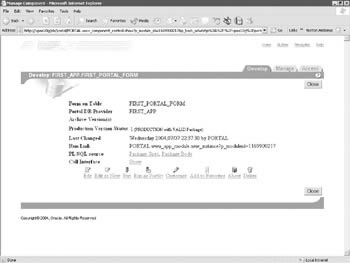
Figure 8-33: The Manage Component screen
This screen provides a wealth of information to the developer: the name of the form, which provider it is associated with, what archive versions are available, the current production version, when it was last altered , the link that can be used programmatically to invoke the component, the PL/SQL that was generated by the wizard when creating the component and the call interface, listing the parameters that can be passed to the component along with examples of invoking the component from a stored procedure and from a URL in a browser.
The links on the bottom of the screen are
-
Edit Edits the existing (production) version of the component; no archiving takes place
-
Edit as New Creates a new version of the component and archives the existing production version of the component
-
Run Runs the component outside of the Portal page structure
-
Run as Portlet Runs and displays the component as what it will look like when placed on a page (page attributes and templates can override this)
-
Customize Allows developers to specify parameters that end users can modify when displaying portlets
-
Add to Favorites Adds component to Favorites Portlet
-
About Gives detailed information about the component
-
Delete Deletes PL/SQL that constitutes component from infrastructure database
| Note | Where is the Favorites portlet? By default, it is not visible, but it is very easy to display it. On any Oracle Application Server Portal screen, click the Builder link in the top-right part of the screen. Click the Customize link in the top right after the Builder page is displayed. On the left-hand side of the page, you ll see a region that has Recent Objects and Developer News listed. Click the icon right above that that looks like two small boxes and a plus sign. You ll be taken to the Add Portlets page. In the search box, type favorites (without the quotes) and click the Go button. When the Favorites portlet appears in the left-hand column, single-click it and it will appear in the right-hand column. Click OK. The Customize Page with Favorites in the left-hand column will display. Click Close and the Build tab will redisplay with the Favorites portlet in the left-hand column. |
Click Run as Portlet to see what the completed Oracle Application Server Portal form will look like as a portlet. Click the Query button to retrieve the first record (see Figure 8-34).
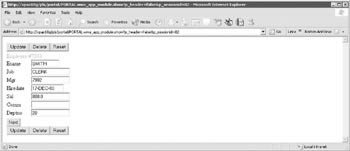
Figure 8-34: The completed form displayed as a portlet
Note how the changes we made in Step 5 (see Figures 8-28 and 8-29) are reflected here: the label next to the EMPNO database column has been changed to Employee #. Notice also that after retrieving the record, that field cannot be updated, as we have deselected the Updatable check box for that column.
Figure 8-35 depicts running the form by clicking the Run link in the Manage Component screen. Note that the background, colors, and fonts reflect the template we chose for this form in Step 7 (see Figure 8-30).
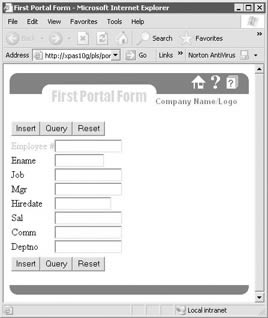
Figure 8-35: The completed form run as a web form
If we select Edit in the Manage Component screen, we will be editing the production version (in this case, version 1) of the form. If we should edit and save the form and realize we made a mistake, we will be out of luck at that point, as we were editing the only version of the form. It s much safer (and smarter ) to use the Edit as New link when modifying an Oracle Application Server Portal component. By clicking this link, a copy of the production component is made, the current production component is archived and the editing screen for that component is executed with the new component. To try this out, return to the Manage page for the Form and click the Edit as New link. A screen similar to Figure 8-36 will appear.
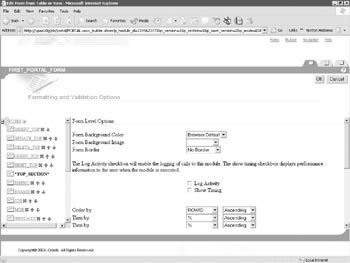
Figure 8-36: The Formatting and Validation Options screen
This looks similar to Step 5 of the Oracle Application Server Portal Form Wizard. It is, in fact, exactly similar to that step in the wizard in every way, except for the tabs at the top right of the screen. These tabs correspond to steps in the wizard that we have completed already. The current tab we re on corresponds to Step 5 of the wizard. The second tab corresponds to Step 7 (remember, we skipped Step 6 since we chose Tabular for our layout style) and the third tab corresponds to the final step: Step 8. For this example, click the ENAME column in the left-hand pane of the window, change the label for the ENAME field to Emp Name (without the quotes), and change the font color to blue (see Figure 8-37). At this point, you can either click another tab to make additional changes or click OK to generate a new version of the form. For this example, click OK. The Manage Component screen for this form will display. It should look something like the screen in Figure 8-38.
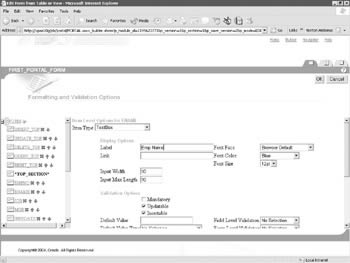
Figure 8-37: Modifying the ENAME field in the portal form wizard
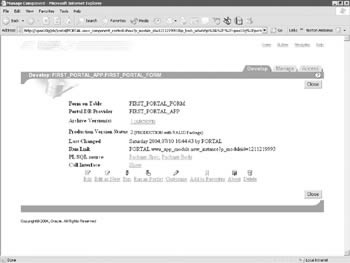
Figure 8-38: The Manage Component screen for the form after our first modification
As you can see, our production version of the form is now version 2, and there is an archived version available to us if we need to roll back to that version for any reason. Click Run to note the effect of the changes to the form that were just made.
Placing Your First Oracle Application Server Portal Form onto a Page
Before we can place our new Oracle Application Server Portal Form onto a page, there are two conditions that need to be checked to make sure our new form shows up in the portlet repository:
-
Is the provider that our form is associated with designated as a portlet provider? Database and web providers can have their provider designation turned off so that none of the components associated with it will be visible in the portlet repository.
-
Is our form exposed as a portlet? Exposing a portlet means making it available to the portlet repository.
| Note | The portlet repository is a list of portlets that can be placed on a page. If either of the above two conditions are not met, the portlet will not show up in the portlet repository. |
To check the first condition, select the Grant Access link next to the database provider that owns your Oracle Application Server Portal component in the Providers tab of the Oracle Application Server Portal Navigator. Make sure the Expose as Provider check box is checked. To check the second condition, click the provider s name and select Grant Access next to the individual component you have just developed. Make sure the Publish as Portlet box is checked. Now that we are sure both conditions have been met, we can place our form onto an Oracle Application Server Portal page.
Pages belong to page groups, so we will need to create one. In the Oracle Application Server Portal Navigator, click the Page Groups tab. Click the Create New Page Group link on the top left of the screen. Fill in the necessary fields and click Create (see Figure 8-39).

Figure 8-39: The Create Page Group screen
After clicking that page, you will be taken to a graphical representation of the root page for that page group (see Figure 8-40). It looks like there s a lot going on on this page, but it s all laid out in a logical manner so that when developers understand the layout of the screen, it becomes easy to modify it quickly. The top three rows of the page (the ones starting with Editing Views:, Page Group:, and Path:) display information about the page and what mode the page is currently being edited in. The current mode is listed in bold (in this example, we are editing the page in Graphical mode). You can switch between Graphical, Layout, and List while editing your page. They all perform the same basic functions (adding/moving/removing portlets, etc.), but just display the information in a different manner. The one you ll pick is a matter of personal preference. The Graphical mode is the one that will be demonstrated in the Portal chapters of this book (11).
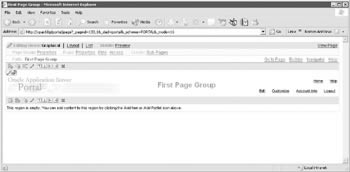
Figure 8-40: The root page in Graphical mode
The fourth row is a series of icons. This row represents the actions you can perform for a particular region. A region is a section of the page. If you remember back to the beginning of this chapter, we said that, using the one-to-many analogy, an Oracle Application Server Portal page has a one-to-many relationship with regions and a region has a one-to-many relationship with portlets. You ll notice that that row of icons is repeated lower on the page. This row represents the actions that can be performed with portlets for the second, lower region on the page.
If you move your mouse over the icons, a small help-text window will pop up telling you the action each of the icons performs . Moving from left to right:
-
Add Item/Portlet Clicking this icon will allow you to add either portlets or items, depending on whether the region is defined as a portlet region or an item region.
-
Add Tab Clicking this icon will add a tab to the region.
-
Arrange Items/Portlets Clicking this icon will allow you to re-order the portlets or items on a page.
-
Edit Region Clicking this icon allows the modification of region attributes.
-
Add Region Above Clicking this icon adds a region above the current one selected.
-
Add Region Below Clicking this icon adds a region below the current one selected.
-
Add Region Left Clicking this icon adds a region to the left of the current one selected.
-
Add Region Right Clicking this icon adds a region to the right of the current one selected.
-
Delete Region Clicking this icon deletes the selected region.
| Note | Items are things you would like to place on your portal that don t fit traditional database constructs such as forms or reports. Examples of items are spreadsheet files, images, sounds, documents, etc. |
For the bottommost region, click the Add Portlet icon. The Add Portlets screen appears (see Figure 8-41). The bottom-left of the screen shows the Portlet Repository with all available portlets organized into groups. The right-side of the page shows what portlets have been placed on the region.
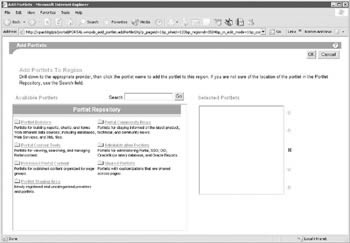
Figure 8-41: The Add Portlets page displaying the Portlet Repository
In previous versions of Portal, to find a component to be placed in a region, you d have to traverse the various groupings to find the component you were looking for. With Oracle Application Server Portal, Oracle has made this process simpler by introducing the search box that allows you to search for portlets from a single location. The name we will be searching for is the internal name of the component we have developed (First_Portal_Form). We can use wildcards, so type fir% (without the quotes) in the search field and click Go. When the search returns the portlet, single-click it to move it to the right-side of the screen (see Figure 8-42).
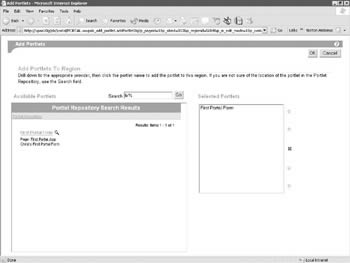
Figure 8-42: Selecting the First_Portal_Form portlet
Click OK and you will be returned to the page in graphical-editing mode with the portlet displayed (see Figure 8-43). It is a fully working portlet, so feel free to test it by hitting the Query button, then the Next and Previous buttons to scroll through the records in that table. To see what the page will look like when it s deployed, click the View Page link in the top right of the page.
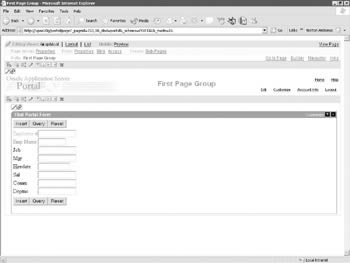
Figure 8-43: Graphically editing the page with the First_Portal_Form portlet placed on it
Let s add another portlet to the right of the First_Portal_Form portlet. Click the Add Region Right icon ( eighth icon from the left). A new region will be placed to the right of the existing region. Click the Add Portlets icon for the new region (if the icon displays Add Item when you move your mouse over it, click the pencil icon and change the region type to Portlets, then go back and click the Add Portlets icon for the new region). Click the Portlet Staging Area link, then the Example Application link. Finally, click the Report from SQL Query link to move it to the right side of the page. Click OK to re-display the First_Portal_Page with two regions and two portlets (see Figure 8-44). Click View Page on the top right of the screen to see how the page will look when it s deployed.
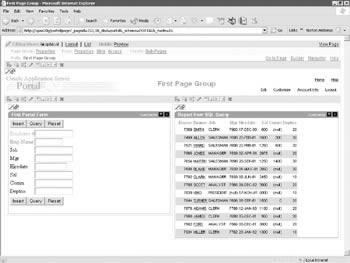
Figure 8-44: The portal page with two regions and two portlets
| | ||
| |
EAN: 2147483647
Pages: 192