Stacking and Grouping Shapes
Stacking and Grouping Shapes
Microsoft Office Specialist When shapes are placed on top of each other, they are stacked . The stacking order is determined by the order in which you draw the shapes. However, you can change the order by selecting a shape and clicking the Bring to Front, Send to Back, Bring Forward, and Send Backward commands on the Draw menu on the Drawing toolbar.
| Tip | If you cannot select a shape because it is covered by others in the stack, you can press [TAB] to cycle forward or [SHIFT]+[TAB] to cycle backward through the stack until you select the shape you want. |
Whether shapes are stacked or not, you can group them so that you can edit, copy, and move them as a unit. Although grouped shapes are treated as one object, each shape in the group maintains its individual attributes. You don t have to ungroup the objects to change an individual shape ”for example, change its color . However, if you need to move or size one of the shapes in a group, you do need to first ungroup the shapes. After you have moved or sized the shape, you can regroup the same shapes by selecting one of the shapes and clicking the Regroup command.
In this exercise, you will change the stacking order of shapes and then group, ungroup, and regroup them.
USE the StackShape presentation in the practice file folder for this topic. This practice file is located in the My Documents\Microsoft Press\PowerPoint 2003 SBS\CreatingShape\StackingShape folder and can also be accessed by clicking Start/All Programs/Microsoft Press/PowerPoint 2003 Step by Step .
OPEN the StackShape presentation.
-
If the Drawing toolbar is not displayed, point to Toolbars on the View menu, and then click Drawing .
-
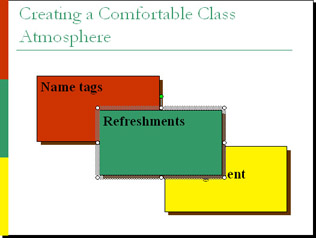
Move to Slide 3, and click the middle rectangle to select it.
-
On the Drawing toolbar, click the Draw button, point to Order , and then click Send to Back .
The middle rectangle appears behind the other two.
-
On the Drawing toolbar, click the Draw button, point to Order , and then click Bring to Front .
The middle rectangle appears on top of the other shapes.
-
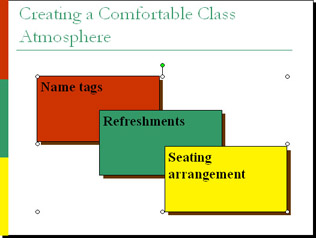
On the Drawing toolbar, click the Draw button , point to Order , and then click Send Backward .
The original stacking order is restored.
-
Click a blank area of the slide to deselect the shape, and then drag a selection box around all three shapes.
Each shape has its own dotted selection box and handles.
-
On the Drawing toolbar, click the Draw button, and then click Group .
The shapes are grouped together as one object with one set of handles around the edge of the grouped object.
-
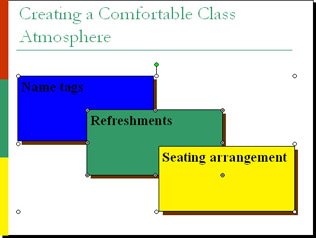
Click a blank area of the top rectangle.
Handles with little Xs in them surround the top rectangle to indicate that it is selected, but the white handles remain around the entire group.
-
On the Drawing toolbar, click the down arrow to the right of the Fill Color button, and then click the Blue color box.
The selected rectangle changes from red to blue.
-
Point to the middle rectangle, and when the pointer changes to a four-headed arrow, drag to the left until the dotted outline of the selected shapes aligns with the left end of the line below the slide title.
The entire group moves to the left. Because you pointed to the middle shape before dragging, that shape has handles with little Xs.
-
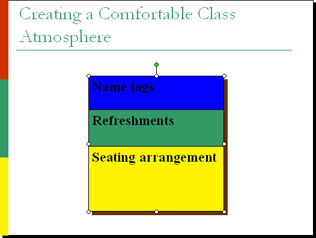
Point to the grouped object s right-middle handle, and drag to the right until the dotted outline aligns with the right end of the line below the slide title.
The sizes of all the shapes in the group change. You cannot change the size of just one shape without ungrouping.
-
On the Drawing toolbar, click the Draw button, and then click Ungroup .
The object is ungrouped into individual shapes, which are all selected.
-
On the Drawing toolbar, click the Draw button, point to Align and Distribute , and then click Align Center .
-
On the Drawing toolbar, click the Draw button, and then click Regroup .
-
On the Standard toolbar, click the Save button to save the presentation. Then turn off the Drawing toolbar.
CLOSE the StackShape presentation, and if you are not continuing on with the next chapter, quit PowerPoint.
EAN: N/A
Pages: 145