Formatting Text and Bullets Throughout a Presentation
Microsoft Office Specialist Formatting the placeholders in Slide Master view makes text objects consistent across all slides in a presentation. The master placeholders determine the style and position of those text objects ”the title, bulleted text, date and time, slide number, and footer. You can format the master placeholders to look any way you want.
In addition to formatting the text, you can customize the bullets for individual bullet points or for all the bullet points in an object. You can change a bullet s font, style, and color , and you can replace it with picture or a number. You can also control the distance between a bullet and its text in much the same way you control indents in Word, by moving indent markers on a ruler, as follows :
-
The First Line Indent marker ” the upper triangle ”controls the first line of the paragraph.
-
The Hanging Indent marker ” the lower triangle ”controls the left edge of the remaining lines of the paragraph.
-
The Left Indent marker ” the small square ”controls how far the entire paragraph sits from the edge of the text object.

By default, the markers of each bullet level are set so that the first line of each paragraph starts further to the left than the remaining lines, which hang below it. This setting is called a hanging indent . To adjust the relationship between the first and remaining lines, you drag the First Line Indent and Hanging Indent markers to the left or right on the ruler. To adjust the distance of the text from the edge of the text object, you drag the Left Indent marker.
In this exercise, you will format a text placeholder on the Slide Master and format bullets with a different symbol and a picture. You will then display the ruler and adjust the indent markers.
USE the FormatMaster presentation in the practice file folder for this topic. This practice file is located in the My Documents\Microsoft Press\PowerPoint 2003 SBS\ApplyingDesign\FormattingText folder and can also be accessed by clicking Start/All Programs/Microsoft Press/PowerPoint 2003 Step by Step .
OPEN the FormatMaster presentation.
-
On the View menu, point to Master , and then click Slide Master to switch to Slide Master view.
-
If Slide 1 ”the Slide Master ”is not displayed, click Slide 1 in the left pane, and then click the Number Area placeholder to select that text object.
-
On the Formatting toolbar, click the down arrow to the right of the Font Size box, and click 18 .
-
Click a blank area outside the text placeholder to deselect it.
Tip If you delete a placeholder and then want to restore it, you can click the Undo button if you notice the deletion before you do anything else. If it s too late to use the Undo button, click Master Layout on the Format menu, select the appropriate placeholder check box, and click OK.
-
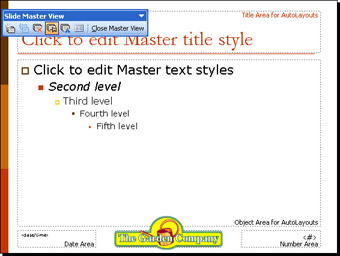
Click Second level to select the text.
Troubleshooting You can also click to the right of the text to select it. But if you click the bullet to the left, PowerPoint selects that level and all the levels below it.
-
On the Formatting toolbar, click the Italic button.
The Second level text changes to italic.
-
Click a blank area outside the text placeholder to deselect it.
-
In the same text placeholder, click Click to edit Master text styles .
The first-level bullet point in the text placeholder is selected.
-
On the Format menu, click Bullets and Numbering .
The Bullets and Numbering dialog box appears.
-
Increase the size of the bullet by clicking the up arrow to the right of the Size box until the setting is 100 .
Tip You can change the bullet color, adjust its size in relation to the text of the bullet point, change the symbol (by selecting a predefined symbol or by using the Picture or Customize command), or change the bullets to numbers .
-
Click Picture .
The Picture Bullet dialog box appears.
-
Scroll toward the bottom of the list box, and click the autumn-leaf image.
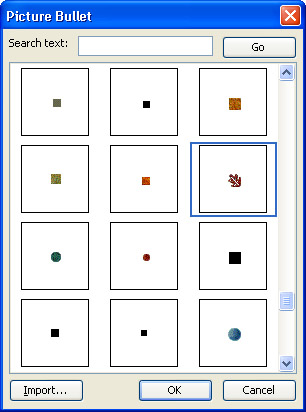
Tip You can use a scanned photograph or other image that is suitable for a bullet. Open the Picture Bullet dialog box, click Import, and in the Add Clips to Organizer dialog box, find and select the image you want to import, and click Add. The image then appears as one of the choices in the Picture Bullet dialog box.
-
Click OK .
The bullet image for the first-level bullet points is now a leaf.
-
Right-click Second level in the text placeholder, and click Bullets and Numbering on the shortcut menu.
-
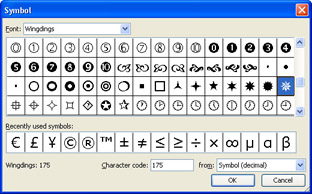
In the Bullets and Numbering dialog box, click Customize .
The Symbol dialog box appears.
-
With Wingdings selected in the Font box, scroll down the symbol list, and click the eight-pointed star symbol in the last column of the ninth row.
-
Click OK to return to the Bullets and Numbering dialog box.
-
Click the up arrow to the right of the Size box until the setting is 85 , and click OK .
The Second level bullet is a fancy star.
-
Click Ruler on the View menu.
Horizontal and vertical rulers appear along the top and left edges of the Slide pane. On the horizontal ruler are five sets of indent markers ”one for each level in the bulleted list.
-
Click Fifth level to select the text.
-
Drag the fifth-level Left Indent marker (the square) to the right to the 4-inch mark on the ruler.
The First Line Indent marker and the Hanging Indent marker move with the Left Indent marker, maintaining the distance of the bullet from the bullet point.
Important If you drag an indent marker to the position of another indent marker, the marker you are dragging pushes the other marker in the direction you are dragging until you release the mouse button. When adjusting indents, it is best to start with the lowest level indent so that you have room to work.
-
Drag the fifth-level First Line Indent marker (the down-pointing triangle) to the 3-inch mark on the ruler.
Troubleshooting If you have trouble positioning the indent markers, remember that you can always click the Undo button on the Standard toolbar and try again.
-
Drag the fifth-level Hanging Indent marker (the up-pointing triangle) to the 3 1 / 2 -inch mark on the ruler.
The bullet point text moves closer to its bullet.

-
On the View menu, click Ruler to turn off the rulers. Then on the Slide Master View toolbar, click the Close Master View button.
You return to Slide 1 in Normal view.
-
Click the Next Slide button to move to Slide 2.
The bullets on Slide 2 are now leaves , reflecting the change you made to the Slide Master.
-
On the Standard toolbar, click the Save button to save the presentation.
CLOSE the FormatMaster presentation.
EAN: N/A
Pages: 145