Working with Forms
When you first created the newsletter, you told Publisher to include a sign-up form on page 3. Publisher has several types of forms that you can use as elements of publications or as their own publications . Each type of form consists of a set of text frames and might include one or more tables.
Filling In Forms
As a demonstration, let s fill in the information needed for the sign-up form:
1. Move to page 3 of the newsletter, change the zoom setting to 150% so that you can see the text more clearly, and then scroll the sign-up form into view.
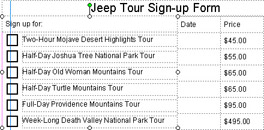
2. Replace the Sign-Up Form Title placeholder text with Jeep Tour Sign-up Form .
3. Change the heading of the middle column below the title from Time to Date . Then delete all the placeholder numbers in the Date column.
4. In the first Type the event name here box, replace the existing text with Two-Hour Mojave Desert Highlights Tour .
5. Select the price, and type $45.00.
6. Repeat steps 4 and 5, entering the information shown in this table:
| Half-Day Joshua Tree National Park Tour | $55.00 |
| Half-Day Old Woman Mountains Tour | $65.00 |
| Half-Day Turtle Mountains Tour | $65.00 |
| Full-Day Providence Mountains Tour | $95.00 |
| Week-Long Death Valley National Park Tour | $495.00 |
The last tour description is too long to fit in its cell, but type the entire entry anyway; you ll fix the cell width in a moment.
Customizing a Form
When Publisher includes a form in a design set, it takes care of most of the formatting, sizing, and positioning details. However, you might need to customize the form to suit your publication. You can work with individual form objects or with groups of objects. In this case, you need to group the form objects and then size and move them so that they appear where you want them. Let s get started:
1. Click the Date frame to select it, hold down the Shift key, and click the Price frame. Then, still holding down the Shift key, click each of the frames in the Date and Price columns , including the Subtotal , Tax , and Total frames.
Publisher selects all the frames, surrounding them with their own borders and handles, as shown in this graphic:

| |
If you want to create a business form using Publisher, check out the Business Forms category in the New Publication task pane before you try to create one from scratch. You can select from a variety of common forms, such as expense reports , fax cover sheets, inventory lists, invoices, and purchase orders.
| |
2. Click the Group Objects button to group the frames together.
Publisher surrounds the entire group with a single border and set of handles.
3. Point to the top border, and when the moving van appears, move the grouped objects to the right about .25 inch.
4. Click the Sign up for: frame, hold down the Shift key, click all the tour description frames to add them to the selection, and then click the Group Objects button to group these items together.
5. Widen the grouped object by dragging the middle-right handle until it touches the left side of the Date column.
The description of the Death Valley National Park Tour is now completely visible, as shown in this graphic:
6. Scroll down the page, and click the Adventure Works frame below the form to select it. Then resize the frame so that it is just high enough to fit its text, by dragging the uppermiddle handle downward.
Now group the payment and address information together for one easy move.
| |
If you are already working on a publication and want to add a form to it, you can do so easily by using the Design Gallery. Click the Design Gallery Object button on the Objects toolbar, and then click the Reply Forms category. You can select from several styles for order forms, response forms, and sign-up forms. When you find one you like, double-click it to insert it in your publication. Then customize it by formatting it, sizing it, and repositioning it anywhere in your publication using the techniques you have learned for working with text and frames.
| |
7. Click the Select Objects button on the Objects toolbar (even though it is already active), point above and to the left of the Method of Payment frame, check that no MOVE box is attached to the pointer, and then drag until the pointer is below and to the right of the Exp. date frame.
As you drag, Publisher draws a selection rectangle around all the frames between the point where you pressed the mouse button and the current position of the pointer. When you release the mouse button, Publisher selects all the frames inside the rectangle and surrounds them with their own borders and sets of handles, as shown in this graphic:
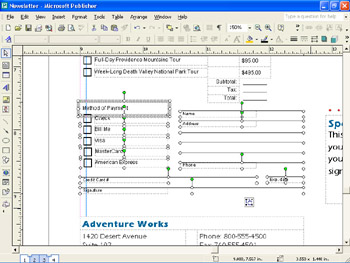
8. Click the Group Objects button to group the selected items together, and then move the grouped object down until it sits just above the Adventure Works frame.
9. Click the Date/Price grouped object, and click the Ungroup Objects button on the Objects toolbar. Then ungroup the Sign up for grouped object.
10. Group the Subtotal , Tax , and Total frames, and move them down to make room for a new row.
You might have to increase the zoom setting to be able to select these frames.
11. Click the last tour description frame, hold down the Shift key, and then click its date and price frames.
12. Click the Copy button to copy the selection, and then click the Paste button.
13. Move the new row so that it sits below the preceding row and aligns with the other frames. Then if necessary, adjust the position of the Subtotal grouped object so that it is aligned with the date and price frames above it.
14. In the copied tour, replace the description text with Week-Long Mojave Desert Fossil Dig Tour and the price text with $610.00.
15. Replace the text beneath the Special Offer heading to the right of the form with the following:
Buy two tickets for our Full-Day Providence Mountains Tour between now and June 12, 2004, and pay for only one ($95). Hurry to book your tour now. Space is limited or is already sold out for some dates.
This graphic shows the results at 100%:

16. To see a printout of the newsletter, click the Print button. Then save and close the publication.
EAN: N/A
Pages: 76