Creating Tables from Scratch
We ve already shown you how to fill in a pre-existing table. Now we ll show you how to create a table from scratch.
| |
Many tables are simple tabular lists that align information in columns . To use tabs to create a table, enter the text you want to appear in the first column, and press the Tab key to move to the next column. The insertion point jumps to a position that corresponds to that of the next tab setting. By default, Publisher sets tabs at every half inch. To adjust the position of the default tabs, click Tabs on the Format menu, and change the Default tab stops setting. To set a custom tab using this dialog box, enter the tab s position in the Tab stop position box, and click the Set button. Publisher adds the tab to the list below the Tab stop position box. To remove a custom tab, click it in the list, and then click the Clear button. You can also specify how the text should be aligned at the tab and whether the tabs should have leaders. For example, if you create a table of contents for a report, you might want to set a right tab with dot leaders to draw your readers eyes from a heading across the page to a page number. You can also set custom tabs by using the rulers. First select the paragraphs that will contain the tabs, and on the horizontal ruler, click where you want the tab to appear. Publisher places a left-aligned tab marker on the ruler. To adjust the tab s position, drag the marker to the left or right. To set a tab with different alignment, click the Tab button at the intersection of the vertical and horizontal rulers until it displays the icon for the alignment you want, and then click a location on the ruler for the custom tab. (An L is a left-aligned tab, an upside-down T is a centered tab, a backward L is a right-aligned tab, and an upside-down T with a period is a decimal-aligned tab.) When you set a custom tab, Publisher removes all the default tabs to the left of the new tab but retains the default tabs to the right.
| |
Inserting a New Table
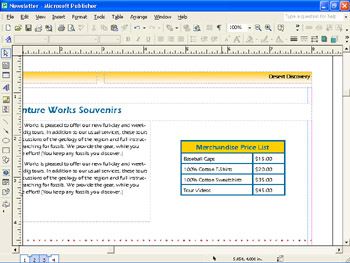
To demonstrate how easy the process is, we ll show you how to create a table that lists the souvenir merchandise sold by Adventure Works. Follow these steps:
1. Move to page 2 , click the empty text frame to the right of the Adventure Works Souvenirs story, and press Delete .
2. Press F9 , and click the Insert Table button on the Objects toolbar.
3. Move the cross-hair pointer over the newsletter, click the upper-left corner of the empty area to the right of the remaining text frame, and drag to create a frame approximately as wide and tall as the text frame.
When you release the mouse button, Publisher displays the Create Table dialog box, as shown in this graphic:
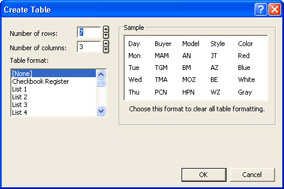
4. Type 4 in the Number of rows box , press Tab , type 2 in the Number of columns box, and then click OK .
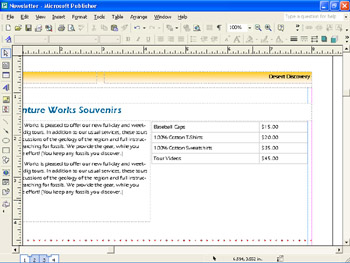
The table looks similar to the one shown in this graphic:

5. In the first cell , type Baseball Caps , press Tab to move to the next cell, type $15.00, and then press Tab to move to the first cell of the next row.
6. Type the entries shown in the following table, pressing Tab to move from cell to cell:
| 100% Cotton T-Shirts | $20.00 |
| 100% Cotton Sweatshirts | $35.00 |
| Tour Videos | $45.00 |
Sizing Columns or Rows
You can change the default column widths and row heights in a table to make the information easier to read. Try this:
1. With the insertion point still in the table, point to the table frame above the second column. When the pointer turns into a downward-pointing black arrow, click once to select the column.
2. Move the pointer to the middle-right handle of the table frame, and when the word RESIZE appears below a twoheaded pointer, drag to the left until the column is just wide enough to display its text.
Changing the size of the second column caused the first column to become smaller as well.
3. Move the pointer to the second column s left border, and when the pointer changes to a two-headed arrow, drag the left border to the right until it just touches the newsletter s blue guide.
| |
By default, if text in a table is longer than one line, Publisher wraps the text to the number of lines needed to display the entries in their entirety, adjusting the height of the rows as necessary. If you don t want the table s cells to expand with the text, click Grow to Fit Text on the Table menu to turn off the command. You will then need to manually resize the table or its rows and columns, edit the text, change the font size, or change the cell margins when Publisher can t fit all your text in a cell.
| |
4. On the Table menu, click Select and then Table to select the entire table.
5. Point to the boundary between any two rows, and when the pointer changes to a double-headed arrow, drag the boundary upward until the rows are just high enough for one line of text. Then click outside the table to deselect it.
All the rows in the table change size simultaneously , and your table now looks similar to this graphic:
Just as with rows, you can adjust all columns of a table simultaneously without having to select the entire table, by pointing to the rightmost column in a table and resizing it.
Adding a Table Title
Suppose you want to add a title to the table. Follow these steps to first insert a new row for the title and then format it to stand out from the rest of the table s text:
1. Click an insertion point in the first row of the table.
2. On the Table menu, click Insert and then Rows Above .
Publisher inserts a blank row as the first row in the table.
3. Click an insertion point in the first cell of the new row, and type Merchandise Price List .
4. On the Table menu, click Select and then Row to select the row.
5. Click Merge Cells on the Table menu.
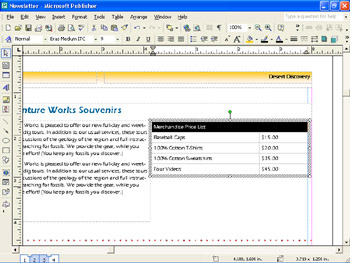
Publisher combines the two cells of the row into one large cell that spans the table. The results are shown in this graphic:
| |
To copy the contents of one cell to the cells below or to the right of it, select the cell you want to copy and all cells to which you want its contents copied . Then click either Fill Down or Fill Right on the Table menu. Publisher copies the contents of the cell you first selected to the remaining cells in the selection.
| |
6. Click the Center button on the Formatting toolbar to center the text in the merged cell.
7. Now click the down arrow to the right of the Font Color button on the Formatting toolbar, and click the slate-blue color box ( Accent 1 , or the second box in the colors row). Then change the font to Eras Demi ITC and the size to 12 .
8. Click outside the table to deselect the row.
The results are shown in this graphic:
Coloring Cells
To make your table more visually appealing, you can add color to the table s title cell. Follow these steps:
1. Click the first row of the table, and then on the Table menu, click Select and then Row to select the row.
2. Click the down arrow to the right of the Fill Color button on the Formatting toolbar, and click the gold color box ( Accent 2 , or the third box in the colors row).
3. Adjust the table so that it s about 2.5 inches wide and is approximately centered vertically on the text frame to its left.
| |
To rearrange a table, select the row or column you want to move, and click the Cut button on the Standard toolbar. Click an insertion point in the row above or the column to the left of which you want the cut information to appear, click Insert on the Table menu, and then click the appropriate row or column option. Select the appropriate options, and click OK. Then with the new row or column selected, click the Paste button to paste in the text. Finally, select the empty row or column, and delete it by clicking Delete on the Table menu and then clicking Columns or Rows.
| |
4. When you are finished adjusting and repositioning the table, click outside the table to deselect it.
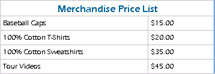
Your table should look similar to the one shown here:

Adding Gridlines and a Border
To finish off the table, you want to add gridlines and a border so that it really stands out and catches the reader s eye. Follow these steps:
1. Click an insertion point anywhere in the table, and click Select and then Table on the Table menu to select the entire table.
2. Click the Line/Border Style button on the Formatting toolbar, and then click More Lines .
Publisher displays the Colors and Lines tab of the Format Table dialog box.
3. In the Presets area, click the third box (the one that displays a sample table with inside and outside borders) to add a border and gridlines to the table.
To add only a border, you can click the center box (the one that displays a sample table with only an outside border).
4. In the Line area, click the down arrow to the right of the Color box, click the slate-blue color box ( Accent 1 , or the second box in the colors row), and then change the Weight setting by typing 2 pt .
5. Click OK to close the dialog box and apply the new border settings, and then click outside the table to deselect it.
| |
An easy way to apply formatting to a table is to use a table autoformat. Click an insertion point anywhere in the table, and click Table AutoFormat on the Table menu. In the Auto Format dialog box, you can choose from a variety of table styles. Click a table format in the Table format list to preview the format in the Sample box. You can modify the style by clicking the Options button and making your selections in the lower portion of the dialog box. Click OK, and you instantly have a great-looking table.
| |
| |
To import data from another program into a Publisher table, first open the file in the original program and copy the data. Next start Publisher. If you are copying the data into an existing blank Publisher table, click an insertion point in the table. On the Edit menu, click Paste Special, click Table Cells With Cell Formatting in the Paste Special dialog box, and click OK. If the copied text requires more cells than the table contains, Publisher displays a message asking if you want to expand the selection. You can click Yes to have Publisher expand the table to accommodate the copied text, or No to paste only as much text as will fit into the table. To insert the copied text in a new table on the active page of the publication, click Paste Special on the Edit menu, and click New Table. Then click OK to create the new table.
| |
The results appear as shown in this graphic:
| |
Publisher works with the Microsoft Graph program, which you can use to create graphs and charts . To start Graph, click Object on the Insert menu, click Microsoft Graph Chart in the Object Type list of the Insert Object dialog box, and then click OK. Publisher opens the Graph program, and Graph s menu bar and toolbars replace Publisher s at the top of the window. Graph displays a grid called a datasheet that contains placeholder data, and plots the data as a graph. Replace the placeholder data with your own information, and watch as Graph updates the plotted graph. You can format the graph by changing its type, changing its colors, and adding other elements such as titles and labels. For more information about using Graph, use Graph s Help menu. To return to your publication, click anywhere outside the graph frame. You can then move, resize, and format the graph object just as you would any other object.
| |
Creating a Table of Contents
Suppose you want to add a table of contents to your newsletter so that readers can easily find the information they need. Many of Publisher s design templates include a table of contents that you can customize to meet your needs. Let s quickly fill in the placeholder table of contents on page 1 of the newsletter:
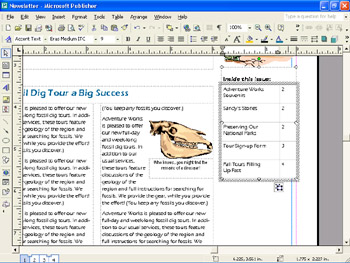
1. Move to page 1 , and scroll the Inside this issue: table into view.
2. Replace the Inside Story placeholder text and the page numbers with the following text:
| Adventure Works Souvenirs | 2 |
| Sandy s Stories | 2 |
| Preserving Our National Parks | 2 |
| Tour Sign-up Form | 3 |
| Fall Tours Filling Up Fast | 4 |
3. Point to the left table border just outside the next Inside Story row, and when the pointer changes to a black arrow, drag downward to select the last two rows. Then on the Table menu, click Delete and then Rows .
4. Click an insertion point in front of the S in Souvenirs , and press Shift+Enter to rebreak the line. Repeat this step to move National to the second line in the third row and to move Up to the second line in the fifth row.
The results are shown in this graphic:
EAN: N/A
Pages: 76