Changing the Structure of Tables
When you used the Table Wizard to set up the Employees table, the wizard made several decisions about the table s basic design. But those decisions aren t cast in stone. In this topic, you ll examine the existing table structure and see how to change it.
| |
As we ve discussed, you don t need to worry about saving the data in a database table because Access updates the table file one record at a time as you enter or edit records. But you do have to explicitly save any changes you make to the way your records are displayed in Datasheet view (such as changes in column widths) or the table s structure in Design view.
| |
| |
Be careful when deleting records. If you make a mistake and delete the wrong record, you can t restore the record after you ve confirmed the deletion. Instead, you must re-create the record.
| |
| |
When you delete a record that has an AutoNumber field (a field to which Access automatically assigns sequential numbers), Access does not update the remaining records numbers. Once a number has been assigned, it is not reused, so deleting a record leaves a gap in the sequential order of the numbers .
| |
Exploring Data Types
The data type of a field determines what kind of information you can put in the field and how Access can work with the information. We ll take a brief look at Access data types, but won t go into much detail. (You can check out data types in the Access Help feature if you want to learn more.) Follow these steps to take a look at the types used in this table:
-
Display the Employees table in Datasheet view.
-
On the toolbar, click the View button to switch to Design view.
Access displays your table s structure, as shown here:
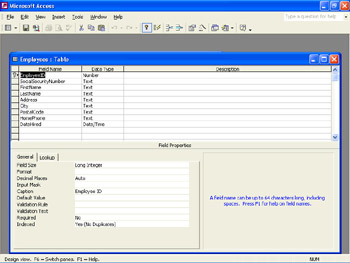
As you can see, the window is divided into two sections. The top half lists the table s field names (with no spaces) and their data type. The bottom half lists the properties assigned to the field selected in the top half.
-
Press Enter to move to the Data Type column for the EmployeeID field.
-
Click the down arrow to drop down the Data Type list.
-
You don t need to change the data type, so with Number highlighted in the list, press Enter to move to the Description column.
-
Type Unique 3-character number identifies each employee .
When the table is displayed and this field is selected, this description will appear in the Access window s status bar.
| |
The View button s picture icon changes depending on whether you are in Design or Datasheet view. If you are in Design view, the View button displays the Datasheet icon, because Access assumes that if you want to change views, you ll want to change to Datasheet view. Similarly, the New Object button displays the icon of the last new object you created, because Access assumes you ll want to create that type of object again. If the icon displayed is the one you want, you can click the button instead of making a selection in the button s dropdown list.
| |
Setting a Field Size
After you define a field for a table, you can refine your field definitions in the Field Properties area. You will use some of these properties frequently and others rarely. Here you ll explore the Field Size property.
Text and number data types have a Field Size property that you can set to limit the data that can be entered in the field. For text fields, the size indicates the maximum number of characters, up to 255, that you can enter in the field. (The characters can be letters , numbers, and other characters such as &, %, and ?.) If you try to enter a field value that is longer than the specified size, Access beeps and refuses to accept the extra characters if you are typing, or displays an error message if you are pasting or importing.
The Field Size property of number fields is different from that of text fields. A number field s size is determined by the complexity of the format selected. The options are:
| Format | Description |
|---|---|
| Byte | Whole numbers between 0 and 255 |
| Integer | Whole numbers between “32,768 and 32,767 |
| Single | Single-precision floating-point numbers between “3.402823E38 and “1.401298E “45, and between 1.401298E “45 and 3.402823E38 |
| Double | Double-precision floating-point numbers between “1.79769313486231E308 and “4.94065645841247E “324, and between 1.79769313486231E308 and 4.94065645841247E “324 |
| Replication ID | Globally unique identifier (GUID) |
| Decimal | Holds values from “10^28 “1 through 10^28 “1 |
| |
Access is much more rigid about its data types than Excel is with its number formats. For example, specifying a Currency number format for a cell in Excel does not prevent you from entering text in that cell . In Access, you cannot enter text in a field that has been assigned the Number data type. For more information about data types, refer to the Access Help feature.
| |
Let s set the size of the text fields of the Employees table:
-
Click anywhere in the SocialSecurityNumber row to display its properties in the Field Properties area.
-
Double-click 30 in the Field Size text box to select it, and type 11 .
Now you can enter no more than eleven characters, which is the correct number of characters for a nine-digit Social Security number plus two hyphens.
-
Repeat steps 1 and 2 to assign the following field sizes:
Field
Size
Field
Size
First Name
10
City
25
Last Name
12
PostalCode
10
Address
25
HomeNumber
14
-
Address 25 HomeNumber 14 Click anywhere in the EmployeeID field, click in the Field Size text box, and then click the Field Size text box s down arrow.
You see a list of available sizes.
-
You don t think the company will ever employ more than 225 employees, so click Byte .
| |
When restructuring a table, bear in mind that some data types cannot be converted to other types without loss of data. Adding a new primary key might result in errors, and reducing field sizes might result in data loss. If you attempt to restructure a field in a way that will result in corrupted or lost data, Access advises you of the problem and gives you the choice of continuing or canceling the restructure process.
| |
Assigning a Caption
By using the Caption property, you can substitute text for the field name when you display the table. The caption might simply repeat the field name with spaces added for readability, or it might display something completely different. Let s change a few of the captions specified by the Table Wizard when you created the Employees table:
-
If necessary, click anywhere in the EmployeeID field to display its properties in the Field Properties area.
-
In the Caption text box, click an insertion point to the right of the p in EmployeeID , hold down the Shift key, and press the End key twice to highlight all but Emp . Then type # .
-
Repeat steps 1 and 2 to change the following captions:
SocialSecurityNumber
SS#
PostalCode
Zip
HomePhone
Phone#
DateHired
First Day
-
DateHired First Day Click the View button to display the table in Datasheet view.
-
Click Yes to save the table, and then click Yes to acknowledge that you decreased the size of one or more fields.
The new captions are displayed as field names above their respective columns .
Setting a Default Value
The Default Value property lets you specify a field value that Access is to enter in the table automatically. Because Tip Top Roofing is small and most of the employees live in the same city, you can use this property for the City and Postal Code fields to speed up data entry. Follow these steps:
-
Click the View button to display the Employees table in Design view.
-
Click anywhere in the City field to display its properties in the Field Properties area.
-
Click in the Default Value text box, and then type Lakewood as the default city name.
-
Repeat steps 2 and 3 for the PostalCode field, specifying 98403 as the default value.
Now every record you enter in the new database table will have Lakewood as its City field value and 98403 as its Zip field value, unless you replace them with something else.
| |
In Access, field names can include spaces. However, many database programs do not allow spaces in field names. If it is possible that you will at some point export a table to a different program, it is prudent to assign names with no spaces to the fields and then add spaces in the captions to make the names more readable in tables, forms, queries, and reports .
| |
Requiring an Entry
If you leave the table s field structure as it is, it would be possible to create incomplete employee records. To ensure that key information is always entered, you can specify that a field must have an entry. Try this:
-
With the Employees table still in Design view, click the EmployeeID field.
-
In the Field Properties area, click the Required text box s down arrow, and click Yes in the drop-down list.
-
Click the Last Name field, and double-click No in the Required text box to change the entry to Yes .
-
Repeat either steps 1 and 2 or step 3 to set the Required property to Yes for the all of the remaining fields.
-
Close the Employees table, and save your changes.
The last record of a table is always blank and ready for your input. Because the required fields in this record are empty. Access displays a message asking if you want the existing data to be tested with the new rules.
-
Click Yes .
Exploring Other Properties
Text, number, currency, and date/time fields can all be indexed. When a field is indexed, Access maintains behind-the-scenes lists of entries that allow it to process queries, search, and sort on that field more quickly. (If a few values are repeated often, as is the case in the City and Zip fields of the Employee table, indexing the field doesn t save much processing time.) Data entry and editing might be slower with indexed fields because Access must maintain the index as well as the table.
You use the Validation Rule and Validation Text properties to check the validity of the data you enter in your tables. You set the Validation Rule property for a field when you want Access to allow only specific field values to be entered in the field. The kind of rule you can set up varies with the field s data type. You can specify that a text field should contain one of a set of values ”for example, the City field should contain only Pinedale or Lakewood. You can specify that a date field should contain only the current date or a date that falls within a certain range. With a number field, you can specify that Access should accept only a specific value, or you can use the greater than (>) and less than (<) symbols to specify that field values must fall within a range. You can also specify that the values in a field must match the values in the same field in another table. When you set a validation rule for a field, you can use the Validation Text property to display a message when an unacceptable value is entered.
You will rarely need to use the Allow Zero Length property (available for text fields), and you don t set it for any of the fields in the Employees table. Nor will you need to set Unicode Compression, which decreases the total storage size of the database.
The last two text field properties, IME Mode and IME Sentence Mode, are new with Access 2002. You can use them to control the Input Method Editor, which is a program that enters East Asian text (Traditional Chinese, Simplified Chinese, Japanese, or Korean) into programs by converting keystrokes into complex East Asian characters. You will not need to set these properties to complete the exercises in this course.
EAN: N/A
Pages: 116