Consolidating Data
Often you will want to summarize Excel data in some way ” for example, by totaling sets of entries. In this section, you ll summarize data using a technique called consolidation . Then you ll create a link that updates the summarized information in a separate worksheet.
Summarizing Data Using Consolidation
Suppose you want to total the amounts in 2002 Jobs by quarter, but instead of putting the totals on the same sheet, you want to enter them on a separate worksheet and create a link between the totals and their source data. Then if the data changes, the totals will, too. This task seems pretty complicated, but it s simple with Excel. Follow these steps:
-
Name the destination worksheet by double-clicking the Sheet2 tab in the 2002 Jobs workbook, typing Quarterly as the name, and pressing Enter .
-
In cell A1 of the Quarterly sheet, type Quarter , and in cell B1 , type Total . Then make the headings bold, size 12 , and centered.
-
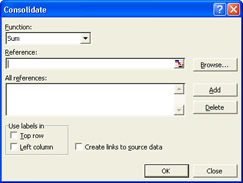
Select cell A2 , and then click Consolidate on the Data menu.
Excel displays the dialog box shown in this graphic:
-
If Sum does not already appear in the Function text box, click the down arrow to the right of the Function box, click Sum in the drop-down list, and then click the Reference text box.
-
Without closing the dialog box, click the Invoices 2002 sheet tab to move to the worksheet that contains the data you want to summarize.
Excel enters the name of that sheet in the Reference text box.
-
Shrink the Consolidate dialog box by clicking the Collapse button at the right end of the Reference text box, and if necessary, move the dialog box by dragging its title bar so that you can see columns D and E .
-
Select D13:E24 on the worksheet, and click the Expand button at the right end of the Reference text box.
Excel enters an absolute reference to the selected range in the Reference text box.
-
In the Use labels in area, select the Left column option.
Excel uses the entries in the Quarter column as labels in the summary worksheet. (Excel also redisplays the Quarterly sheet at this point.)
-
Select Create links to source data to link the data in the Quarterly sheet to the data in the Invoices 2002 sheet, and click OK to perform the consolidation.
-
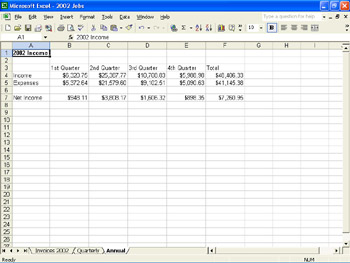
If necessary, widen columns A and C to display the data.
The results are shown in this graphic:

As you can see, Excel has entered the column labels in the Quarter column and the quarter totals in the Total column, which is now column C. Excel inserted a column and outlined the worksheet to hide the mechanisms used to maintain the link between the totals and their source data. When you have time, you can practice consolidating data from several worksheets and using some of the other functions available in the Consolidate dialog box.
| Information about | Absolute references, page 141 |
| |
Excel s outlining feature lets you view as little or as much of a worksheet as you want to see. To outline a worksheet, select all the cells containing data, and on the Data menu, click Group and Outline, and then click Auto Outline. Excel searches for what it considers to be the most important information (for example, the totals) and then uses this information to create different row and column outline levels. Initially, an outlined worksheet displays all its levels. You use the row level buttons and column level buttons in the upper-left corner of the window to expand and collapse the outline. For example, clicking the 2 row level button displays only the first and second levels and hides any lower levels. You can also click the buttons marked with minus signs above and to the left of the worksheet to collapse an outline level. Excel deduces that the last row or column of a section is the bottom line of the collapsed section and displays only that row or column. Conversely, you can click the buttons marked with plus signs to expand collapsed levels. Click Group and Outline, and then click Clear Outline to leave outline mode.
| |
Creating a Link Between Worksheets
Before you can move on, you need to set up a summary income statement for Tip Top Roofing. In the process, you ll link this worksheet to the Quarterly worksheet. You want the final result to look like the statement shown in this graphic:
| |
To consolidate data from more than one worksheet, the data in each of the source worksheets must be arranged in the same way. For example, if customer names are in column B in one sheet, they must also be in column B in the other sheets as well. Furthermore, all the worksheets must contain the same customer names in the same order. After setting up the consolidation worksheet, select the destination area, and click Consolidate on the Data menu. Select a function (such as Sum), enter a reference to the first source worksheet, click Add, enter a reference to the second source worksheet, and continue to enter references in this manner until you have entered references to all the source worksheets you need. Then click OK. Excel performs the consolidation, assembling the data from the source worksheets in your consolidation worksheet.
| |
| Information about | AutoFill, page 141 |
To set up the second worksheet, follow these steps:
-
Double-click the Sheet3 tab of the 2002 Jobs workbook, and enter Annual as the sheet name.
-
In cell A1 , type 2002 Income , click the Enter button, and click the Bold button on the Formatting toolbar to make the title bold.
-
In cell B3 , type 1st Quarter , and click the Enter button. Then drag cell B3 s fill handle to cell E3 .
AutoFill:Copying Formulas with AutoFill Excel fills C3:E3 with the labels 2nd Quarter , 3rd Quarter , and 4th Quarter .
-
In cell F3 , enter Total , and in cell A4 , enter Income . Then press Enter .
-
Select columns A through F , click Cells on the Format menu, and double-click General on the Number tab to clear any existing number formats.
Now for the linking:
-
Click the Quarterly tab, select C4 (the first quarter total), and then click the Copy button.
-
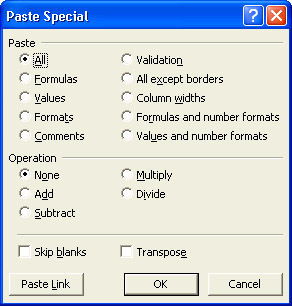
Click the Annual tab, select B4 , and click Paste Special on the Edit menu.
Excel displays the dialog box shown in this graphic:
-
Be sure the All option is selected in the Paste area and None is selected in the Operation area, and then click the Paste Link button to create a link between the totals in the Quarterly and Annual worksheets.
-
Repeat steps 7 through 9 for the 2nd, 3rd, and 4th quarter totals in the Annual sheet.
-
Enter the following information in the indicated cells:
A5
Expenses
A7
Net Income
B5
=0.85*B4
-
Select B4:F7, and assign the Currency format.
-
Use AutoFill to copy the formula in cell B5 to C5:E5.
-
Widen column A so that all its labels fit. Then drag through the headers for columns B through F , click Column and then Width on the Format menu, type 12 in the Column width text box, and click OK .
The selected columns take on the new width.
-
Select cell F4 , and click the AutoSum and Enter buttons. Then use AutoFill to copy the formula in cell F4 to cell F5 .
-
In cell B7 , type B4-B5, and click the Enter button.
Excel enters the result, $948.11, as the 1st Quarter s net income.
-
Use AutoFill to copy the formula in cell B7 to C7:F7.
Your worksheet should now look like the one shown at the beginning of this procedure. To test the links, try the following:
-
Click the Invoices 2002 tab, select E20 , type 100000 , and click the Enter button.
The total in cell E25 is $146,507.87.
-
Click the Quarterly tab, and, if necessary, widen column C .
The 3rd quarter total in cell C13 is now $108,810.37.
-
Click the Annual tab, and note the changes Excel has made in the summary income statement.
As you can see, creating links between worksheets can really save you time because when you update the source worksheet, Excel updates any linked worksheets for you. Links help cut down on typographical errors, too.
| Information about | Currency format, page 113 |
EAN: N/A
Pages: 116