Working with Tables
Tables provide visual summaries of information and enable you to quickly grasp relationships that might get lost in narrative explanations . Creating tables in Word is a simple process. You specify the number of columns and rows, and then leave it to Word to figure out the initial settings. After you create the basic table, you can change its design by adding or deleting rows or columns , changing row height or column width, and adding lines or a border. You can insert text, numbers , or graphics, and you can format the content as you like.
You can also perform mathematical calculations on columns or rows of numbers in your table. In this topic, we ll look at totaling a set of numbers, one of the simplest calculations, but check the Word Help file for information about performing other mathematical functions. Word s functions might not let you create sophisticated stock projections or loan analyses, but if your formulas involve nothing more complex than a few mathematical calculations, being able to use formulas in Word tables could save you considerable time.
| |
You can adjust column widths in three ways. If the ruler is displayed, you can click in the table and point to the grid marker on the horizontal ruler that aligns with the right edge of the column you want to adjust. When the pointer changes to a two-headed arrow with a ScreenTip that reads Move Table Column, drag to the left or right until the column is the width you want. You can also point to the right border of any cell in the column you want to make wider or narrower, and when the pointer changes to a two-headed arrow, drag to the left or right until the column is the desired width. To change column width using exact measurements, select a column, and on the Table menu, click Table Properties. On the Column tab, change the Preferred width setting to a specific measurement, and click OK.
Adjusting row heights works similarly. You can manually adjust the height of a row by pointing to the row s bottom border and dragging up or down to the desired height. If the ruler is turned on, hold down the Alt key as you drag to have Word display the exact row height in the adjacent vertical ruler. You can also drag the gray bars in the vertical ruler to adjust row heights. To change row height using exact measurements, select a row, and click Table Properties on the Table menu. On the Row tab, click the Specify height box, and enter a specific measurement. In the adjacent box, specify whether you want the row to be exactly that height or at least that height by selecting the appropriate option. Then click OK.
| |
Creating a Table Using the Insert Table Button
Suppose you want to include information about major sources of air pollution to your flyer. This information would look best in a table. Follow these steps to insert a table in the Flyer document:
-
Press Ctrl+End to move to the end of the flyer.
Because you inserted a page break earlier, your insertion point is now at the top of page 2 of the flyer.
-
Type AIR POLLUTANT SOURCES as the table s title, press Enter , type In Millions of Metric Tons , and press Enter twice.
-
Make the title bold and 14 points, and make the subtitle bold and italic. Then center both lines.
-
Press Ctrl+End, and then on the Standard toolbar, click the Insert Table button to drop down a column/row grid.
-
Point to the upper-left square, hold down the mouse button, and drag the pointer across four columns and down six rows.
The grid expands as you drag beyond its lower edge, and Word shows the size of the selection below the grid. When you release the mouse button, Word inserts a table structure in the document like the one shown in this graphic:
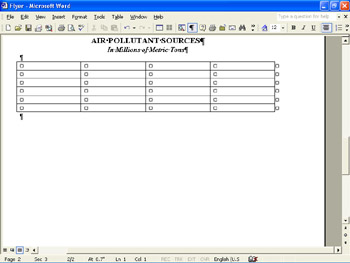
| |
You can create a table with specific column widths by clicking Insert and then Table on the Table menu and entering specifications in the Insert Table dialog box. From this dialog box, you can also move to the Table AutoFormat dialog box, where you can select and, if desired, modify one of a number of sample table styles. Yet another way to create a table is to use the Draw Table button on the Tables and Borders toolbar. Click the button to activate the drawing tool (the pointer turns into a pencil), and drag it diagonally to draw a box. When the box is the size you want the table to be, release the mouse button. Then draw horizontal and vertical lines to create rows and columns. To remove a line, click the Eraser button on the Tables and Borders toolbar, and click the line you want to erase. You can erase one border of a cell to merge cells either vertically or horizontally. To turn off a tool, click the appropriate button to toggle it off. You can then edit and format the table just as you would any other table.
| |
Entering Table Content
Acting on your instructions, Word has created a table with four equal columns and six equal rows, spanning the width of the document s text column. The insertion point is in the table s first cell (the intersection of the first column and the first row). To make an entry in this cell, all you have to do is type. You move from one cell to another by pressing the Tab key. We ll enter data in the table in this section, and format the data in a later section. Follow these steps to enter the table s content:
-
To enter column headings, type Contributor in the first cell, and press Tab .
The insertion point moves to the cell to the right.
-
Type Sulfur Dioxide , press Tab , type Carbon Monoxide , press Tab , type Nitrogen Oxides , and press Tab .
Notice that pressing Tab at the end of the first row moves the insertion point to the first cell in the second row. Pressing Shift+Tab moves the insertion point to the previous cell. You can also use the arrow keys and the mouse to move around.
-
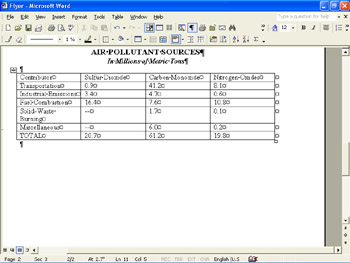
Finish the table by typing the entries shown below, pressing Tab to move from cell to cell.
Transportation
0.9
41.2
8.1
Industrial Emissions
3.4
4.7
0.6
Fuel Combustion
16.4
7.6
10.8
Solid-Waste Burning
”
1.7
0.1
Miscellaneous
”
6.0
0.2
-
After typing the last entry, press Tab .
Word adds a blank row to the table. We ll enter text in this row in the next section.
| |
You can move a table anywhere in your document. Point to the table, and when Word displays a framed four-headed arrow above the upper-left corner of the table, point to it, and drag the table to the desired location. (As you drag, Word displays a dotted frame indicating where the table will appear when you release the mouse button.) To modify the way text flows around the table, click the table to select it, and then on the Table menu, click Table Properties. On the Table tab, select the desired alignment option, and click OK. To fine-tune the positioning, check that the table is still selected, and then click Table Properties on the Table menu. On the Table tab, click the Positioning button, and enter measurements such as the distance of the table from the surrounding text.
To move a row or column to a different location within a table, first select the column or row you want to move. Then point to the selected element, and drag the shadow insertion point to the element s new location.
To delete one or more rows or columns, select the rows or columns you want to delete. On the Tools menu, click Delete and then click either Rows or Column. (If you click Delete and then Cells, Word displays a dialog box in which you can specify what you want to delete.) To delete an entire table, select the table and click Delete and then Table on the Tables menu. If you press the Delete key to accomplish any of these tasks , the contents of the cells, but not the cells themselves , are deleted.
| |
Totaling Values in a Table
Word includes a variety of functions that you can use to build formulas directly in Word tables. Using the row we just added to the table, let s see how easily you can turn a Word table into a simple spreadsheet. Follow these steps:
-
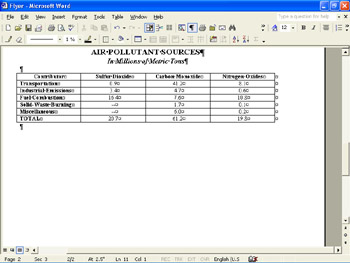
In the first column of the new row, type TOTAL , and press Tab to move to the second column.
-
Click the Tables and Borders button on the Standard toolbar to display the Tables and Borders toolbar.
-
Double-click the toolbar s title bar to dock it below the Standard and Formatting toolbars .
-
If the Office Assistant appears with a tip, click Cancel.
-
On the Tables and Borders toolbar, click the AutoSum button.
Word calculates the sum of the values entered in the cells above.
-
Press Tab to move to the third column, click the AutoSum button again to total the values in the third column, and then repeat this step for the final column.
Your table now looks like the one shown in this graphic:
| |
If your table is structured so that the values you want to total are oriented horizontally in a row instead of vertically in a column, you can click the AutoSum button for the first row you want to total. For the remaining rows, however, clicking this button won t produce the results you want. Instead, click Formula on the Table menu, change the =SUM(ABOVE) formula in the Formula text box to =SUM(LEFT), and then click OK. Otherwise the AutoSum feature will mistakenly total the cells above, rather than those to the left.
| |
Formatting Table Content
After you have entered data, you can format it in the usual ways. Follow these steps to see how to select and then format the content in the table:
-
Click anywhere in the first row of the table, and click Select and then Row on the Table menu.
You can click Select and then Column to select the column containing the active cell, or Select and then Table to select the entire table.
-
On the Formatting toolbar, click the Center and Bold buttons .
-
To make the headings in the Contributor column bold, point to the top border of the column, and when the pointer changes to a black downward-pointing arrow, click to select the first column. Then click the Bold button twice, and click away from the table to release the selection.
Clicking the Bold button once would have simply removed the bold formatting from the first cell.
-
To center the values, point to the left of the 0.9 entry in the Sulfur Dioxide column, drag through all the cells containing values to select them, and click the Center button.
-
Click anywhere in the table, click Select and then Table on the Table menu, and change the font size to 10 .
-
Press Home .
Your table now looks like the one shown in this graphic:
Adding Gridlines and Borders
By default, Word puts a ½-point, single-line gridline around each cell and a ½-point, single-line border around the whole table. Before we wrap up this topic, let s experiment with gridlines and table borders:
-
With the insertion point anywhere in the table, click Select and then Table on the Table menu.
-
On the Tables and Borders toolbar, click the Line Weight box s down arrow, and then in the drop-down list, click 1 ½ pt .
We changed the line weight and style earlier in this chapter when working with borders, so Word already displays the values we want to use rather than the default settings.
-
Click the Line Style box s down arrow, and click the singleline style in the drop-down list.
-
Click the Outside Border button s down arrow to display a palette of options.
-
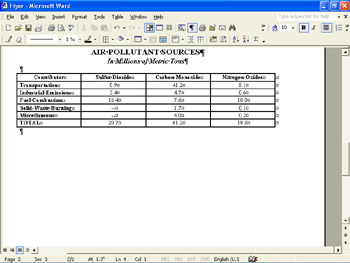
Click the All Borders button to create a 1 ½-point, singleline border around the entire table and between cells, and then press Home .
The results are shown in this graphic:
If you want a table without a border or gridlines, select the table, and then click the No Border button in the Border s drop “down list. If you want to use gridlines to help you manipulate the structure of your table but you don t want the gridlines to appear in a printed document, click Show Gridlines on the Table menu, and then click Hide Gridlines to turn them back off. (The gridlines will still appear on the screen, but they won t appear when you print the document.)
-
Check the flyer in Print Preview, and then print it.
-
On the Print Preview toolbar, click Close , click the Tables and Borders button to turn off the Tables and Borders toolbar, and then save and close the Flyer document.
With the features you have explored in these first few chapters, you should have no trouble using Word to create useful documents.
| |
To insert rows or columns anywhere in a table, select the number of rows or columns you want to add, and on the Table menu, click Insert and then Rows Above, Rows Below, Columns to the Left, or Columns to the Right. You can also use the Insert Rows or Insert Columns button on the Standard toolbar.
| |
EAN: N/A
Pages: 116