Customizing Setup
Customizing Setup
In this section, I ll discuss a number of ways you can tailor the setup process to the requirements of your device. First of all, if your device belongs to a new setup class, you can write an installer DLL to handle all the details of installing and managing a device of that class. I think that few readers of this book will actually need to do this. At most, you might need to provide a class-specific co-installer DLL to modify the default behavior of the system setup programs. If your device belongs to an existing setup class or to a new class that has no special requirements, you can provide a device-specific co-installer DLL that comes into play for just a few of the installation and management steps.
If your driver package has a digital signature (see the major section on WHQL at the end of this chapter), you can streamline the setup process by preinstalling your software on the end user s machine. By designing your package not to require interaction with the user, you will thereby permit an unattended server-side install that can occur even without an administrator present at the computer.
Often, vendors ship special applications along with their hardware. Microsoft refers to software that s in addition to the signed driver package as value-added software. Using a co-installer DLL, you can provide for installation of the value-added software along with the drivers and other digitally signed components in your package. Sometimes, you might want to launch an application after setup completes, and the RunOnce key in the registry provides a vehicle for doing that. As a special case, you might want to launch an application each time the user plugs in your device. I ll briefly describe the scheme used by the AUTOLAUNCH sample to help you accomplish that as well.
NOTE
A so-called server-side install is possible with a signed package that requires no user interaction. A client-side install requires that an administrator be present and occurs whenever a package is unsigned or requires user interaction to locate the INF file, to locate one or more of the driver files, to initiate the add-hardware wizard in the first place, or because a component displays a property page. According to the DDK, The term server-side is used because installation can be accomplished by the system s PnP Manager without a user-mode client making calls into the PnP Manager.
Installers and Co-installers
The system setup program gets into the act of installing, removing, and managing all the devices in the system. It works with a collection of installer and co-installer DLLs to perform the required actions. You can write such DLLs yourself, and you can install them along with a driver package by putting directives in your INF file.
NOTE
Strictly speaking, the setup program calls installer and co-installer functions, which the program finds in DLLs someplace on the system. One DLL can contain many entry points. I think that most readers of this book will tend to create only co-installer DLLs (and probably only device-specific ones at that) and to put just one entry point in each of those DLLs.
To speak generally, the setup program needs to identify the setup class for a device before the program can know which installer DLL and which class-specific co-installer DLLs it will call. Several pathways through the system setup functions lead up to identifying the setup class:
-
When you install a PnP device, the setup program will match a device or a compatible identifier returned by the bus driver with a model statement in an INF file. The setup program learns the device s setup class by reading the [Version] section in the INF file. If necessary, the setup program will also process the directives in the [ClassInstall32] section to create a new class.
-
When you install a non-PnP device, you use the Add Hardware wizard. The wizard allows you to designate a specific setup class as containing the device you want to install.
-
When you install a non-PnP device belonging to a new class, you perforce have to tell the setup program which INF file you want to use. Setup determines the class from the [Version] section and will install a new class based on the [ClassInstall32] section.
-
When you undertake to modify an existing device through the Device Manager, or by means of some other similar management utility, you make dialog choices that specify a particular device, whose setup class is recorded in the registry.
As installation of a new device or modification of an existing device proceeds, the setup program eventually knows which device you re working with. It then starts using any device-specific co-installer DLLs that exist. For many of the tasks the setup program performs, therefore, it uses an installer DLL, one or more class-specific co-installers, and one or more device-specific co-installers.
Setup Function Codes
The setup program communicates with the various DLLs by calling an exported function. Among the arguments to the function is a DIF code that indicates which function the DLL should perform. In this subsection, I ll present an overview of the DIF codes used for several common activities. Refer to the DDK (specifically the section entitled Device Installation Function Codes ) for a detailed explanation of the tasks to perform.
On the CD I built the debug version of SAMCLASS.DLL and recorded the resulting trace information as I did various things with devices. Don t assume that these are the only steps that would be performed on all systems or that the listed steps wouldn t be performed in other situations too.
In the tables that follow, I indicate in the Co-installer? column whether the setup program sends a particular DIF code to a co-installer. It sends all the noted codes to the installer.
| DIF Code | Co-installer? | Summary of Operation |
| DIF_REGISTERDEVICE | No | Determine whether non-PnP device is a duplicate. |
| DIF_SELECTBESTCOMPATDRV | No | Modify list of possible drivers; possibly prune list or select the driver. |
| DIF_ALLOW_INSTALL | No | Determine whether setup should proceed to install the device. |
| DIF_INSTALLDEVICEFILES | No | Copy files; modify list of files to be copied later. |
| DIF_REGISTER_COINSTALLERS | No | Modify list of device-specific co-installers. |
| DIF_INSTALLINTERFACES | Yes | Register device interfaces. |
| DIF_INSTALLDEVICE | Yes | Do whatever is needed before setup loads the drivers for the device. |
| DIF_NEWDEVICEWIZARD_ FINISHINSTALL | Yes | Create any desired additional wizard pages |
| DIF_DESTROYPRIVATEDATA | Yes | Perform cleanup. |
| DIF Code | Co-installer? | Summary of Operation |
| DIF_SELECTBESTCOMPATDRV | No | Modify list of possible drivers; possibly prune list or select the driver. |
| DIF_ALLOW_INSTALL | No | Determine whether setup should proceed to install the device. |
| DIF_INSTALLDEVICEFILES | No | Copy files; modify list of files to be copied later. |
| DIF_REGISTER_COINSTALLERS | No | Modify list of device-specific co-installers. |
| DIF_INSTALLINTERFACES | Yes | Register device interfaces. |
| DIF_INSTALLDEVICE | Yes | Do whatever is needed before setup loads the drivers for the device. |
| DIF_NEWDEVICEWIZARD_ FINISHINSTALL | Yes | Create any desired additional wizard pages. |
| DIF_DESTROYPRIVATEDATA | Yes | Perform cleanup. |
The only difference between this scenario and the non-PnP installation scenario is the absence of the DIF_REGISTERDEVICE step.
Note that these actions occur only when you re initially installing the drivers for a PnP device. Thereafter, you can unplug and replug the device any number of times without involving the setup program.
| DIF Code | Co-installer? | Summary of Operation |
| DIF_ADDPROPERTYPAGE_ADVANCED | Yes | Create any desired property pages. |
| DIF_POWERMESSAGEWAKE | Yes | Provide text for the Power Management tab. |
| DIF_DESTROYPRIVATEDATA | Yes | Perform cleanup. |
| DIF Code | Co-installer? | Summary of Operation |
| DIF_PROPERTYCHANGE | Yes | Alert the installer/co-installer to a change in device state (start/stop, enable/disable) or in a configuration parameter. |
| DIF_DESTROYPRIVATEDATA | Yes | Perform cleanup. |
| DIF Code | Co-installer? | Summary of Operation |
| DIF_PROPERTYCHANGE | Yes | Alert the installer/co-installer to a change in device state (start/stop, enable/disable) or in a configuration parameter. |
| DIF_DESTROYPRIVATEDATA | Yes | Perform cleanup. |
| DIF Code | Co-installer? | Summary of Operation |
| DIF_REMOVE | Yes | Decide whether removal should proceed; clean up any persistent private data. |
| DIF_DESTROYPRIVATEDATA | Yes | Perform cleanup. |
Surprise-Removing a PnP device
No setup actions occur when you surprise-remove a PnP device.
Co-installer DLLs
A co-installer DLL has an exported entry point with the following prototype:
DWORD __stdcall CoinstallerProc(DI_FUNCTION dif, HDEVINFO infoset, PSP_DEVINFO_DATA did, PCOINSTALLER_CONTEXT_DATA ctx);
The dif argument is one of the DIF codes discussed in the preceding subsection, infoset is a handle to a device information collection, did is the address of a structure containing information about a specific single device, and ctx is a pointer to a context structure (declared, along with the entire public interface to the setup program, in SETUPAPI.H):
typedef struct _COINSTALLER_CONTEXT_DATA { BOOLEAN PostProcessing; DWORD InstallResult; PVOID PrivateData; } COINSTALLER_CONTEXT_DATA, *PCOINSTALLER_CONTEXT_DATA; The setup program calls the co-installer procedure either once or twice for each DIF code, as directed by the co-installer itself. The initial call is for preprocessing before an action is carried out. The PostProcessing member of the context structure will be FALSE in this initial call. The co-installer returns one of these values:
-
NO_ERROR, which indicates that the co-installer has done everything it wants to do in regard to the DIF code.
-
ERROR_DI_POSTPROCESSING_REQUIRED, which indicates that the co-installer wants to do additional work after the action associated with the DIF code completes.
-
Any Win32 error except ERROR_DI_DO_DEFAULT, which indicates that some sort of error occurred. Co-installers should not return ERROR_DI_DO_DEFAULT, as this might cause the setup program to do the wrong thing.
Generally speaking, if the co-installer returns an error code, the setup program will abort some operation. You need to consult the detailed documentation for each DIF code to see exactly what will happen, though.
In the second of these return cases returning ERROR_DI_POST PROCESSING_REQUIRED the co-installer can set the PrivateData member of the context structure to any desired value before returning. The setup program will call the co-installer again later with the same DIF code, infoset, and did values. The PostProcessing member of the context structure will be TRUE, and the InstallResult member will indicate the return code from the previous installer or co-installer DLL. PrivateData will equal whichever value the co-installer returned in the preprocessing phase. The co-installer can return NO_ERROR or a Win32 error code in response to a postprocessing call; the default return value should be InstallResult.
The DDK contains two examples of co-installer DLLs COINST in TOASTER and TOASTCO in TOASTPKG. I know that I d prefer to write user-mode code, especially code that includes user-interface elements, using Microsoft Foundation Classes. If you share this preference, you ll want to take a close look at the COINSTALLER sample in the companion content. This sample includes two general-purpose classes that you can copy to an MFC DLL project in order to very easily construct a co-installer DLL:
-
CCoinstaller, derived from CExternalDialogApp (my class) and, ultimately, from CWinApp (a standard MFC class), encapsulates a co-installer DLL. The CCoinstaller class includes the co-installer procedure described earlier, virtual functions for the preprocessing and postprocessing variants of each relevant DIF code, and an AddPropertyPage function for easily populating either the Device Manager property sheet or the installation wizard with custom pages.
-
CCoinstallerDialog, derived from CExternalDialog (my class) and, ultimately, from CPropertyPage (a standard MFC class), encapsulates a property page belonging to an external property sheet. CCoinstallerDialog::OnInitDialog also automatically initializes controls named IDC_CLASSICON and IDC_DEVNAME, if they exist, with the class icon and the device name. This initialization considerably reduces the burden of building a Device Manager property page.
Here is the entire declaration and implementation of the CSample Coinstaller class. I removed some MFC commentary that just clutters the presentation.
class CSampleCoinstallerApp : public CCoinstaller { public: CSampleCoinstallerApp(); virtual ~CSampleCoinstallerApp(); public: virtual DWORD AddPropertyPages(HDEVINFO infoset, PSP_DEVINFO_DATA did, PVOID& PostContext); virtual DWORD FinishInstall(HDEVINFO infoset, PSP_DEVINFO_DATA did, PVOID& PostContext); CShoeSize* m_shoesize; CShoeSizeProperty* m_shoesizeprop; DECLARE_MESSAGE_MAP() }; BEGIN_MESSAGE_MAP(CSampleCoinstallerApp, CExternalDialogApp) END_MESSAGE_MAP() CSampleCoinstallerApp::CSampleCoinstallerApp() { m_shoesize = NULL; m_shoesizeprop = NULL; } CSampleCoinstallerApp::~CSampleCoinstallerApp() { if (m_shoesize) delete m_shoesize; if (m_shoesizeprop) delete m_shoesizeprop; } CSampleCoinstallerApp theApp; DWORD CSampleCoinstallerApp::AddPropertyPages(HDEVINFO infoset, PSP_DEVINFO_DATA did, PVOID& PostContext) { m_shoesizeprop = new CShoeSizeProperty; AddPropertyPage(infoset, did, m_shoesizeprop); return NO_ERROR; } DWORD CSampleCoinstallerApp::FinishInstall(HDEVINFO infoset, PSP_DEVINFO_DATA did, PVOID& PostContext) { m_shoesize = new CShoeSize; AddPropertyPage(infoset, did, m_shoesize); return NO_ERROR; } CShoeSize and CShoeSizeProperty are standard MFC-generated dialog classes derived from CCoinstallerDialog. They implement the behavior of a wizard page and a Device Manager page, respectively.
AddPropertyPages overrides a virtual base function to handle the DIF_ADDPROPERTYPAGE_ADVANCED call. FinishInstall overrides a virtual base function to handle the DIF_NEWDEVICEWIZARD_FINISHINSTALL call.
Since this book is (by original intention, anyway) a treatise on driver programming, I won t go into the details of how I implemented the base classes. Figure 15-13 illustrates the wizard page that you ll see if you install the dummy device associated with the COINSTALLER sample.
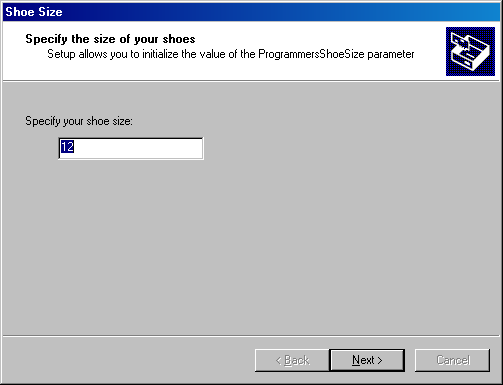
Figure 15-13. Wizard page presented by a co-installer DLL.
The wizard page in COINSTALLER has an important defect that you d want to correct in a real situation. It purports to let you initialize a configuration parameter. The PnP Manager has, however, already loaded and initialized the driver by the time this page appears. The way the co-installer and the driver are coded, the driver won t pick up the changed parameter until the next time it starts. The co-installer might cause the device to restart automatically when the installation wizard completes. (In fact, the Device Manager property page contains a check box for doing just that.) Alternatively, you can provide a dynamic method, such as an I/O control (IOCTL) call or a Windows Management Instrumentation (WMI) call, to notify the driver that the parameter has changed. I elected not to burden the sample with this extra complication, though.
On the CD One important use for a co-installer DLL is to assign a unique friendly name to a device when you have more than one device installed. Since, however, co-installer DLLs aren t supported in Windows 98/Me, you might need an alternative method. The MAKENAME sample in the companion content shows how to use RUNDLL32 with a simple DLL to create unique friendly names.
Preinstalling Driver Files
You achieve the most painless end user experience by preinstalling all the files needed for a server-side install. You d follow these steps:
-
First get your driver installation package digitally signed. Preinstallation alone doesn t allow an unsigned package to be installed without user interaction. In other words, you don t gain much by preinstalling an unsigned package.
-
Write a setup program that will copy all needed driver files to a local directory on the end user system. People commonly use an InstallShield script for this purpose, but any solution that fulfills Microsoft s requirements for an application setup program will be OK.
-
As part of the setup program described in the preceding step, execute a call to SetupCopyOEMInf (documented as part of the platform SDK or in MSDN) with the SPOST_PATH option.
The TOASTPKG sample in the DDK contains a fully worked-out example of how to preinstall a signed driver package in Windows XP. The sample includes a CD-image directory with an AUTORUN.INF file that will autoplay a CD-ROM to run the preinstallation setup program.
A multifunction device often requires more than one INF file typically, the parent and child devices belong to different setup classes. The main device s INF is the one that you should specify in a call to SetupCopyOEMInf, and it should itself contain CopyInf directives in the install section to copy the INF files to install child devices. The CopyInf directive was added to Windows XP. You can install COCPYINF.DLL as a device-specific co-installer. COCPYINF.DLL also implements the CopyInf directive. Full details about using this redistributable component of the DDK are in the file Tools\Coinstallers\x86\cocpyinf.htm.
Value-Added Software
You can save yourself some grief by not including any so-called value-added software (that is, applications and other user-mode components besides co-installers) in the CopyFiles directives within your INF file. The digital signature you obtain will cover any file that the INF file copies. Making any change at all to such a file invalidates your digital signature and requires you to obtain a new one from WHQL.
Microsoft recommends that you install valued-added software using a separate program, such as an InstallShield script. You can launch that separate program in a variety of ways, I suppose, but probably the most robust way is the one illustrated in the DDK s TOASTPKG sample. In the sample, a registry entry indicates whether the user has been given an opportunity to install the value-added package on a given system. If the flag is clear, a co-installer DLL presents an install wizard page to inquire whether the end user wants to install the value-added stuff. (Note that this dialog page will require a client-side install.) If the answer to that question is yes, the co-installer launches the value-added setup program from a subdirectory below the directory containing the INF file.
In TOASTPKG, the co-installer comes into play to install the value-added software only when the end user happens to install the hardware before running the preinstallation program that comes with the package. (The preinstallation program will do the value-added install or not, as specified by the user, and set the registry to prevent the co-installer from later presenting the wizard page. A server-side install is therefore possible after the preinstallation program has run.)
Envisioning and preparing for the various installation scenarios that might occur is a complex task. It s because of this complexity that I advised you in the Management Overview and Checklist section of Chapter 1 to plan ahead for the work required to prepare your installation package.
Installing a Driver Programmatically
If you have a non-PnP device, or if you have a PnP device for which you want to supply an updated driver, you might want to write a program to install the driver software without involving the user any more than necessary. The DEVCON sample in the DDK illustrates how to programmatically install or update driver software and to perform many other device-manager tasks in Windows 2000 and Windows XP. The FASTINST sample in the companion content to this book illustrates just the programmatic installation of driver software, but it applies to any WDM platform. I hope that you ve been using FASTINST to install the sample drivers throughout this book.
The Windows 2000 and Windows XP version of FASTINST performs these steps:
-
Parses the INF file whose name you supply as a command-line argument to locate the first model statement, which determines the device identifier to be used later on. (You can run FASTINST from a command prompt and specify any device identifier you want, thereby overriding the default choice of the identifier in the first model statement.)
-
Constructs an empty device node having the device identifier determined by the first step.
-
Calls UpdateDriverForPlugAndPlayDevices to replace the driver for the empty device node using the INF file.
The RunOnce Key
You can place values in the HKEY_LOCAL_MACHINE\Software\Microsoft\Windows\CurrentVersion\RunOnce registry key to execute commands after setup finishes installing a device. Each value in RunOnce contains a command string. When setup finishes, it executes those commands and deletes the entries.
NOTE
The system also executes any commands that might be in the RunOnce key each time the system boots. The DDK indicates that RunOnce commands can be processed at other, unspecified times in addition. It adds, If you place a command under the RunOnce key, you cannot predict when it will execute.
Here s an example, drawn from the AUTOLAUNCH sample in the companion content, of INF-file syntax for creating a RunOnce command:
[DriverInstall.ntx86] CopyFiles=DriverCopyFiles,AutoLaunchCopyFiles AddReg=DriverAddReg.ntx86 [DriverAddReg.ntx86] HKLM,%RUNONCEKEYNAME%,AutoLaunchStart,, \ "rundll32 StartService,StartService AutoLaunch" [Strings] RUNONCEKEYNAME="Software\Microsoft\Windows\CurrentVersion\RunOnce"
RUNDLL32 is a standard system utility that invokes a function within a DLL. If all the RunOnce commands you create involve RUNDLL32, a server-side install will still be possible using your INF. In fact, using any other verb in a RunOnce command causes your INF to flunk the WHQL tests.
The syntax of a RUNDLL32 command is this:
rundll32 dllname,entryname [cmdline]
where dllname is the name of a DLL (with or without the .DLL file extension), entryname is the name of an exported entry point, and cmdline is an optional command string to be processed by the DLL. The entryname function should be defined like this:
[extern "C"] void CALLBACK entryname(HWND hwnd, HINSTANCE hInst, LPSTR cmdline, int nshow) {  }
} Note that CALLBACK includes the __stdcall directive. The hwnd argument is the handle to a window that should be the parent of any user-interface elements the function creates, hInst is the instance handle of the DLL, cmdline is an exact copy of the like-named argument in the RUNDLL32 command, and nshow is one of the standard show-state values such as SW_SHOWNORMAL.
Launching an Application
As a special case of using RunOnce, I designed a scheme for the first edition to allow you to arrange to execute a value-added application each time (including the first) that the system starts your device. This scheme is shown in the AUTOLAUNCH sample in the companion content. In outline, the scheme is this:
-
The INF file installs an AutoLaunch service that runs in user mode looking for arrival notifications on a particular interface GUID.
-
When AutoLaunch receives an arrival notification, it consults the registry to obtain a command string, which it then executes on the interactive desktop.
-
In order to get the application launched the very first time you install the device, the INF uses a RunOnce command to start the AutoLaunch service.
I ve gotten very few questions from readers about AutoLaunch, so I judge that it s not important enough to describe here in detail.
EAN: 2147483647
Pages: 119