Miscellaneous Programming Techniques
Miscellaneous Programming Techniques
In the remainder of this chapter, I m going to discuss some miscellaneous topics that might be useful in various parts of your driver. I ll begin by describing how you access the registry database, which is where you can find various configuration and control information that might affect your code or your hardware. I ll go on to describe how you access disk files and other named devices. A few words will suffice to describe how you can perform floating-point calculations in a WDM driver. Finally I ll describe a few of the features you can embed in your code to make it easier to debug your driver in the unlikely event it shouldn t work correctly the first time you try it out.
Accessing the Registry
Windows XP and Windows 98/Me record configuration and other important information in a database called the registry. WDM drivers can call the functions listed in Table 3-10 to access the registry. If you ve done user-mode programming involving registry access, you might be able to guess how to use these functions in a driver. I found the kernel-mode support functions sufficiently different, however, that I think it s worth describing how you might use them.
| Service Function | Description |
| IoOpenDeviceRegistryKey | Opens special key associated with a physical device object (PDO) |
| IoOpenDeviceInterfaceRegistryKey | Opens a registry key associated with a registered device interface |
| RtlDeleteRegistryValue | Deletes a registry value |
| RtlQueryRegistryValues | Reads several values from the registry |
| RtlWriteRegistryValue | Writes a value to the registry |
| ZwClose | Closes handle to a registry key |
| ZwCreateKey | Creates a registry key |
| ZwDeleteKey | Deletes a registry key |
| ZwDeleteValueKey | Deletes a value (Windows 2000 and later) |
| ZwEnumerateKey | Enumerates subkeys |
| ZwEnumerateValueKey | Enumerates values within a registry key |
| ZwFlushKey | Commits registry changes to disk |
| ZwOpenKey | Opens a registry key |
| ZwQueryKey | Gets information about a registry key |
| ZwQueryValueKey | Gets a value within a registry key |
| ZwSetValueKey | Sets a value within a registry key |
In this section, I ll discuss, among other things, the ZwXxx family of routines and RtlDeleteRegistryValue, which provide the basic registry functionality that suffices for most WDM drivers.
Opening a Registry Key
Before you can interrogate values in the registry, you need to open the key that contains them. You use ZwOpenKey to open an existing key. You use ZwCreateKey either to open an existing key or to create a new key. Either function requires you to first initialize an OBJECT_ATTRIBUTES structure with the name of the key and (perhaps) other information. The OBJECT_ATTRIBUTES structure has the following declaration:
typedef struct _OBJECT_ATTRIBUTES { ULONG Length; HANDLE RootDirectory; PUNICODE_STRING ObjectName; ULONG Attributes; PVOID SecurityDescriptor; PVOID SecurityQualityOfService; } OBJECT_ATTRIBUTES; Rather than initialize an instance of this structure by hand, it s easiest to use the macro InitializeObjectAttributes, which I m about to show you.
Suppose, for example, that we wanted to open the service key for our driver. The I/O Manager gives us the name of this key as a parameter to DriverEntry. So we could write code like the following:
NTSTATUS DriverEntry(PDRIVER_OBJECT DriverObject, PUNICODE_STRING RegistryPath) {  OBJECT_ATTRIBUTES oa;
InitializeObjectAttributes(&oa, RegistryPath, OBJ_KERNEL_HANDLE OBJ_CASE_INSENSITIVE, NULL, NULL); HANDLE hkey; 
status = ZwOpenKey(&hkey, KEY_READ, &oa); if (NT_SUCCESS(status)) { 
ZwClose(hkey); } } -
We re initializing the object attributes structure with the registry pathname supplied to us by the I/O Manager and with a NULL security descriptor. ZwOpenKey will ignore the security descriptor anyway you can specify security attributes only when you create a key for the first time.
-
ZwOpenKey will open the key for reading and store the resulting handle in our hkey variable.
-
ZwClose is a generic routine for closing a handle to a kernel-mode object. Here we use it to close the handle we have to the registry key.

Even though we often refer to the registry as being a database, it doesn t have all of the attributes that have come to be associated with real databases. It doesn t allow for committing or rolling back changes, for example. Furthermore, the access rights you specify when you open a key (KEY_READ in the preceding example) are for security checking rather than for the prevention of incompatible sharing. That is, two different processes can have the same key open after specifying write access (for example). The system does guard against destructive writes that occur simultaneously with reads, however, and it does guarantee that a key won t be deleted while someone has an open handle to it.
Other Ways to Open Registry Keys
In addition to ZwOpenKey, Windows XP provides two other functions for opening registry keys.
IoOpenDeviceRegistryKey allows you to open one of the special registry keys associated with a device object:
HANDLE hkey; Status = IoOpenDeviceRegistryKey(pdo, flag, access, &hkey);
where pdo is the address of the physical device object (PDO) at the bottom of your particular driver stack, flag is an indicator for which special key you want to open (see Table 3-11), and access is an access mask such as KEY_READ.
| Flag Value | Selected Registry Key |
| PLUGPLAY_REGKEY_DEVICE | The hardware (instance) subkey of the Enum key |
| PLUGPLAY_REGKEY_DRIVER | The driver subkey of the class key |
I use IoOpenDeviceRegistryKey with the PLUGPLAY_REGKEY_DEVICE flag very often in my own drivers. In Windows XP, this function opens the Device Parameters subkey of the hardware key for the device. In Windows 98/Me, it opens the hardware key itself. These keys are the right place to store parameter information about the hardware. I ll discuss this key more fully in Chapter 15 in connection with installing and distributing a driver.
IoOpenDeviceInterfaceRegistryKey opens the key associated with an instance of a registered device interface:
HANDLE hkey; status = IoOpenDeviceInterfaceRegistryKey(linkname, access, &hkey);
where linkname is the symbolic link name of the registered interface and access is an access mask such as KEY_READ.
The interface registry key is a subkey of HKLM\System\CurrentControl Set\Control\DeviceClasses that persists from one session to the next. It s a good place to store parameter information that you want to share with user-mode programs because user-mode code can call SetupDiOpenDeviceInterfaceRegKey to gain access to the same key.
Getting and Setting Values
Usually, you open a registry key because you want to retrieve a value from the database. The basic function you use for that purpose is ZwQueryValueKey. For example, to retrieve the ImagePath value in the driver s service key I don t actually know why you d want to know this, but that s not my department you could use the following code:
UNICODE_STRING valname; RtlInitUnicodeString(&valname, L"ImagePath"); size = 0; status = ZwQueryValueKey(hkey, &valname, KeyValuePartialInformation, NULL, 0, &size); if (status == STATUS_OBJECT_NAME_NOT_FOUND size == 0) <handle error>; size = min(size, PAGE_SIZE); PKEY_VALUE_PARTIAL_INFORMATION vpip = PKEY_VALUE_PARTIAL_INFORMATION) ExAllocatePool(PagedPool, size); if (!vpip) <handle error>; status = ZwQueryValueKey(hkey, &valname, KeyValuePartialInformation, vpip, size, &size); if (!NT_SUCCESS(status)) <handle error>; <do something with vpip->Data>ExFreePool(vpip);
Here we make two calls to ZwQueryValueKey. The purpose of the first call is to determine how much space we need to allocate for the KEY_VALUE_PARTIAL_INFORMATION structure we re trying to retrieve. The second call retrieves the information. I left the error checking in this code fragment because the errors didn t work out in practice the way I expected them to. In particular, I initially guessed that the first call to ZwQueryValueKey would return STATUS_BUFFER_TOO_SMALL (since I passed it a zero-length buffer). It didn t do that, though. The important failure code is STATUS_OBJECT_NAME_NOT_FOUND, which indicates that the value doesn t actually exist. Hence, I test for that value only. If there s some other error that prevents ZwQueryValueKey from working, the second call will uncover it.
NOTE
The so-called partial information structure you retrieve in this way contains the value s data and a description of its data type:
typedef struct _KEY_VALUE_PARTIAL_INFORMATION { ULONG TitleIndex; ULONG Type; ULONG DataLength; UCHAR Data[1]; } KEY_VALUE_PARTIAL_INFORMATION, *PKEY_VALUE_PARTIAL_INFORMATION; Type is one of the registry data types listed in Table 3-12. (Additional data types are possible but not interesting to device drivers.) DataLength is the length of the data value, and Data is the data itself. TitleIndex has no relevance to drivers. Here are some useful facts to know about the various data types:
-
REG_DWORD is a 32-bit unsigned integer in whatever format (big-endian or little-endian) is natural for the platform.
-
REG_SZ describes a null-terminated Unicode string value. The null terminator is included in the DataLength count.
-
To expand a REG_EXPAND_SZ value by substituting environment variables, you should use RtlQueryRegistryValues as your method of interrogating the registry. The internal routines for accessing environment variables aren t documented or exposed for use by drivers.
-
RtlQueryRegistryValues is also a good way to interrogate REG_MULTI_SZ values in that it will call your designated callback routine once for each of the potentially many strings.
NOTE
Notwithstanding the apparent utility of RtlQuery RegistryValues, I ve avoided using it ever since it caused a crash in one of my drivers. Apparently, the value I was reading required the function to call a helper function that was placed in the initialization section of the kernel and that was, therefore, no longer present.
| Data Type Constant | Description |
| REG_BINARY | Variable-length binary data |
| REG_DWORD | Unsigned long integer in natural format for the platform |
| REG_EXPAND_SZ | Null-terminated Unicode string containing %-escapes for environment variable names |
| REG_MULTI_SZ | One or more null-terminated Unicode strings, followed by an extra null |
| REG_SZ | Null-terminated Unicode string |
To set a registry value, you must have KEY_SET_VALUE access to the parent key. I used KEY_READ earlier, which wouldn t give you such access. You could use KEY_WRITE or KEY_ALL_ACCESS, although you thereby gain more than the necessary permission. Then call ZwSetValueKey. For example:
RtlInitUnicodeString(&valname, L"TheAnswer"); ULONG value = 42; ZwSetValueKey(hkey, &valname, 0, REG_DWORD, &value, sizeof(value));
Deleting Subkeys or Values
To delete a value in an open key, you can use RtlDeleteRegistryValue in the following special way:
RtlDeleteRegistryValue(RTL_REGISTRY_HANDLE, (PCWSTR) hkey, L"TheAnswer");
RtlDeleteRegistryValue is a general service function whose first argument can designate one of several special places in the registry. When you use RTL_REGISTRY_HANDLE, as I did in this example, you indicate that you already have an open handle to the key within which you want to delete a value. You specify the key (with a cast to make the compiler happy) as the second argument. The third and final argument is the null-terminated Unicode name of the value you want to delete. This is one time when you don t have to create a UNICODE_STRING structure to describe the string.
In Windows 2000 and later, you can use ZwDeleteValueKey to delete a value (it s an oversight that this function isn t documented in the DDK):
UNICODE_STRING valname; RtlInitUnicodeString(&valname, L"TheAnswer"); RtlDeleteValueKey(hkey, &valname);
You can delete only those keys that you ve opened with at least DELETE permission (which you get with KEY_ALL_ACCESS). You call ZwDeleteKey:
ZwDeleteKey(hkey);
The key lives on until all handles are closed, but subsequent attempts to open a new handle to the key or to access the key by using any currently open handle will fail with STATUS_KEY_DELETED. Since you have an open handle at this point, you must be sure to call ZwClose sometime. (The DDK documentation entry for ZwDeleteKey says the handle becomes invalid. It doesn t you must still close it by calling ZwClose.)
Enumerating Subkeys or Values
A complicated activity you can carry out with an open registry key is to enumerate the elements (subkeys and values) that the key contains. To do this, you ll first call ZwQueryKey to determine a few facts about the subkeys and values, such as their number, the length of the largest name, and so on. ZwQueryKey has an argument that indicates which of three types of information you want to retrieve about the key. These types are named basic, node, and full. To prepare for an enumeration, you d be interested first in the full information:
typedef struct _KEY_FULL_INFORMATION { LARGE_INTEGER LastWriteTime; ULONG TitleIndex; ULONG ClassOffset; ULONG ClassLength; ULONG SubKeys; ULONG MaxNameLen; ULONG MaxClassLen; ULONG Values; ULONG MaxValueNameLen; ULONG MaxValueDataLen; WCHAR Class[1]; } KEY_FULL_INFORMATION, *PKEY_FULL_INFORMATION; This structure is actually of variable length since Class[0] is just the first character of the class name. It s customary to make one call to find out how big a buffer you need to allocate and a second call to get the data, as follows:
ULONG size; ZwQueryKey(hkey, KeyFullInformation, NULL, 0, &size); size = min(size, PAGE_SIZE); PKEY_FULL_INFORMATION fip = (PKEY_FULL_INFORMATION) ExAllocatePool(PagedPool, size); ZwQueryKey(hkey, KeyFullInformation, fip, size, &size);
Were you now interested in the subkeys of your registry key, you could perform the following loop calling ZwEnumerateKey:
for (ULONG i = 0; i < fip->SubKeys; ++i) { ZwEnumerateKey(hkey, i, KeyBasicInformation, NULL, 0, &size); size = min(size, PAGE_SIZE); PKEY_BASIC_INFORMATION bip = (PKEY_BASIC_INFORMATION) ExAllocatePool(PagedPool, size); ZwEnumerateKey(hkey, i, KeyBasicInformation, bip, size, &size); <do something with bip->Name> ExFreePool(bip); } The key fact you discover about each subkey is its name, which shows up as a counted Unicode string in the KEY_BASIC_INFORMATION structure you retrieve inside the loop:
typedef struct _KEY_BASIC_INFORMATION { LARGE_INTEGER LastWriteTime; ULONG Type; ULONG NameLength; WCHAR Name[1]; } KEY_BASIC_INFORMATION, *PKEY_BASIC_INFORMATION; The name isn t null-terminated; you must use the NameLength member of the structure to determine its length. Don t forget that the length is in bytes! The name isn t the full registry path either; it s just the name of the subkey within whatever key contains it. This is actually lucky because you can easily open a subkey given its name and an open handle to its parent key.
To accomplish an enumeration of the values in an open key, employ the following method:
ULONG maxlen = fip->MaxValueNameLen + sizeof(KEY_VALUE_BASIC_INFORMATION); maxlen = min(maxlen, PAGE_SIZE); PKEY_VALUE_BASIC_INFORMATION vip = (PKEY_VALUE_BASIC_INFORMATION) ExAllocatePool(PagedPool, maxlen); for (ULONG i = 0; i < fip->Values; ++i) { ZwEnumerateValueKey(hkey, i, KeyValueBasicInformation, vip, maxlen, &size); <do something with vip->Name> } ExFreePool(vip); Allocate space for the largest possible KEY_VALUE_BASIC_INFORMATION structure that you ll ever retrieve based on the MaxValueNameLen member of the KEY_FULL_INFORMATION structure. Inside the loop, you ll want to do something with the name of the value, which comes to you as a counted Unicode string in this structure:
typedef struct _KEY_VALUE_BASIC_INFORMATION { ULONG TitleIndex; ULONG Type; ULONG NameLength; WCHAR Name[1]; } KEY_VALUE_BASIC_INFORMATION, *PKEY_VALUE_BASIC_INFORMATION; Once again, having the name of the value and an open handle to its parent key is just what you need to retrieve the value, as shown in the preceding section.
There are variations on ZwQueryKey and on these two enumeration functions that I haven t discussed. You can, for example, obtain full information about a subkey when you call ZwEnumerateKey. I showed you only how to get the basic information that includes the name. You can retrieve data values only, or names plus data values, from ZwEnumerateValueKey. I showed you only how to get the name of a value.
Accessing Files
It s sometimes useful to be able to read and write regular disk files from inside a WDM driver. Perhaps you need to download a large amount of microcode to your hardware, or perhaps you need to create your own extensive log of information for some purpose. There s a set of ZwXxx routines to help you do these things.
File access via the ZwXxx routines require you be running at PAS SIVE_LEVEL (see the next chapter) in a thread that can safely be suspended. In practice, the latter requirement means that you must not have disabled Asynchronous Procedure Calls (APCs) by calling KeEnterCriticalRegion. You ll read in the next chapter that some synchronization primitives require you to raise the IRQL above PASSIVE_LEVEL or to disable APCs. Just bear in mind that those synchronization primitives and file access are incompatible.
The first step in accessing a disk file is to open a handle by calling ZwCreateFile. The full description of this function in the DDK is relatively complex because of all the ways in which it can be used. I m going to show you two simple scenarios, however, that are useful if you just want to read or write a file whose name you already know.
Sample Code
The FILEIO sample driver in the companion content illustrates calls to some of the ZwXxx functions discussed in this section. This particular sample is valuable because it provides workarounds for the platform incompatibilities mentioned at the end of this chapter.
Opening an Existing File for Reading
To open an existing file so that you can read it, follow this example:
NTSTATUS status; OBJECT_ATTRIBUTES oa; IO_STATUS_BLOCK iostatus; HANDLE hfile; // the output from this process PUNICODE_STRING pathname; // you've been given this InitializeObjectAttributes(&oa, pathname, OBJ_CASE_INSENSITIVE OBJ_KERNEL_HANDLE, NULL, NULL); status = ZwCreateFile(&hfile, GENERIC_READ, &oa, &iostatus, NULL, 0, FILE_SHARE_READ, FILE_OPEN, FILE_SYNCHRONOUS_IO_NONALERT, NULL, 0);
Creating or Rewriting a File
To create a new file, or to open and truncate to zero length an existing file, replace the call to ZwCreateFile in the preceding fragment with this one:
status = ZwCreateFile(&hfile, GENERIC_WRITE, &oa, &iostatus, NULL, FILE_ATTRIBUTE_NORMAL, 0, FILE_OVERWRITE_IF, FILE_SYNCHRONOUS_IO_NONALERT, NULL, 0);
In these fragments, we set up an OBJECT_ATTRIBUTES structure whose main purpose is to point to the full pathname of the file we re about to open. We specify the OBJ_CASE_INSENSITIVE attribute because the Win32 file system model doesn t treat case as significant in a pathname. We specify OBJ_KERNEL_HANDLE for the same reason we did so in the registry example shown earlier in this chapter. Then we call ZwCreateFile to open the handle.
The first argument to ZwCreateFile(&hfile) is the address of the HANDLE variable where ZwCreateFile will return the handle it creates. The second argument (GENERIC_READ or GENERIC_WRITE) specifies the access we need to the handle to perform either reading or writing. The third argument (&oa) is the address of the OBJECT_ATTRIBUTES structure containing the name of the file. The fourth argument points to an IO_STATUS_BLOCK that will receive a disposition code indicating how ZwCreateFile actually implemented the operation we asked it to perform. When we open a read-only handle to an existing file, we expect the Status field of this structure to end up equal to FILE_OPENED. When we open a write-only handle, we expect it to end up equal to FILE_OVERWRITTEN or FILE_CREATED, depending on whether the file did or didn t already exist. The fifth argument (NULL) can be a pointer to a 64-bit integer that specifies the initial allocation size for the file. This argument matters only when you create or overwrite a file, and omitting it as I did here means that the file grows from zero length as you write data. The sixth argument (0 or FILE_ATTRIBUTE_NORMAL) specifies file attribute flags for any new file that you happen to create. The seventh argument (FILE_SHARE_READ or 0) specifies how the file can be shared by other threads. If you re opening for input, you can probably tolerate having other threads read the file simultaneously. If you re opening for sequential output, you probably don t want other threads trying to access the file at all.
The eighth argument (FILE_OPEN or FILE_OVERWRITE_IF) indicates how to proceed if the file either already exists or doesn t. In the read-only case, I specified FILE_OPEN because I expected to open an existing file and wanted a failure if the file didn t exist. In the write-only case, I specified FILE_OVERWRITE_IF because I wanted to overwrite any existing file by the same name or create a brand-new file as necessary. The ninth argument (FILE_SYNCHRONOUS_IO_NONALERT) specifies additional flag bits to govern the open operation and the subsequent use of the handle. In this case, I indicated that I m going to be doing synchronous I/O operations (wherein I expect the read or write function not to return until the I/O is complete). The tenth and eleventh arguments (NULL and 0) are, respectively, an optional pointer to a buffer for extended attributes and the length of that buffer.
You expect ZwCreateFile to return STATUS_SUCCESS and to set the handle variable. You can then carry out whatever read or write operations you please by calling ZwReadFile or ZwWriteFile, and then you close the handle by calling ZwClose:
ZwClose(hfile);
You can perform synchronous or asynchronous reads and writes, depending on the flags you specified to ZwCreateFile. In the simple scenarios I ve outlined, you would do synchronous operations that don t return until they ve completed. For example:
PVOID buffer; ULONG bufsize; status = ZwReadFile(hfile, NULL, NULL, NULL, &iostatus, buffer, bufsize, NULL, NULL); -or- status = ZwWriteFile(hfile, NULL, NULL, NULL, &iostatus, buffer, bufsize, NULL, NULL); These calls are analogous to a nonoverlapped ReadFile or WriteFile call from user mode. When the function returns, you might be interested in iostatus.Information, which will hold the number of bytes transferred by the operation.
Scope of Handles
Each process has a private handle table that associates numeric handles with pointers to kernel objects. When you open a handle using ZwCreateFile, or NtCreateFile, that handle belongs to the then-current process, unless you use the OBJ_KERNEL_HANDLE flag. A process-specific handle will go away if the process terminates. Moreover, if you use the handle in a different process context, you ll be indirectly referencing whatever object (if any) that that handle corresponds to in the other process. A kernel handle, on the other hand, is kept in a global table that doesn t disappear until the operating system shuts down and can be used without ambiguity in any process.If you plan to read an entire file into a memory buffer, you ll probably want to call ZwQueryInformationFile to determine the total length of the file:
FILE_STANDARD_INFORMATION si; ZwQueryInformationFile(hfile, &iostatus, &si, sizeof(si), FileStandardInformation); ULONG length = si.EndOfFile.LowPart;
Timing of File Operations
You ll be likely to want to read a disk file in a WDM driver while you re initializing your device in response to an IRP_MN_START_DEVICE request. (See Chapter 6.) Depending on where your device falls in the initialization sequence, you might or might not have access to files using normal pathnames like \??\C:\dir\file.ext. To be safe, put your data files into some directory below the system root directory and use a filename like \SystemRoot\dir\file.ext. The SystemRoot branch of the namespace is always accessible since the operating system has to be able to read disk files to start up. Sample Code
The RESOURCE sample combines several of the ideas discussed in this chapter to illustrate how to access data in a standard resource script from within a driver. This is not especially easy to do, as you ll see if you examine the sample code.
Floating-Point Calculations
There are times when integer arithmetic just isn t sufficient to get your job done and you need to perform floating-point calculations. On an Intel processor, the math coprocessor is also where Multimedia Extensions (MMX) instructions execute. Historically, there have been two problems with drivers carrying out floating-point calculations. The operating system will emulate a missing coprocessor, but the emulation is expensive and normally requires a processor exception to trigger it. Handling exceptions, especially at elevated IRQLs, can be difficult in kernel mode. Additionally, on computers that have hardware coprocessors, the CPU architecture might require a separate expensive operation to save and restore the coprocessor state during context switches. Therefore, conventional wisdom has forbidden kernel-mode drivers from using floating-point calculations.
Windows 2000 and later systems provide a way around past difficulties. First of all, a system thread see Chapter 14 running at or below DIS PATCH_LEVEL is free to use the math coprocessor all it wants. In addition, a driver running in an arbitrary thread context at or below DISPATCH_LEVEL can use these two system calls to bracket its use of the math coprocessor:
ASSERT(KeGetCurrentIrql() <= DISPATCH_LEVEL); KFLOATING_SAVE FloatSave; NTSTATUS status = KeSaveFloatingPointState(&FloatSave); if (NT_SUCCESS(status)) { KeRestoreFloatingPointState(&FloatSave); } These calls, which must be paired as shown here, save and restore the nonvolatile state of the math coprocessor for the current CPU that is, all the state information that persists beyond a single operation. This state information includes registers, control words, and so on. In some CPU architectures, no actual work might occur because the architecture inherently allows any process to perform floating-point operations. In other architectures, the work involved in saving and restoring state information can be quite substantial. For this reason, Microsoft recommends that you avoid using floating-point calculations in a kernel-mode driver unless necessary.
Sample Code
The FPUTEST sample illustrates one way to use floating-point and MMX instructions in a WDM driver.
What happens when you call KeSaveFloatingPointState depends, as I said, on the CPU architecture. To give you an idea, on an Intel-architecture processor, this function saves the entire floating-point state by executing an FSAVE instruction. It can save the state information either in a context block associated with the current thread or in an area of dynamically allocated memory. It uses the opaque FloatSave area to record meta-information about the saved state to allow KeRestoreFloatingPointState to correctly restore the state later.
KeSaveFloatingPointState will fail with STATUS_ILLEGAL_FLOAT_CONTEXT if no real coprocessor is present. (All CPUs of a multi-CPU computer must have coprocessors, or else none of them can, by the way.) Your driver will therefore need alternative code to carry out whatever calculations you had in mind, or else you ll want to decline to load (by failing DriverEntry) if the computer doesn t have a coprocessor.
NOTE
You can call ExIsProcessorFeaturePresent to check up on various floating-point capabilities. Since this function isn t present in Windows 98/Me, you ll also need to ship WDMSTUB with your driver. Consult Appendix A for more information about this and related system incompatibilities.
Making Debugging Easier
My drivers always have bugs. Maybe you re as unlucky as I am. If so, you ll find yourself spending lots of time with a debugger trying to figure out what your code is doing or not doing correctly or incorrectly. I won t discuss the potentially divisive subject of which debugger is best or the noncontroversial but artistic subject of how to debug a driver. But you can do some things in your driver code that will make your life easier.
Checked and Free Builds
When you build your driver, you select either the checked or the free build environment. In the checked build environment, the preprocessor symbol DBG equals 1, whereas it equals 0 in the free build environment. So one of the things you can do in your own code is to provide additional code that will take effect only in the checked build:
#if DBG <extra debugging code> #endif
The KdPrint macro
One of the most useful debugging techniques ever invented is to simply print messages from time to time. I used to do this when I was first learning to program (in FORTRAN on a computer made out of vacuum tubes, no less), and I still do it today. DbgPrint is a kernel-mode service routine you can call to display a formatted message in whatever output window your debugger provides. Another way to see the output from DbgPrint calls is to download the DebugView utility from http://www.sysinternals.com. Instead of directly referencing DbgPrint in your code, it s often easier to use the macro named KdPrint, which calls DbgPrint if DBG is true and generates no code at all if DBG is false:
KdPrint((DRIVERNAME " - KeReadProgrammersMind failed - %X\n", status));
You use two sets of parentheses with KdPrint because of the way it s defined. The first argument is a string with %-escapes where you want to substitute values. The second, third, and following arguments provide the values to go with the %-escapes. The macro expands into a call to DbgPrint, which internally uses the standard run-time library routine _vsnprintf to format the string. You can, therefore, use the same set of %-escape codes that are available to application programs that call this routine but not the escapes for floating-point numbers.
In all of my drivers, I define a constant named DRIVERNAME like this:
#define DRIVERNAME "xxx" where xxx is the name of the driver. Recall that the compiler sees two adjacent string constants as a single constant. Using this particular trick allows me to cut and paste entire subroutines, including their KdPrint calls, from one driver to another without needing to make source changes.
The ASSERT macro
Another useful debugging technique relies on the ASSERT macro:
ASSERT(1 + 1 == 2);
In the checked build of your driver, ASSERT generates code to evaluate the Boolean expression. If the expression is false, ASSERT will try to halt execution in the debugger so that you can see what s going on. If the expression is true, your program continues executing normally. Kernel debuggers will halt when ASSERT failures happen, even in the retail build of the operating system, by the way.
IMPORTANT
An ASSERT failure in a retail build of the operating system with no kernel debugger running generates a bug check.

The Driver Verifier is part of the checked and free builds of the operating system and is fast becoming one of Microsoft s major tools for checking driver quality. You can launch Driver Verifier from the Start Menu, whereupon you ll be presented with a series of wizard pages. Here is a bit of a road map to guide you through these pages the first time.
Figure 3-14 illustrates the initial wizard page. I recommend checking the Create Custom Settings (For Code Developers) option. This choice will allow you to specify in detail which Driver Verifier options you want to engage.
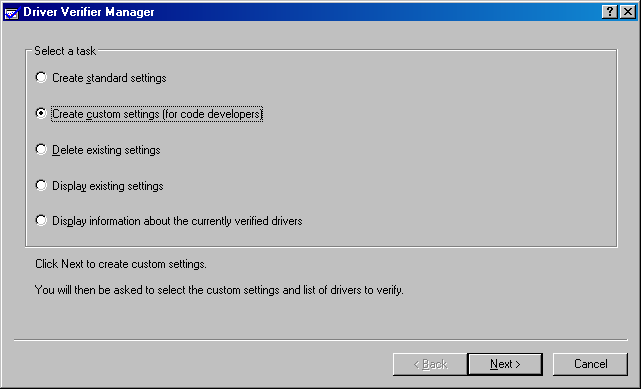
Figure 3-14. Initial Driver Verifier wizard page
After making my recommended choice from the first page, you ll be presented with a second page (see Figure 3-15). Here, I recommend checking the Select Individual Settings From A Full List option.
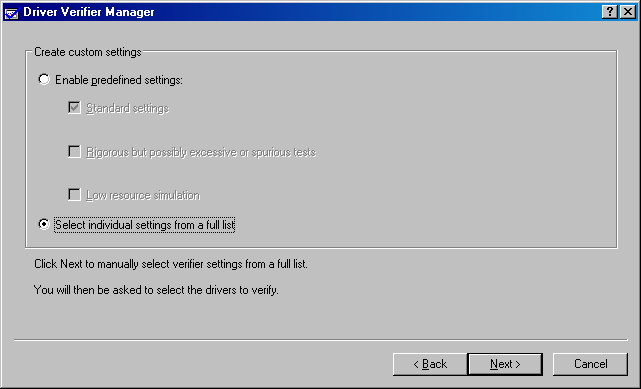
Figure 3-15. Second Driver Verifier wizard page
The next wizard page (see Figure 3-16) allows you to specify the verifier settings you desire. The specified checks are in addition to a number of checks that the Driver Verifier makes automatically.
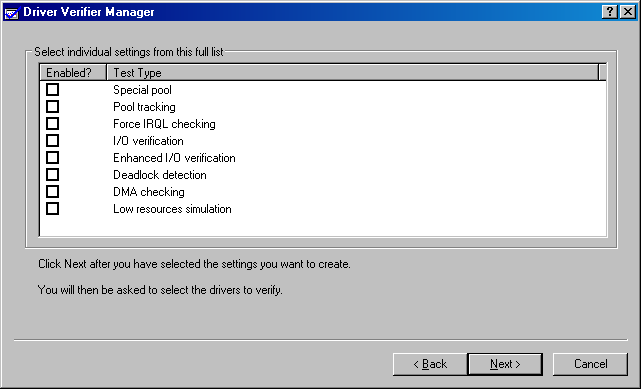
Figure 3-16. Driver Verifier s custom settings wizard page
The choices available at the time I m writing this are as follows:
-
Special Pool forces all memory allocations from verified drivers to be made from the special pool. As described earlier in this chapter, such allocations are at the end (or start) of a page, so that storing after (or before) the allocated memory leads to an immediate bug check.
-
Pool Tracking causes the Driver Verifier to track memory allocations made by verified drivers. You can see statistics about memory usage as it changes from time to time. The Driver Verifier also ensures that all allocations are freed when the verified drivers unload to help you catch memory leaks.
-
Force IRQL Checking essentially causes paged memory to be flushed whenever a verified driver raises IRQL to DISPATCH_LEVEL or above. This action helps find places where the driver is incorrectly accessing paged memory. The system runs quite slowly when this option is turned on.
-
I/O Verification causes the Driver Verifier to make basic checks on how a driver handles IRPs that it creates or forwards to other drivers.
-
Enhanced I/O Verification attempts to flush out driver errors in boundary cases, such as completing PnP and Power IRPs incorrectly, making assumptions about the order in which the PnP Manager loads drivers, and so on. Some of these tests occur when the driver initially starts, by the way, which can prevent the system from starting.
-
Deadlock Detection creates a graph of the locking hierarchy for spin locks, mutexes, and fast mutexes used by verified drivers in order to detect potential deadlocks.
-
DMA Checking ensures that verified drivers perform DMA using the methods prescribed by the DDK.
-
Low Resources Simulation involves randomly failing pool allocations from verified drivers, beginning seven minutes after the system starts. The purpose of these failures is to ensure that drivers test the return value from pool allocation calls.
You can use a special procedure, described in the DDK, to activate checks on a SCSI miniport driver.
NOTE
There can be interactions between the options you specify. At the present time, for example, asking for DMA checking or deadlock detection turns off enhanced I/O verification.
Note too that the Driver Verifier is evolving rapidly even as we speak. Consult the DDK you happen to be working with for up-to-date information.
After you select the verifier options you want, you will see one final wizard page (see Figure 3-17). This page allows you to specify which drivers you want verified by checking boxes in a list. After making that selection, you ll need to restart the computer because many of the Driver Verifier checks require boot-time initialization. When I m debugging one of my own drivers, I find it most convenient to not have my driver loaded when the restart occurs. My driver therefore won t already be in the list, and I ll have to add it via the Add Currently Not Loaded Driver(s) To The List button.
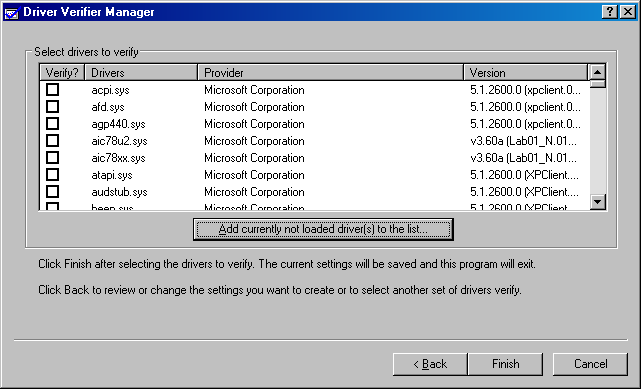
Figure 3-17. Driver selection page for Driver Verifier.
Driver Verifier failures are bug checks, by the way. You will need to be running a kernel debugger or to analyze the crash dump after the fact to isolate the cause of the failure.
Don t Ship the Checked Version!
Incidentally, I and every other user of kernel debuggers would greatly prefer that you not ship the debug version of your driver. It will probably contain a bunch of ASSERT statements that will go off while we re looking for our own bugs, and it will probably also print a lot of messages that will obscure the messages from our drivers. I recall a vendor who shipped a debug driver for a popular network card. This particular driver logs every packet it receives over the wire. Nowadays I carry with me to consulting gigs a little driver that patches their driver to eliminate the spew. And I buy other vendors network cards.
EAN: 2147483647
Pages: 119