Editing Xrefs in Place
ACAD only You've seen different methods for editing blocks and Xrefs as external files. There is another way to edit a block or an Xref directly within a file, without having to edit an external file. You use the Xref And Block Edit option in the Modify pull-down menu. This option issues the Refedit command.
The following exercise demonstrates how Refedit works:
-
If it isn't already open, open the Planxref.dwg file. Also make sure that you have closed the Unitxref.dwg file.
-
Zoom into the unit plan in the lower-left corner of the drawing so you see a view similar to Figure 6.16.

Figure 6.16: The enlarged view of the Unit Xref in the Planxref file -
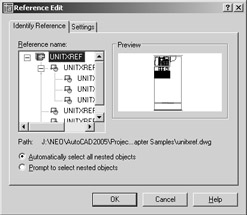
Double-click the kitchenette in the corner of the unit. You can also choose Modify Xref And Block Edit Edit Reference In-Place from the menu bar. Then, at the Select reference: prompt, click the kitchenette in the corner unit to open the Reference Edit dialog box.
-
The Reference Edit dialog box contains two panels. The right panel shows the entire Xref that you are editing. The left panel shows a listing of the specific item you selected in the Xref. Notice that the listing shows the hierarchical relationship of the kitchenette block in relation to the Unitxref Xref.
-
In the left panel, click the Kitchen listing, and then click OK. The Reference Edit dialog box disappears, and the Refedit toolbar appears.
-
Use a selection window to select the entire lower-left corner unit. Notice that only the kitchenette is highlighted; all other objects become gray. This shows you that only the kitchen is available for editing.
-
Press the Esc key to clear your selection.
| |
AutoCAD offers a few additional settings that boost the performance of the Demand Load feature. When you choose File Save As to save a file in the standard .dwg format, you see the Options button. Clicking the Options button opens the Export Options dialog box. Using the options on the Index Type drop-down list can help improve the speed of demand loading. The index options are as follows :
None No index is created.
Layer AutoCAD loads only layers that are both turned on and thawed.
Spacial AutoCAD loads only portions of an Xref or raster image within a clipped boundary.
Layer & Spacial Turns on both the Layer and Spacial options.
| |
| Tip | You can open the Refedit toolbar so that it stays on the screen by right-clicking any toolbar and choosing Refedit from the shortcut menu. |
The Refedit command isolates the objects you select in step 5 for editing. You cannot edit anything else in the Xref until you exit the Refedit command and start over.
At this point, you can edit a block within an Xref. Now let's continue editing the kitchenette:
-
Zoom in on the kitchenette, and then move the four burners to the right 8 ² (20 cm for metric users).
-
Erase the sink.
-
 Click the Save Back Changes To Reference button on the Refedit toolbar or choose Modify Xref And Block Edit Save Reference Edit.
 -
A warning message appears, telling you that the changes you've made to the Xref will be saved to disk. Click OK.
-
Zoom back to your previous view. Notice that the other units now reflect the changes you made to the Unitxref Xref (see Figure 6.17).

Figure 6.17: The Xrefs after being edited -
Open the Unitxref.dwg file. Notice that the kitchen now reflects the changes you made to the Xref of the unit in the Planxref file. This shows you that by choosing to save the reference edit in step 3, you actually save the changes back to the Xref's source file.
As you saw from these two exercises, it's possible to edit a specific block within an Xref, but to do that you must select the block name in the Refedit dialog box.
In these exercises, you edited a block contained within an Xref, but you could have just as easily edited a block within the current drawing. You can also edit nested blocks by using the Refedit command. Changes in blocks in the current file will not affect other files because blocks are not linked to external files. The changes to blocks remain within the current file until you explicitly export the changed block to a file, as you saw in earlier exercises.
Adding and Removing Objects from Blocks and Xrefs
ACAD only In the previous exercises, you removed objects from the Kitchen block simply by using the Erase command. You can also move objects from a block or an Xref into the current drawing without erasing it. To do this, choose Modify Xref And Block Edit Remove From Working Set. This removes the object from the block or Xref without erasing it. Likewise, you can add new objects to the block or Xref by choosing Modify Xref And Block Edit Add To Working Set. Both of these menu options invoke the Refset command, with different options applied.
To see how Refset works, try the following exercise:
-
Close the Unitxref.dwg file.
-
In the Planxref file, zoom into the kitchenette to get a view similar to Figure 6.18.
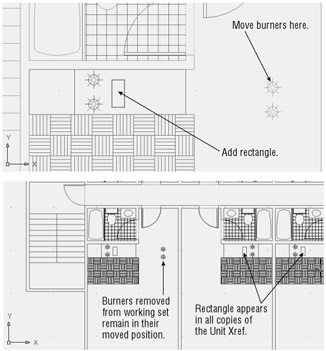
Figure 6.18: Moving the burners out of the Kitchen block and the rectangle in -
Double-click the unit plan drawing. You can also choose Modify Xref And Block Edit Edit Reference and then click the unit plan.
-
Click the Kitchen listing in the Reference Edit dialog box and then click OK.
-
Use the Move tool to move the two burners on the right just to the right of the kitchenette, as shown in Figure 6.18.
-
 Click the Remove Objects From Working Set tool in the Refedit toolbar, or choose Modify Xref And Block Edit Remove From Working Set.
 -
Select the two burners you just moved and then press
 .
.
Notice that the burners become grayer to show that they are now removed from the working set. They remain as part of the Planxref drawing, but they are no longer part of the Kitchen block.
Now add a rectangle to the Kitchen block in place of the burners:
-
Draw a 7 ² 16 ² (18 cm 40 cm) rectangle in place of the moved burners, as shown in Figure 6.18.
-
Select the rectangle you drew in place of the moved burners and press
. -
Click Save Back Changes To Reference Tool on the Refedit toolbar or choose Modify Xref And Block Edit Save Reference Edits.
-
Zoom out enough to see the other units in the drawing (see Figure 6.19).
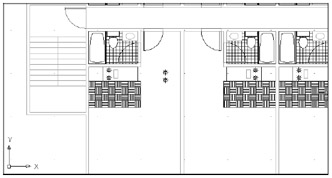
Figure 6.19: The Planxref drawing with the changes made to the Unitxref Xref
You can see that the burners have been replaced by the rectangle in all the other Xref units. The burners you moved are still there in the lower-right corner unit, but they have been removed from all the Xrefs. It is as if you had extracted them from the block and placed them in the Plan drawing.
After you start the Refedit command, any new objects you create are added to the working set automatically, until you save your reference edits. When you drew the rectangle in step 1, for example, it was automatically included in the working set, which is the set of objects included in the block or Xref you are currently working on. You didn't have to specifically add it to the working set.
![]() If you want to include existing objects in the working set, choose Modify Xref And Block Edit Add To Working Set option, or choose Add Objects To Working Set from the Refedit toolbar.
If you want to include existing objects in the working set, choose Modify Xref And Block Edit Add To Working Set option, or choose Add Objects To Working Set from the Refedit toolbar.
You've completed the exercises in this chapter so you can exit AutoCAD without saving these changes.
Understanding Reference Edit Dialog Box Options
ACAD only The Reference Edit dialog box offers you the option to isolate specific blocks within the Xref by selecting them from the hierarchy list. You might have also noticed the two radio button options: Automatically Select All Nested Objects and Prompt To Select Nested Objects. The default option, Automatically Select All Nested Objects, lets you select any object contained within the selected object in the hierarchy listing. If you select the Prompt To Select Nested Objects option, you are prompted to select objects on the screen before the Reference Edit toolbar appears.
In addition to the options you used in the exercises, the Reference Edit dialog box also offers the Settings tab with some additional options.
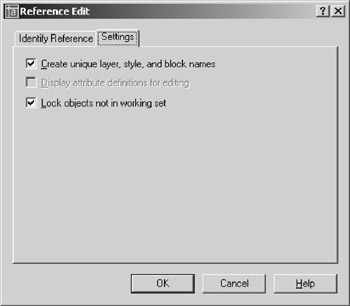
Create Unique Layer, Style, and Block Names
When you use the Refedit command with the Automatically Select All Nested Objects option turned on, you can import nested blocks into the current drawing. For example, if you selected the Bath block in the hierarchy list in the previous exercise, you would have access to the Tub and Toilet blocks in the Bath block. You can then copy either of those blocks into the current file.
When you make a copy of a block from an Xref, AutoCAD needs to assign that block a name. The Create Unique Layer, Style, And Block Names option tells AutoCAD to use the original block name and append a $#$ prefix to the name (# is a numeric value starting with zero). If you were to import the Bath block, for example, it would become $0$bath in the current drawing. This ensures that the block will maintain a unique name when it is imported even if there is a block with the same name in the current drawing. If you turn off the Create Unique Layer, Style, And Block Names option, the original name will be maintained . If the current drawing contains a block of the same name, the imported block will use the current file's definition of that block.
Display Attribute Definitions for Editing
If your drawing contains attributes (see Chapter 10 for more on attributes), this option is offered . If you turn on this option, you can then edit attribute definitions by using the Refedit command. If you select a block that contains an attribute definition while you are using the Refedit command, the attribute definition will be exposed, enabling you to make changes. Changes to attribute definitions affect only new attribute insertions. Except for the attribute of the edited block, existing attributes are not affected. If you want to update existing attributes to a newly edited definition, use the Sync option of the Block Attribute Manager (choose Modify Object Attribute Block Attribute Manager).
Lock Objects Not in Working Set
In the Refedit exercises, you saw that objects that are not selected in the Reference Edit dialog box are grayed out and are not selectable. The Lock Objects Not In Working Set option controls this feature and is turned on by default.
EAN: 2147483647
Pages: 261