Putting AutoLISP to Work
Most high-end CAD packages offer a macro or programming language to help users customize their systems. AutoCAD has AutoLISP , which is a pared-down version of the popular LISP artificial intelligence language.
Don't let AutoLISP scare you. In many ways, an AutoLISP program is just a set of AutoCAD commands that help you build your own features. The only difference is that you have to follow a different set of rules when using AutoLISP. But this isn't so unusual. After all, you had to learn some basic rules about using AutoCAD commands too ”how to start commands, for instance, and how to use command options.
If the thought of using AutoLISP is a little intimidating, bear in mind that you don't really need substantial computer knowledge to use this tool. In this section, you will see how to get AutoLISP to help out in your everyday editing tasks , without having to learn the entire programming language.
Loading and Running an AutoLISP Program
Many AutoCAD users have discovered the usefulness of AutoLISP through the thousands of free AutoLISP utilities that are available from bulletin board and online services. In fact, it's quite common for users to maintain a "toolbox" of their favorite utilities on a disk. But before you can use these utilities, you need to know how to load them into AutoCAD. In the following exercise, you'll load and use a sample AutoLISP utility found on the companion CD:
-
On the CD Start AutoCAD and open the Unit.dwg file.
-
Choose Tools Load Application to open the Load/Unload Applications dialog box.

-
Locate and select the Getarea.lsp file from the companion CD.
-
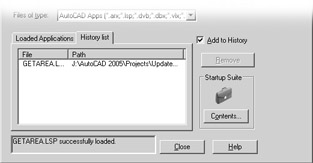
Click the Load button. The message GETAREA.LSP successfully loaded appears in the message box at the very bottom of the dialog box. If you scroll down the list in the Loaded Applications tab, you also see Getarea.lsp listed there, which tells you that it is loaded.
-
Click Close to close the Load/Unload Applications dialog box.
-
Now enter getarea
 .
. -
At the Select point inside area to be calculated: prompt, click inside the unit plan.
-
At the Select location for area note: prompt, pick a point just above the door to the balcony . A label appears, displaying the area of the room in square feet.
You have just loaded and used an AutoLISP utility. As you saw in the Load/Unload Applications dialog box, there are several other utilities you can load and try out. Next , you'll look more closely at the Load/Unload Applications dialog box.
| Tip | The functions of some of the more popular AutoLISP utilities have become part of the core AutoCAD program. Tools such as Match Properties and Make Object's Layer Current have been around as AutoLISP utilities since the earliest releases of AutoCAD. |
Managing Your AutoLISP and VBA Library
The Load/Unload Applications dialog box gives you plenty of flexibility in managing your favorite AutoLISP utilities. You can also manage your VBA and ARX applications. As you saw in the previous exercise, you can easily find and select utilities by using this dialog box. If you often use a custom application, you can include it in the History List tab of the Load/Unload Applications dialog box, as you'll see in the following steps:
-
Choose Tools Load Application again to open the Load/Unload Applications dialog box.
-
Click the Add To History check box.
-
Click the History List tab.
-
Select Getarea.lsp again from the list of applications at the top of the dialog box.
-
Click Load. Getarea.lsp now appears in the History List tab.
-
Click Close to close the Load/Unload Applications dialog box.
Now when you exit AutoCAD, the dialog box retains the name of the Getarea.lsp utility in the History List tab. When you want to load Getarea.lsp in a future session, you won't have to hunt it down. You can highlight it in the History List tab and then load it from there. You can add as many items as you want to your History list or remove items by highlighting them and clicking the Remove button. The History List tab works with all types of applications that AutoCAD supports.
| |
If you are serious about customization, you'll want to know about Autodesk 's ObjectARX programming environment that enables Microsoft Visual C++ programmers to develop full applications that work within AutoCAD. ObjectARX enables programmers to create new objects within AutoCAD as well as add functionality to existing objects. ObjectARX is beyond the scope of this book, so to find out more, contact your AutoCAD dealer or visit Autodesk's website at www.autodesk.com .
If you are familiar with Visual Basic, you'll want to know that AutoCAD offers Visual Basic ActiveX Automation as part of its set of customization tools. ActiveX Automation offers the ability to create macros that operate across different applications. It also gives you access to AutoCAD objects through an object-oriented programming environment. Automation is a broad subject, so several chapters on the CD are devoted to this topic.
| |
Loading AutoLISP Programs Automatically
As you start to build a library of AutoLISP and VBA applications, you might find that you use some of them all the time. You can set up AutoCAD to automatically load your favorite applications. To do this, you use the Startup Suite in the Load/Unload Applications dialog box:
-
Choose Tools Load Applications to open the Load/Unload Applications dialog box.
-
Click the Contents button or the suitcase icon in the Startup Suite group to open the Startup Suite dialog box. This dialog box contains a list box that shows any applications that are to be started whenever AutoCAD starts. You add applications with the Add button at the bottom. If there are applications in the list, you can use the Remove button to remove them.
Tip You can also drag and drop files into the Startup Suite list from Windows Explorer or other drag-and-drop-compatible applications.
-
Click the Add button to open the Add File To Startup Suite dialog box. This is a typical file dialog box that enables you to search for and select a file.
-
Locate and select the Getarea.lsp file in the Figures folder, and then click Add. The Startup Suite dialog box reappears, and Getarea.lsp is listed.
-
Click Close, and then click Close again in the Load/Unload Applications dialog box.
From now on, Getarea.lsp will be loaded automatically whenever you start AutoCAD. You can add several files to the Startup Suite list, or you can remove them by selecting them in the list and then clicking the Remove button.
Creating Keyboard Macros with AutoLISP
You can write some simple AutoLISP programs of your own that create what are called keyboard macros. Macros ”like script files ”are strings of predefined keyboard entries. They are invaluable for shortcuts to commands and options you use frequently. For example, you might often use the Break command to break an object at a single point while editing a particular drawing. Here's a way you can turn this operation into a macro:
-
Open the Unit file and enter the following text at the command prompt. Be sure you enter the line exactly as shown here. If you make a mistake while entering this line, you can use the I-beam cursor or arrow keys to go to the location of your error to fix it.
(defun C:breakat () (command "break"pause "f"pause "@"))
-
Next, enter breakat
at the command prompt. The Break command starts, and you are prompted to select an object. -
Click the wall on the right side of the unit.
-
At the Enter First Point: prompt, click a point on the wall where you want to create a break, and make sure the Osnap mode is turned off.
-
To see the result of the break, click the wall again. You will see that it has been split into two lines, as shown in Figure 19.15.
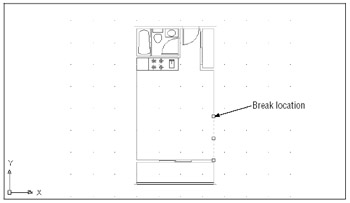
Figure 19.15: With the grips exposed, you can see that the wall is split into two lines.
You've just written and run your first AutoLISP macro! Let's take a closer look at this very simple program (see Figure 19.16). It starts with an opening parenthesis, as do all AutoLISP programs, followed by the word defun . Defun is an AutoLISP function that lets you create commands; it is followed by the name you want to give the command ( Breakat , in this case). The command name is preceded by C: , telling defun to make this command accessible from the command prompt. If the C: were omitted, you would have to start Breakat by using parentheses, as in (Breakat) .
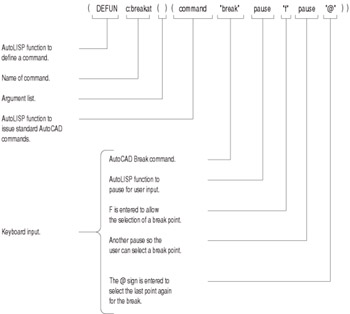
Figure 19.16: Breakdown of the Breakat macro
After the command name is a set of opening and closing parentheses. This set encloses what is called the argument list. The details aren't important; just be aware that these parentheses must follow the command name.
Finally, a list of words follows , enclosed by another set of parentheses. This list starts with the word command . Command is an AutoLISP function that tells AutoLISP that whatever follows should be entered just like regular keyboard input. Only one item in the Breakat macro ”the word pause ”is not part of the keyboard input series. Pause is an AutoLISP function that tells AutoLISP to pause for input. In this particular macro, AutoLISP pauses to let you pick an object to break.
Notice that most of the items in the macro are enclosed in quotation marks. Literal keyboard input must be enclosed in quotation marks in this way. The pause function, on the other hand, does not require quotation marks because it is a proper function, one that AutoLISP can recognize.
Finally, the program ends with a closing parenthesis. All parentheses in an AutoLISP program must be in balanced pairs, so these final two parentheses close the opening parenthesis at the start of the command function as well as the opening parenthesis back at the beginning of the defun function.
Storing AutoLISP Macros as Files
When you create a program at the command prompt, as you did with the Breakat macro, AutoCAD remembers it only until you exit the current file. Unless you want to re-create this macro the next time you use AutoCAD, save it by copying it into an ASCII text file with an .lsp extension. Figure 19.17 shows the saved Breakat macro, along with some other macros I use often.

Figure 19.17: The contents of Keycad.lsp
Use the Windows Notepad application and copy the listing in Figure 19.17. Give this file the name Keycad.lsp , and be sure you save it as an ASCII file. Then whenever you want to use these macros, you don't have to load each one individually. Instead, you load the Keycad.lsp file the first time you want to use one of the macros, and they're all available for the rest of the session.
After the file is loaded, you can use any of the macros within it just by entering the macro name. For example, entering ptx ![]() will set the point style to the shape of an X.
will set the point style to the shape of an X.
Macros loaded in this manner will be available to you until you exit AutoCAD. Of course, you can have these macros loaded automatically every time you start AutoCAD by including the Keycad.lsp
file in the Startup Suite of the Load/Unload Applications dialog box. That way, you don't have to remember to load it in order to use the macros.
Now that you have some firsthand experience with AutoLISP, I hope these examples will encourage you to try learning more about this powerful tool.
EAN: 2147483647
Pages: 261