Visualizing Your 3D Model
As you work with your 3D model, you will want to get an idea of how it looks with hidden lines removed. Frequently, object intersections and shapes are not readily apparent until you can see which objects lie in front of others.
AutoCAD provides two helpful viewing commands for this situation. First, the Hide command enables you to quickly view your drawing with the hidden lines removed. You can then assess where surfaces are and get a better feel for the model. Hide is also an option at plot time, enabling you to create printed line drawings of a 3D model. You can then render the hard copy by using manual techniques if you want.
The second command, Shademode, lets you work with your 3D model as if it were composed of opaque surfaces instead of lines. Shademode also has a variety of options for controlling how colors are applied. You can't plot views as they appear when Shademode is turned on. It is intended only as a visualization aid for constructing 3D models.
Let's begin by looking at the Hide command, and then I'll discuss the Shademode command.
Removing Hidden Lines
Hide is perhaps the easiest of all the AutoCAD 3D viewing commands to use. Try the following to see a hidden-line view of your model:
-
Restore the view you saved earlier with the name 3D by using the View dialog box. This shows that you can store and recall 3D views as well as 2D views.
-
Choose View Hide or enter Hi
 at the command prompt. AutoCAD displays this message:
 Regenerating Model
If the drawing is complex, a graphic bar appears in the status bar showing the progress of the hidden-line removal. When AutoCAD is finished, the image appears with the hidden lines removed (see Figure 15.14).
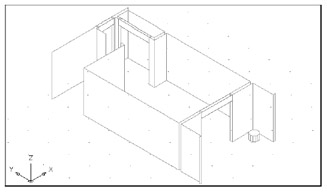
Figure 15.14: A unit in the apartment building drawing with hidden lines removed -
After you review the results of the View Hide, choose View Regen or type Re
to return to your Wireframe view. Tip You can also plot a view from the model tab with hidden lines removed by selecting the Hide Objects check box in the Plot Configuration dialog box before you start your plot. Using the Hide Objects option generally adds only a few seconds to your plot time. If you're plotting from a Layout tab, you need to turn on the Hideplot property of the viewport containing the 3D view.
This hidden-line view remains until your drawing is regenerated. Note that you cannot use the View command to save a hidden-line view. You can, however, save this view as a slide.
| Tip | In earlier versions of AutoCAD, text would not hide when using the Hide command. Since AutoCAD 2004 you can use the Hidetext system variable to control whether text is hidden when using the Hide command. See Appendix C for more on system variables . |
Although it did not take much time to perform a hidden-line removal on this drawing, the more complex the 3D drawing, the longer the Hide command takes. But even the most complex model you create does not take much more than several minutes.
| Warning | If you want to use the Zoom Realtime tool after you use the Hide command, you must choose View Regen. |
Showing Hidden Lines as Dashed
In most architectural 3D drawings, you don't want to show the hidden lines in your final views. In mechanical applications, however, you might want to show hidden lines as dashed to help better visualize the form of an object. AutoCAD offers two system variables, Obscuredltype and Obscured- color , that enable you to control how hidden lines are displayed when the Hide command is used.
Obscuredltype gives you control over the line type of hidden lines. Normally, Obscuredltype is set to 0 so that hidden lines are invisible. If Obscuredltype is set to 1, hidden lines are made visible even when Hide is used. If it is set to 2, hidden lines are shown as dashed lines, as in a mechanical drawing.
Obscuredltype offers the 11 line-type settings shown here with their corresponding numeric values.

Obscuredcolor gives you control over the color of hidden lines. This system variable has no effect unless Obscuredltype is set to a value other than 0. Obscuredcolor can be set to any value from 0 to 255; the numeric value corresponds to the 255 AutoCAD colors. You can use the Obscuredcolor setting in combination with color plot style tables to alter the appearance of hidden lines in print or plotter output.
To use either of these system variables, enter the variable name at the command prompt; then enter the numeric value that corresponds to the desired effect.
| |
When you plot a hidden-line drawing from Model Space and you have Obscuredltype set to a value other than 0, your plot will look like your hidden-line view in the AutoCAD Model Space work area. (Make sure you select Hide Objects in the Layout Settings tab of the Plot dialog box.) However, if you plot from a Layout tab with the Hideplot setting turned on for the viewport, the Obscuredltype line-type setting will not appear in your printer or plotter output; the output will look like a normal plot showing the hidden lines as solid lines.
To get around this limitation, you can use Obscuredcolor in conjunction with a color plot style to create a plot with dashed hidden lines when plotting from a Layout tab. You might need to convert your drawing to one that uses color plot style tables. See Chapter 7 for more on color plot styles and plot style conversions.
Also note that the Ltscale system variable has no effect on the line type generated by Obscuredltype. Finally, if you prefer, you can control Obscuredcolor and Obscuredltype settings through the Obscured Lines group of the Hidden Line Settings dialog box. To open the Hidden Lines Settings dialog box, enter Hlsettings ![]() at the command prompt.
at the command prompt.
| |
Using a Shaded Mode with Your 3D Model
ACAD only If you're used to working with wireframe 3D images, the Hide command is usually good enough to give you an idea of how your model looks from time to time as you work on it. But when you want to get an even better visualization of the form your model is taking on, it's time for the Shademode command.
| Tip | The Shademode command is set up as a toolbar with several tools. Each tool issues the Shademode command and applies a different option. If you prefer, you can enter the Shademode command at the command prompt and enter the appropriate options to get the same results as the toolbar tools. Shademode in LT offers only the options of 2D Wireframe and Hidden. |
To see how Shademode works, try the following exercise:
-
Right-click any toolbar and choose Shade from the shortcut menu to open the Shade toolbar.
-
 Click the Flat Shaded tool. You can also choose View Shade Flat Shaded. Notice that a ground plane appears. This is an aid to help you better visualize the model; it isn't part of your drawing.
 -
Click the Grid button in the status bar. Notice that the 3D grid turns off. Click the button again to turn the grid back on. The grid you see with the shaded view does not reflect the grid spacing you set in the Drafting Settings dialog box. It's there only to help you visualize the plane represented by the x-y axes at 0 elevation. It also shows you the limits of your drawing, just like the standard grid.
-
 In the Shade toolbar, click the Flat Shaded, Edges On tool, or choose View Shade Flat Shaded, Edges On from the menu bar. Notice that this time, the edge of each surface is highlighted for visibility (see Figure 15.15).
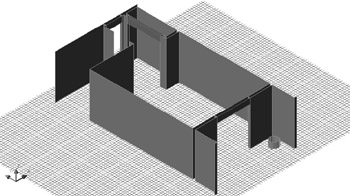
Figure 15.15: The unit plan shaded by using the Flat Shaded, Edges On option -
 Click the Hidden tool or choose View Shade Hidden. Your drawing changes to look as it did when you used the View Hide option. But there is a difference in this option as you'll see in the next two steps.
 -
Choose View Regen. The view doesn't change. AutoCAD remains in a Shaded view mode.
-
 Click the 2D Wireframe tool in the Shade toolbar or choose View Shade 2D Wire- frame. Your drawing returns to the Wireframe view you started with.
Unlike the Hide option, the View Shade Hidden option doesn't revert to a wireframe view when you use the Regen command. To return to a Wireframe view, you need to select a different Shade option as you did in step 7.
The Hidden Shade mode makes it easier to visualize your 3D drawing. Depending on the type of model and its complexity, you can even work on it with the Hidden Shade mode turned on. You can always go back to the Wireframe view by using the 2D Wireframe option. In fact, at times you might want to "see through" a wall or other object while you're editing your 3D model. That's when the 2D Wireframe view will be more helpful. The Hide command you used earlier is good for a quick hidden line view when your working in a 2D Wireframe view.
Before you continue editing the unit plan, you might want to know the functions of the other options on the Shade toolbar. The 3D Wireframe option displays a view similar to the 2D Wire- frame view, with the addition of the ground plane you first saw in step 2. The other two options are Gouraud Shaded and Gouraud Shaded, Edges On. Both are used to get a smooth shade effect on curved surfaces, as shown in Figure 15.16. These Gouraud options don't have an effect on flat surface models such as the walls of the unit plan. You can see the effect of the Gouraud options in the planter of the unit plan.

Figure 15.16: A sphere shaded by using different shade modes
The Edges On options display the edge of flat surfaces. The spheres in Figure 15.16 are made up of flat surfaces, which can be seen in the Hidden example. The Gouraud Shaded options smooth out the facets of the sphere. The Gouraud Shaded, Edges On option shows the edges of the facets even though the smoothing effect is on.
A third method for visualizing your model lets you place varying light sources in your drawing. The AutoCAD rendering functions on the Render toolbar let you adjust light reflectance of surfaces, smooth out faceted surfaces such as spheres and cylinders , and place light sources accurately. You'll get a chance to work with the rendering functions in Chapter 17. For now, let's look at some other factors that affect how a 3D model will look when it is shaded or when hidden lines are removed.
EAN: 2147483647
Pages: 261