Section 6.4. Drag n Drop with Scriptaculous and Prototype
6.4. Drag 'n' Drop with Scriptaculous and PrototypeScriptaculous was written by Thomas Fuchs, a software developer from Austria. He writes: "Disappointed by current web application frameworks making no sense to me, I set out on a search for the perfect underpinnings of my web sites and web apps. I think I've found it." Scriptaculous can be used freely with the MIT license described on the Scriptaculous home page (http://script.aculo.us). You only need to include the copyright in the code that uses it. You'll often find Scriptaculous used in conjunction with the Prototype library (http://prototype.conio.net) for communication with the server. We've seen Prototype before; it was one of the first Ajax frameworks and is used by many frameworks, including Rico. Both Scriptaculous and Prototype are now part of the Ruby on Rails project, but that won't stop us from using them with Java; they are too rich to ignore. The Scriptaculous home page has an example of a shopping cart application written in PHP. To explore the power of Scriptaculous, let's build a drag and drop shopping cart of our own. Our shopping cart will tie directly to a database. When the user clicks on a product image and drags it to the shopping cart, a JavaScript function will call the server to update the database, adding the new item to the user's cart. Then another function will query the database for the items in the shopping cart and update the cart on the web page. Figure 6-5 shows the look we're going for. Figure 6-5. Scriptaculous drag and drop in action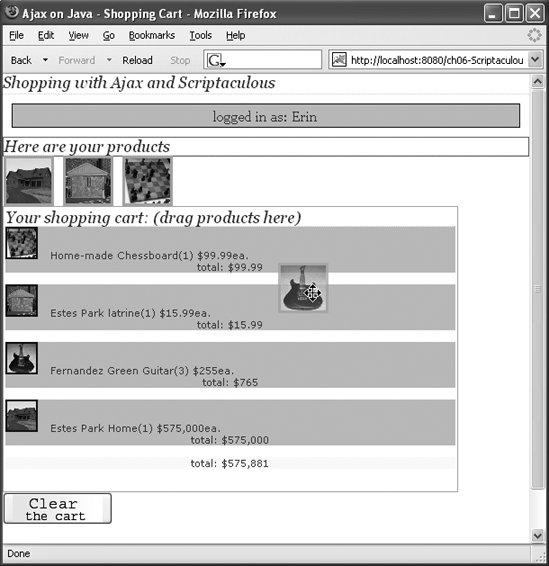 The shopping cart needs the following features:
As with previous examples, we will persist the information to a MySQL database. Here's how to set up the USERS table, which we'll use to store user account information. It's similar to the USERS table we used in Chapter 5, with two additional fields (JOINED and LAST_LOGIN): DROP TABLE USERS; CREATE TABLE USERS ( USER_ID int PRIMARY KEY auto_increment not null, USERNAME varchar(50), PASSWORD varchar(50), FIRST_NAME varchar(50), LAST_NAME varchar(50), EMAIL varchar(50), ADDRESS varchar(50), ZIPCODE varchar(10), CITY varchar(50), STATE varchar(2), JOINED date, LAST_LOGIN date ); While we are working on the database, we will need some other tables. After a user signs up and then signs in, he will need a shopping cart. Here's how to create the SHOPPING_CART table: CREATE TABLE SHOPPING_CART ( CART_ID int PRIMARY KEY auto_increment not null, USER_ID int, START_DATE datetime, LAST_UPDATED datetime, ACTIVE tinyint ); This table ties to the USERS table through the USER_ID field. It also gives us a START_DATE (datetime) field for when the shopping cart was created and a LAST_UPDATED (datetime) field to record how long it has been since something has been added to the cart. Next, we need a table called ITEMS_IN_CART, which ties the products and the quantity of each item to the cart: CREATE TABLE ITEMS_IN_CART ( ITEM_ID int, CART_ID int, COUNT int ); Why don't we just use the SHOPPING_CART table and forget about the ITEMS_IN_CART table? We could add the fields ITEM_ID and COUNT to the SHOPPING_CART table and just add a new row to the SHOPPING_CART table for each new item selection. However, we'd still need a new row for every item added. That would result in a lot of duplicate information: the USER_ID, ACTIVE, and START_DATE fields would be repeated for every item in the cart. Having only one row for the shopping cart and linking the items to the shopping cart in their own table makes the database more efficient.
Now that we have the USERS, SHOPPING_CART, and ITEMS_IN_CART tables, we need a table to store the products that can be put into a shopping cart. This is the PRODUCTS table: CREATE TABLE PRODUCTS ( PRODUCT_ID int PRIMARY KEY auto_increment not null, PRODUCT_NAME varchar(50), DESCRIPTION varchar(100), FILENAME varchar(100), PRICE decimal(9,2) ); The FILENAME field contains the name of the image file that is used to display the product. So, the images need to be stored somewhere on the disk. In Chapter 8, we will use Struts to manage the products, but for now let's just hand-enter some to get started: INSERT INTO PRODUCTS VALUES (1,'house','Estes Park Home2','house.png',575000.00); INSERT INTO PRODUCTS VALUES (2,'latrines','Estes Park latrine', 'latrine.png','15.99'); INSERT INTO PRODUCTS VALUES (3,'chessboard','Home-made Chessboard', 'chessboard.png','99.99'); INSERT INTO PRODUCTS VALUES (4,'Guitar','Fernandez Green Guitar', 'guitar.png','255.00'); INSERT INTO PRODUCTS VALUES (5,'Tortoise','Cherry Box Turtle', 'cherry.png','19.99'); That completes the database setup, but the issue of where to put the images remains. I've included the images for these examples with the source distribution for the book, which is available from http://www.oreilly.com/catalog/9780596101879. Put the images in a subdirectory called images under the war directory. The images should be 100 x 100 pixels and in .jpg, .png, or .gif format. Next, we will build the page that allows the user to sign up for the shopping cart application. 6.4.1. The User Signup ApplicationThe signup portion of our application won't really be any different from that of most other applications, except for the lack of any obvious submit/response activity. Thanks to Ajax, the submit/response is done in the background; as a result, this web application feels more like a desktop application. The sequence diagram in Figure 6-6 shows how the application works. When a user signs up for the shopping cart system, a request is passed through XMLHTTPRequest to AjaxSignupServlet. The servlet creates a User object and calls UserManager. In turn, the UserManager makes a connection to the database and persists the user to the database. Figure 6-6. Signup sequence diagram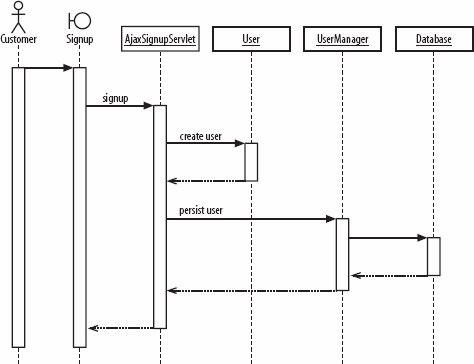 When the application is first loaded, several variables and the initial screen view need to be initialized: function init( ) { loginDiv = document.getElementById("loginDivId"); signupDiv = document.getElementById("signupDivId"); signupDiv.style.visibility ="hidden"; shoppingCartDiv = document.getElementById("cart"); loginmessageDiv = document.getElementById("loginmessage"); shoppingCartDiv.style.visibility="hidden"; productsdiv = document.getElementById("products"); productsdiv.style.visibility="hidden"; buttonsDiv = document.getElementById("buttonsDiv"); buttonsDiv.style.visibility="hidden"; } The init( ) function is called by window.onload( ), which also initializes the key handler for the loginDiv. The window.onload( ) function (defined in oreillyajaxdragndrop.js) is automatically called whenever the page is loaded: window.onload = function ( ) { init( ); obj = document.getElementById("username"); obj.focus( ); loginDiv.onkeydown = function (inEvent) { if (!inEvent) { inEvent = window.event; } keyDownHandler(inEvent); } } The "Sign up" button on the login screen (Figure 6-7) uses the onClick TRigger to call the signup( ) JavaScript function. In this function, the signup div's visibility is set to visible and the login div's visibility is set to hidden: Figure 6-7. The shopping cart login screen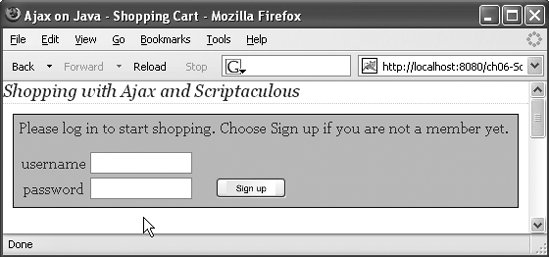 function signup( ) { loginDiv.style.visibility="hidden"; signupDiv.style.visibility="visible"; } This technique (using dynamic styling to show and hide divs) gives the application a rich feel. It becomes much more responsive, because there's no need to load new pages for different stages of the application. Once the login div has been hidden and the signup div is visible (Figure 6-8), the user can fill in the requested information and click the Signup button to send a request to AjaxSignupServlet. Figure 6-8. The signup screen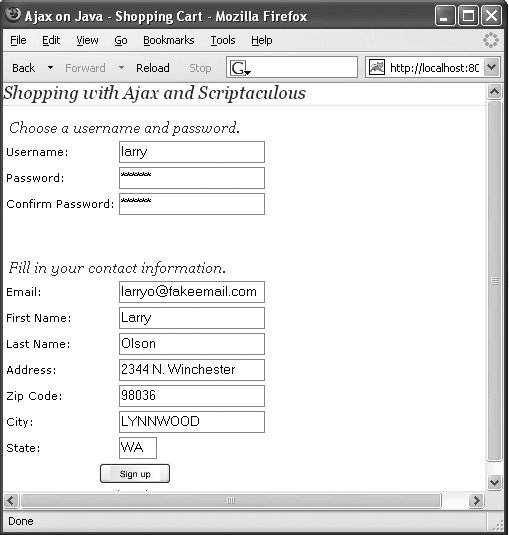 It's important to understand that users are not moving between different web pages as they click from the login screen to the signup screen to the actual shopping screen. There's only one page in this application: dragNdrop.html. Rather than downloading a new page for each response, the application changes the screen by hiding and exposing different <div> tags. What we're doing is changing the behavior of a single page by modifying the document object model, which is the structure in which the browser represents the page. The whole page is downloaded and rendered once; all we do is tweak the DOM to show and hide different parts of it. When a new user enters data and clicks the Signup button, a JavaScript trigger invokes the addUser( ) JavaScript function. This function creates a new Ajax.Request object, which sends a request to the signup URL. That URL passes control to the AjaxSignupServlet, which adds the user to the database. The code for the AjaxSignupServlet is shown in Example 6-6. Example 6-6. The AjaxSignupServlet
6.4.2. Using Prototype to Wrap XMLHttpRequestThe JavaScript code behind the Signup button is largely contained in the addUser( ) function. This is one place where Prototype comes in handy: using Prototype's wrapper around XMLHttpRequest is easy. Example 6-7 shows a call to Prototype's new Ajax.Request( ) constructor. First we pass in the target URL (in this case, simply "signup"). Then we pass in parameters that specify whether the call will be asynchronous (true), specify the HTTP type ("get"), and set the parameters to send in the request. The final two parameters, onSuccess and onFailure, are actually function definitions; they specify what happens after the request has been sent. onFailure determines what happens when an error occurs, whereas onSuccess sends the newly signed-up user to the login pagewhich is just the current page, so a reload isn't needed. Example 6-7. Invoking Ajax.Request
Let's look again at the URL passed to the Ajax.Request constructor. The URL, "signup", is mapped to the servlet that is waiting for the XMLHTTPRequest. Here's how we map that URL to the processing servlet in web.xml: <servlet> <servlet-name>AjaxSignupServlet</servlet-name> <servlet-class> com.oreilly.ajax.servlet.AjaxSignupServlet </servlet-class> <load-on-startup>4</load-on-startup> </servlet> <servlet-mapping> <servlet-name>AjaxSignupServlet</servlet-name> <url-pattern>/signup</url-pattern> </servlet-mapping> 6.4.3. The User Login FunctionsWhen the user logs in, a shopping cart is created and linked to the user by the USER_ID field in the SHOPPING_CART table. At this point, the user is ready to start shopping. The login sequence diagram (Figure 6-9) is similar to the signup sequence diagram, with the following differences:
Figure 6-9. Login sequence diagram When the user logs in to the shopping cart application, the login div is changed to display the message "logged in as: <username>" and the product list and shopping cart divs are set to visible. The product list div is populated with the products in the database's PRODUCTS table via the ProductManager class. To get a list of products in the shopping cart, the AjaxLoginServlet (shown in Example 6-8) calls ShoppingCartManager:getCartContents( ), which returns a JSON object. Example 6-8. The AjaxLoginServlet
The JSON object is sent back to the browser, where it is parsed by the call to updateCart(request). This method takes the JSON object out of the request and populates the shopping cart div with the items in the cart: function updateCart(req) { var jsonData = req.responseText; var myJSONObject = eval('(' + jsonData + ')'); var cartdiv = document.getElementById("cart"); // clear cart var output="<p> Your shopping cart: (drag products here) </p>"; for(i=0;i<myJSONObject.cartcontents.length-1;i++) { output+='<div><img src="/books/4/163/1/html/2/images/'+myJSONObject.cartcontents[i].filename+ '"> '+myJSONObject.cartcontents[i].description+ '('+myJSONObject.cartcontents[i].value+')$'+ myJSONObject.cartcontents[i].price+ 'ea. <CENTER> total: $'+ myJSONObject.cartcontents[i].total+ '</CENTER></div><br />'; } output+='<div height:32px; style="background-color:#FFFF99; margin-bottom:10px;"> <CENTER> total: $' +myJSONObject.cartcontents[myJSONObject.cartcontents.length-1].total +'</CENTER></div><br />'; cartdiv.innerHTML=output; } Figure 6-10 shows what the application looks like at this point. Figure 6-10. Typical view of a user's shopping cart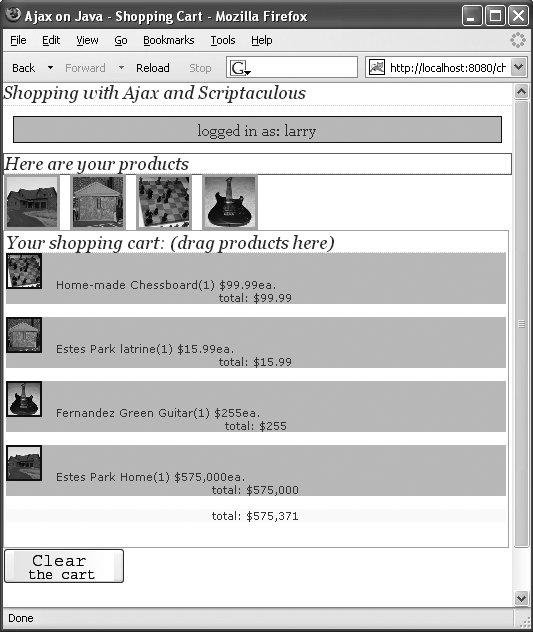 This view was built from a JSON array that lists the description, price, total price, and quantity of each item in the cart. The final element of the array represents the total price of all the items in the cart: {"cartcontents":[ {"product":"chessboard","price":"99.99","total":"99.99","description":"Chessboard", "value":"1"}, {"product":"latrine","price":"15.99","total":"47.97","description":"latrine", "value":"3"}, {"product":"guitar","price":"99.99","total":"499.95","description":"guitar", "value": "5"}, {"product":"house","price":"575,000","total":"575,000","description":"house", "value":"1"}, {"total":"575,647.94"} ]} It's fairly simple to see how the data in this object was used to populate the shopping cart: the value field for the guitar is 5 in the JSON object, and the web page shows that five guitars ("guitar(5)") are in the cart. Later, we'll see where the images come from. 6.4.4. The Shopping Functions: Getting a Product ListNow let's see how the products div is populated. This div holds the products for the user to drag into the shopping cart div and is updated whenever a user logs in to the application. When the login function finds a match for the username and password entered into the login screen, it calls getProductList( ). This JavaScript function creates an Ajax.Request object to get a list of products from the database: function getProductList( ) { new Ajax.Request("products", { asynchronous: true, method: "get", onSuccess: function(request) { updateProductList(request); }, onFailure: function(request) { alert('failed to get product list'); } }); } The Ajax.Request object calls the servlet mapped to the "products" URL. That URL is mapped to the ProductServlet by web.xml: <servlet> <servlet-name>ProductServlet</servlet-name> <servlet-class> com.oreilly.ajax.servlet.ProductServlet </servlet-class> <load-on-startup>6</load-on-startup> </servlet> <servlet-mapping> <servlet-name>ProductServlet</servlet-name> <url-pattern>/products</url-pattern> </servlet-mapping> The ProductServlet, shown in Example 6-9, returns a JSON object that contains information about all the products that can be selected. Example 6-9. The ProductServlet
The JSON object is actually constructed by a call to ProductManager.getJSONProducts( ) (Example 6-10). This method builds the JSON object by manipulating a StringBuffer, but this could alternatively have been done using one of the JSON libraries discussed in the latter part of Chapter 4. Example 6-10. ProductManager.getJSONProducts( )
Here's what the JSON document embedded in the response looks like: {"products": [ {"description":"house","name":"house","filename":"images/house.png", "price":"575000.0"}, {"description":"latrine","name":"latrine","filename":"images/latrine.png", "price":"15.99"}, {"description":"Chessboard","name":"chessboard", "filename":"images/chessboard.png","price":"99.99"}, {"description":"guitar","name":"guitar","filename":"images/guitar.png", "price":"99.99"} ]} For each product, there is a description, a product name, the filename for an image file, and a price. That information is necessary to build the product list. The onSuccess parameter of getProductList( ) is a function that transfers execution to updateProductList( ) if the request is successful. In turn, updateProductList( ) takes the JSON object from the request (the listing of the products that are available) and uses it to populate the product list div: function updateProductList(req) { jsonData = req.responseText; var myJSONObject = eval('(' + jsonData + ')'); // clear cart productsdiv.innerHTML="<p>Here are your products</p>"; for(i=0;i<myJSONObject.products.length;i++) { productsdiv.innerHTML+='<img height="100px" alt=' + myJSONObject.products[i].description + ' name="'+ myJSONObject.products[i].name + '" src="/books/4/163/1/html/2/'+ myJSONObject.products[i].filename+'"/>'; } // I should be able to put the draggable in the above loop, but that // doesn't work so I had to do this in a separate loop. Strange, but true. for (i=0;i<myJSONObject.products.length;i++) { new Draggable(myJSONObject.products[i].name, {revert:true}); } Droppables.add('cart', { onDrop:function(element) { addToCart(element.id); } }); } The result is that the application updates the product list whenever a user logs in. The updateProductList( ) function iterates through the products listed in the JSON object and creates an HTML string that holds the information about each product. For the guitar that's for sale, the string looks like this: <img height="100px" alt="guitar" name="guitar" src="/books/4/163/1/html/2/images/guitar.png"/> The JavaScript assembles this image element from data in the JSON response. Among other things, the JSON object contains the image filename, which is inserted into the <img> element by updateProductList( ). Once we've created a sequence of <img> tags to display the product list, we make another pass through the JSON array. This loop sets up the drag-and-drop feature by calling Draggable( ) from the Scriptaculous library and passing in the IDs of each element on the HTML page: new Draggable(myJSONObject.products[i].name, {revert:true})
The products[i].name reference refers to an element in the products array that is contained by the JSON object. The server built this array with a call to JSONUtil.convertMapToProducts( ) (which you'll see later, in Example 6-12). Finally, we need to make the shopping cart accept draggable items. To enable dropping, we call Droppables.add( ) from the Scriptaculous library and pass it the ID of the shopping cart div, 'cart'. Now the shopping cart div can accept draggable items. The second parameter, onDrop, specifies what to do when an item is dropped on the shopping cart. In this case, we call addToCart( ) with the ID of the element we want to add. Each time the customer drags a product to the shopping cart, addToCart( ) is invoked. This function creates a new Ajax.Request object with the target URL of "shoppingcart"; in turn, this URL maps to the ShoppingCartServlet. The request makes a simple HTTP GET request, with the "item=" parameter string appended to the URL: function addToCart(item) { parameterString = "item="+item; new Ajax.Request("shoppingcart", { asynchronous: true, method: "get", parameters: parameterString, onSuccess: function(request) { updateCart(request); }, onFailure: function(request) { alert('failed to add item to cart'); } }); } The ShoppingCartServlet, shown in Example 6-11, then picks up the information in the parameter string and creates an entry in the ITEMS_IN_CART table. This entry includes the Shopping Cart ID and the Product ID. It packs the contents of the shopping cart into a JSON object and ships that back to the client. Example 6-11. The ShoppingCartServlet
The ShoppingCartServlet makes a call to convertMapToProducts( ) (Example 6-12), a method from the JSONUtil class that converts a Map to a JSON String that contains an array of products. Example 6-12. convertMapToProducts( )
The getProducts( ) function inserts the appropriate images from the PRODUCTS table into the product list div (Figure 6-11). Figure 6-11. The product list div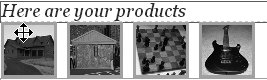 The images are from the filesystem, but their paths are stored in the FILENAME field of the PRODUCTS table (Figure 6-12). Figure 6-12. The PRODUCTS table viewed in SQuirreL SQL Adding new products is easy: just add a new product image to the server's images directory, and then add an entry for it in the database's PRODUCTS table. Now you have seen what it takes to build a complete application using one HTML page. This page makes heavy use of CSS formatting, Scriptaculous.js, and a JavaScript file with our own custom functions. The backend to the application consists of some simple Java servlets backed by a database. Is it a lot of work? Possiblythough probably not much more work than building a traditional shopping cart application. Will your customers be satisfied? Most definitely. By using Ajax and DOM rewriting, we've made an application that's much more responsive than most of the web applications available. |
