Windows Management Instrumentation (WMI)
| < Day Day Up > |
Windows Management Instrumentation (WMI)The promises of WMI ”Microsoft's implementation of the WEB Based Enterprise Management (WBEM) standard ”finally materialized in Windows Server 2003. Not only did Microsoft add WMI providers to almost all OS components , it also provided a Command Line Interface (CLI) called WMIC. This section introduces WMI and provides an overview of the features of Windows Server 2003 WMI providers.
To browse the WMI schema, I recommend you do not use the Windows Server 2003 built-in tool (WBEMTest.exe), but rather install the WMI SDK (Software Developer's Kit) downloaded from Microsoft (make sure you get SDK version 1.5 minimum). The SDK comes with two great tools: Common Information Model (CIM) Studio and WMI Object Browser. CIM Studio allows browsing of any WMI schema metadata; all that is needed is the initial namespace and you get the following:
Whereas CIM Studio is a metadata browser (only allows access to the schema), WMI Object Browser provides access to data. All object instances in a namespace can be accessed. It is possible to see values, update values, and execute methods. The interfaces are nearly identical between the two tools. Most examples in this section will relate to Microsoft Cluster, but the examples can be easily modified to deal with almost any WMI providers. WMI ArchitectureJust as it takes two to tango, it takes three to make WMI useful! The three required elements are
Obviously, this description is simplified, but it shows that the WMI providers are key elements that provide WMI with its richness. WMI does not limit providers to OS components; for example, Exchange 2000 ships with WMI providers. Over time, more products will ship with providers. Exploring the WMI ProvidersAs previously mentioned, a WMI provider is a software layer that converts (thunk is the Microsoft term ) between Windows native and the WMI standard format. For example, when WMIC is used to collect cluster information, the cluster WMI provider converts the request between the WMI format and the native ClusApi. A WMI call can actually involve multiple native calls, and WMI object properties might or might not exist in the native environment. The definitive and complete description for each WMI provider is available on MSDN. However, for a simple introduction to what is available on your server, look at your server in the directory %WinDir%\system32\wbem for files with the extension Managed Object Format (.mof). Each of those files describes providers in a C-like format. You will be able to find:
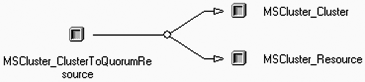
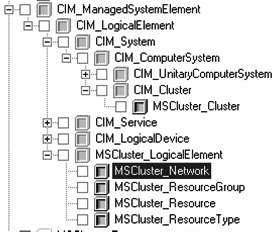
note The directory only contains files for components you have installed. For example, if your server is not configured as a DNS, the file DnsProv.MOF will probably not be there. You can also learn more about the WMI providers on your server by browsing. You can browse the schema using the CIM Studio (the GUI from the WMI SDK mentioned previously). For example Figures 10.10 through 10.14 show what information is available from the cluster provider. Figure 10.10. Initial display of the CIM Studio.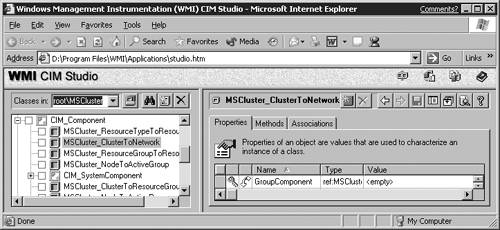 Figure 10.14. Association class. Figure 10.11. Object hierarchy. Figure 10.12. Class properties.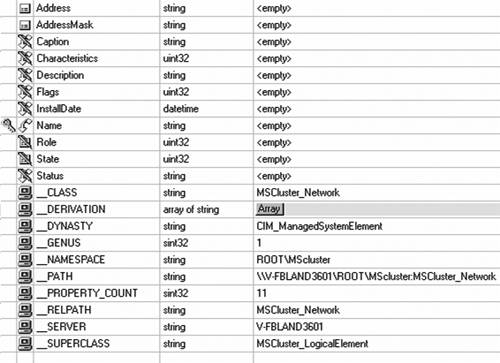 Figure 10.13. Class methods. The default namespace is \\Root\CIMv2 . When accessing objects, the path only needs to be specified if the objects are not stored in the default path . Most classes in the form Win32_<something> are stored in the default namespace. Objects such as cluster or LDAP are stored in their own namespace. WMI Access from ScriptsWMI does not restrict the choice of programming language. Most developers will use a highly optimized language like C or C++. However, when doing simple management, it is possible to use WMI with minimum development effort or expertise using Windows Scripting Host (WSH). WMI can be scripted from any scripting language, but in this chapter Visual Basic Script (VBScript) is used to provide coding examples. Getting StartedThe VBS examples presented here are simple and are best executed using the CSCRIPT processor. Windows offers the choice of console-based scripting or windows-based scripting. However, only console-based scripting allows simple input and output interaction (some of the examples use the WScript.StdIn.Readline method to capture user input). To execute an example script, copy the script from this document using a simple editor like Notepad and save it using a unique file name like FOO.VBS. Then, use the console command: C:\> cscript foo.vbs The biggest obstacle is simply how to get going. After the first script is available, it's simple to use it as a template and adapt it for another purpose. The three most common syntactic examples to access objects are as follows :
Beware that WMI returns object sets, even in the case of a set with a single object (such as a cluster, because a node can only belong to a single cluster at a time). For nonreal-time objects, loop through the object using the VBS syntax: FOR EACH object IN objectset NEXT Accessing PropertiesThe object properties defined in the class are accessed using the ObjectName.PropertyName syntax. For example, InterfaceType and Size are properties of the DiskDrive class and can be viewed using the following code: DIM oResourceSet, oResource SET oResourceSet = GetObject( "winmgmts://./root/CIMv2" ). _ InstancesOf( "Win32_DiskDrive" ) FOR EACH oResource IN oResourceSet WScript.Echo( "Disk " & oResource.DeviceID & " has " & _ oResource.InterfaceType & " interface " & _ oResource.Size & " bytes" ) NEXT SET oResourceSet = NOTHING SET oResource = NOTHING Using MethodsMethods are used to perform operations on objects. For example, renaming a printer requires more than changing the Name property. A method called RenamePrinter changes the name, updates the Registry, and does anything else that needs to be done. Another example involves pausing printers; the following VBS code would prompt for every printer that is running on a server and allow the user to pause it: DIM oPrinterSet, oPrinter CONST PAUSED=1 CONST RUNNING=0 SET oPrinterSet = GetObject( "winmgmts://./root/CIMv2" )._ InstancesOf("Win32_Printer") FOR EACH oPrinter IN oPrinterSet IF oPrinter.PrinterState = RUNNING THEN Wscript.Echo( "Pause " & oPrinter.Name & "?" ) strInput = WScript.StdIn.ReadLine strInput = UCASE( LEFT( strInput , 1 ) ) IF strInput = "Y" THEN CALL oPrinter.Pause( ) END IF ELSEIF oPrinter.PrinterState = PAUSED THEN WScript.Echo( oPrinter.Name & " is paused." ) END IF NEXTSET oPrinterSet = NOTHING SET oPrinter = NOTHING In general, a method performs its work on the object that is used to invoke it; for example, a rename method's only input is the new name; the old name is assumed to be the name of the current object. However, there are times when this cannot be the case. To create a new instance of an object, for example, any object in the same class can be used. So to create a new cluster resource group object, use the CreateGroup method from any ResourceGroup object. Association ClassesAn association class relates two objects. The objects can be in the same class, as in the case of MSCluster_ResourceToDependentResource or in different classes such as MSCluster_ ResourceGroupToResource . The association objects usually have only two string properties of type Reference (REF) , and each property points to an object in the respective target classes. Type REF as a pseudo-WQL format; it isn't a true WQL query and needs to be modified to be used as a WQL query. However, it contains all the information to create a valid WQL query that will provide the desired object. For example, one instance of MSCluster_ResourceGroupToResource has the following properties: ResourceGroupTo.GroupComponent [ra] MSCluster_ResourceGroup.Name="Cluster Group" ResourceGroupTo.PartComponent [ra] MSCluster_Resource.Name="Cluster IP Address" The WQL is not valid because it includes the object name in the association. Turning these into valid WQL requires adding Select From at the front and replacing the period with Where and would produce: Select * From MSCluster_ResourceGroup Where Name="Cluster Group" Select * From MSCluster_Resource Where Name="Cluster IP Address" This can then be used as the argument of a WMI query: GetObject( "winmgmts://./root/MSCluster" ).ExecQuery( <WQL> ) Association classes by themselves are cumbersome to use. However, WMI provides a method to use association classes without having to actually deal with the class instances. Using the associated WMI syntax, you can retrieve the associated classes. For example, the association class MSCluster_ResourceGroupToResource links cluster resource groups to their resources. Using that class, without actually manipulating instances of it, to associate the two classes and retrieve all instances of MSCluster_Resource that belong to the cluster group requires the WMI syntax: ASSOCIATORS OF {MSCluster_ResourceGroup.Name='Cluster Group'} WHERE AssocClass=MSCluster_ResourceGroupToResource" Using this WMI feature, it becomes trivial to use association classes. For example, the following code allows the user to specify a cluster group and will return all the names of all the resources in that group along with the resource type: REM REM Given a resource group name, find all the resources and REM their types in that group using associators REM OPTION EXPLICIT ON ERROR RESUME NEXT DIM refWMIServices, oResourceSet, oResource, oResourceTypeSet DIM oResourceType, strQuery, strInput, nCount WSCript.Echo ("Enter name of the resource group to look for:" ) strInput = WScript.StdIn.ReadLine SET refWMIServices = GetObject( "winmgmts://./root/MSCluster" ) strQuery = "ASSOCIATORS OF {MSCluster_ResourceGroup='" & _ strInput & "'} WHERE AssocClass=" & _ "MSCluster_ResourceGroupToResource" SET oResourceSet = refWMIServices.ExecQuery( strQuery ) nCount = oResourceSet.Count IF Err.Number <> 0 THEN WScript.Echo ("Group " & strInput & " was not found!" ) WsCript.Quit END IF WScript.Echo ( "Got " & nCount & " resources in " & _ strInput & ":" ) FOR EACH oResource IN oResourceSet WITH oResource strQuery = "ASSOCIATORS OF {MSCluster_Resource='" & _ .Name & "'} WHERE AssocClass=" & _ "MSCluster_ResourceTypeToResource" SET oResourceTypeSet = refWMIServices.ExecQuery( _ strQuery ) FOR EACH oResourceType IN oResourceTypeSet WScript.Echo ( "Resource Name -> " & .Name & _ " of type -> " & oResourceType.Name ) NEXT END WITH NEXT SET oResourceSet = NOTHING SET oResource = NOTHING SET oResourceTypeSet = NOTHING SET oResourceType = NOTHING Two association classes are used in this example:
Yet, no instances of those association classes are manipulated by the script! Also, the fact that the name field is the primary key for MSCluster_ResourceGroup and MSCluster_Resource shortens the syntax by omitting the .Name in the WQL string. Updating PropertiesWhen accessing an object with the GetObject method, the system actually returns an in-memory private copy of the object. This guarantees that a bug in a program does not accidentally damage a live object; however, it makes updating objects more difficult. Updating an object requires three things:
For example, this simple code will disable an account by updating the Disabled property (Here we pick on "Test User"): DIM oUserSet, oUser, oNamedValueSet CONST wbemChangeFlagUpdateOnly = 1 SET oNamedValueSet = CreateObject( _ "WbemScripting.SWbemNamedValueSet" ) CALL oNamedValueSet.Add ( "__PUT_EXTENSIONS", TRUE ) CALL oNamedValueSet.Add ( "__PUT_EXT_CLIENT_REQUEST", TRUE ) strQuery = "Select * From Win32_UserAccount Where Name=" & _ """Test User""" SET oUserSet = GetObject( "winmgmts://./root/CIMv2" ). _ ExecQuery( strQuery ) FOR EACH oUser IN oUserSet EXIT FOR NEXT oUser.Disabled = "True" arProperties = ARRAY( "oUser.Disabled" ) CALL oNamedValueSet.Add ( "__PUT_EXT_PROPERTIES", arProper-ties ) CALL oUser.Put_( wbemChangeFlagUpdateOnly, oNamedValueSet ) SET oUser = NOTHING SET oUserSet = NOTHING SET oNamedValueSet = NOTHING note The FOR EACH “ EXIT FOR “ NEXT construct in the previous code sample might look unusual at first; however, it is a simple technique to obtain the only object from an object set that we expect to contain only one object. For a more robust program, it would be advisable to check that oUserSet.Count=1 and take an error action if not. The Count property of an object set is an inherited property that always returns the number of items in the set. Event ClassesEvents are different from the previous objects in that they are not permanent, but rather happen in an asynchronous fashion in real time. After an event has happened , it's lost unless it's captured. Windows Server 2003 event logs might capture a lot of events, but it's sometimes preferable to get the events as they occur. For example, the MSCluster_Event classes have a special-purpose method called MSCluster_Event.NextEvent that can be used to wait for an event to occur and return the new event. To display all cluster resource state change events in real time on the console, use this simple code: DIM oEvents, oItem SET oEvents = GetObject( "winmgmts://./root/MSCluster" ). _ ExecNotificationQuery( "Select * from MSCluster_EventResourceStateChange" ) DO SET oItem = oEvents.NextEvent WITH oItem WScript.Echo( DATE & " " & TIME & _ " EventNewState=" &.EventNewState & _ " EventObjectName=" &.EventObjectName & _ " EventObjectPath=" &.EventObjectPath & _ " EventObjectType=" &.EventObjectType & _ " EventTypeMajor=" & .EventTypeMajor & _ " EventTypeMinor=" &.EventTypeMinor ) END WITH LOOP SET oEvents = NOTHING SET oItem = NOTHING note This simple code works, but good programming technique requires a user-triggered method to exit the loop. In this example, the code will never reach the cleanup section. It is assumed the user will terminate this using Ctl+C. WMIC ManagementThe goal of WMI is to standardize Windows management. However, until now, Microsoft has offered only a set of APIs and providers. This limited the penetration of WMI to programmers, whereas the ultimate goal of WMI is to facilitate the tasks of system Administrators and application Administrators. Windows Server 2003 provides a CLI to WMI called WMIC. WMIC is an incredibly powerful tool that provides a common interface and syntax to manage almost everything on a system. Because WMIC can manage anything that offers a WMI provider, Administrators and end users finally have access to the stated benefits of WMI. The first time WMIC is invoked, the system installs the required component to allow you to use the WMIC tool: C:\>wmic Please wait while WMIC is being installed. This only occurs the first time and takes less than 30 seconds. WMIC has two separate sets of help:
WMIC can generate output in any format desired. The default formats available are text, CSV, HTML, and XML. However, it is possible to define new formats. WMIC Command SyntaxWMIC commands are made of multiple context sensitive parts ; refer to the online help for the full description. However, to get started, the following format is usually used: WMIC /NameSpace:<Path> [global switches] PATH <Class> [WHERE WQL] [Verb/VerbQualifier [[PropertyName [=Value] MethodName [Parameters] ]/Qualifier] In creating WMI queries, the WMIC options shown here are important in formatting the query to accomplish what you want. Following is a list of definitions of these options:
WMIC NavigationNavigating the WMI schema with WMIC initially might appear like navigating a labyrinth. Using the /? command to get help greatly eases the feeling of navigating blind. The command WMIC /? will show you the syntax elements and also all the aliases defined. The first step in navigating using WMIC is to discover aliases. An alias is nothing more that a shortcut. Microsoft includes aliases for the most useful classes. For example, the WMIC /? command will show you that there is an OS class. So to access the OS class, all you have do is type WMIC OS . However, the output will be very disappointing. By default, WMIC outputs text in table format. In this case, the table is very wide and only contains one row of information. To change the output in to a more useable column, you would type WMIC OS GET /VALUE . This produces the same output, but instead of being truncated to the right, it just scrolls in your command window. If you are interested in finding out what an alias actually points to, you can use the command WMIC ALIAS <Alias> GET /VALUE . Using this command will show that the OS alias actually points to Win32_OperatingSystem . So the following two commands are equivalent: WMIC OS GET /VALUE WMIC PATH Win32_OperatingSystem GET /VALUE Follow the same technique to browse all the available aliases. Some aliases might fall short on information; for example, if your test machine only has IDE drives , the SCSI alias will not have any instances. Also note that WMIC actually appeared in Windows XP so you can use it on your Windows XP clients . WMIC is not and will never be available for Windows 2000 or earlier. WMIC HelpAfter you have found a class to investigate you can easily obtain more information about the class. For example, to find out the properties of the OS class, type WMIC OS GET /? . This will list all the properties available in the class. Similarly, the command WMIC OS CALL /? lists all the methods available. note Most properties and methods have descriptive names. But what if the descriptive name still does not satisfy you? For example, CSDversion is a property of the Win32_OperatingSystem class available via the OS alias. But what is it? The command WMIC OS GET CSDversion /?:FULL will display further specific information. Note the description you obtain in this manner is the same as what you obtained looking at the MOF files earlier, but it's a lot easier to obtain and not all providers have easily accessible MOF files. WMIC Output FormattingThe previous sections introduced you to the WMIC commands. However, all the examples so far have been simple and resulted in immediate display of text results in a command-prompt window. WMIC can do much more. For managing a server, WMIC command mode with immediate text results are fine, but for monitoring a server, the powerful output formatting of WMIC and its repeating feature are needed. WMIC formats results using common style sheets (files with .XSL extensions). To use the style sheet, simply add the /FORMAT:Style-sheet to a WMIC command. The standard style sheets provided are
The default style sheets can be found in the same %WinDir%\System32\WBEM directory as the MOF files. Also, you can create your own style sheet and translation; see TechNet at http://www.microsoft.com/technet/prodtechnol/windowsserver2003/proddocs/entserver/wmic_creating_format.asp. WMIC Repeating CommandNow that you have learned to use WMIC to extract system information and either display it or send it to an application, wouldn't it be nice if you could make it refresh the information at fixed intervals? That is exactly what the /EVERY qualifier does. You specify a repeat interval in seconds, and the command repeats over and over at fixed intervals. Using a combination of /OUTPUT , /FORMAT , and /EVERY , it is now possible to use WMIC to create Web pages that are automatically updated and served via IIS. As you travel out of the office, you still can keep track of your server infrastructure remotely. WMI and WMIC LimitationsYou must understand some of the limitations of WMI and WMIC to prevent frustration:
Especially Useful ClassesSo far, we have dealt in generalities. However, some WMI classes are especially useful for managing a server. The list is not meant to be exhaustive, and everyone has favorites; however, this is a good starting point. NtEventThe class Win32_NTLogEvent provides access to the Windows NT event logs. It provides access to all entries maintained in the system event logs, including the system and application log. The log is selected using WQL on the LogFile property. WMIC provides an alias called NtEvent for easy access. For example, the command wmic ntevent where "logfile='Application' and eventcode=7026" get sourcename,message /value produces the list of all system event 7026 (service failed to load). HotfixesThe class Win32_QuickFixEngineering provides easy access to all hotfixes applied to a system. WMIC has a QFE alias, so the command WMIC QFE GET HOTFIXID will list ID of all hotfixes applied to a system. WMIC QFE will list all information (including IDs) known about the hotfix . BIOSThe class Win32_BIOS provides easy access to your server's BIOS, especially the version and build date. WMIC has a BIOS alias, so the simple command WMIC BIOS GET /VALUE will show you most of what you will ever want to know without having to shut down and look at the BIOS using <F9 or F10>. Terminal ServicesThe class Win32_TerminalService offers access to remote Terminal Services. When managing servers, it is safer to leave administrative mode terminal services disabled until needed. This WMI class provides a simple interface to enable or disable remote Terminal Services. The following command wmic /node:<IP or network name> /user:<Domain\User> path Win32_TerminalServiceSetting where AllowTsConnections=0 call SetAllowTsConnections 1 enables terminal services on a remote machine. If the password for the username specified does not match the local password, WMIC will prompt for the password. After you are finished performing your remote session, you can either disable remote connections from the computer property box or use the following command remotely: wmic /node:<IP or network name> /user:<Domain\User> path Win32_TerminalServiceSetting where AllowTsConnections=1 call SetAllowTsConnections 0 |

| < Day Day Up > |
EAN: N/A
Pages: 214